SARGENT Profile Series v.S2 Cylindrical Locks User Manual
Page 2
2
Hinge Door Position Switch
Installation and Wiring Instructions
FOR INSTALLATION ASSISTANCE, CALL SARGENT AT 1-800-810-WIRE (9473) • www.sargentlock.com
WIRING INSTRUCTIONS
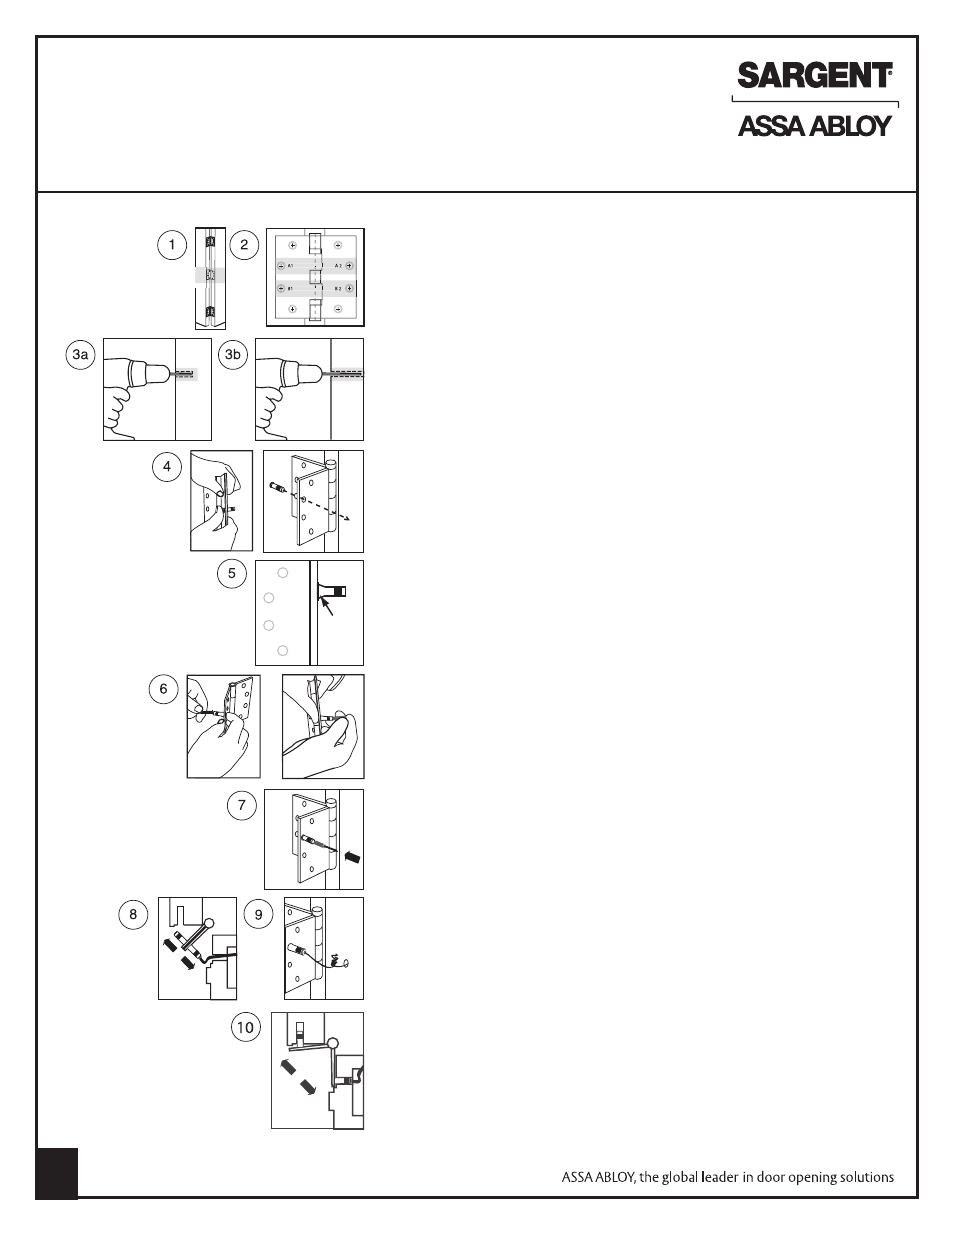
1. The Door Position Switch, DPS, must be installed in the center hinge
(non load-bearing hinge) on the door.
NOTE: The DPS can be installed with the door already hung in the frame.
2. To install, select two hinge screw holes farthest away from the hinge pivot, such
as holes A1/A2 or B1/B2, the screw holes must be in-line with each other.
3a. Drill 5/8” diameter x 1-1/2 inches deep, into the door.
3b. Drill 5/8” diameter into the frame in-line with the 5/8" diameter in the door.
For metal frames use pre-existing tapped hole for positioning.
NOTE: Deburr all sharp edges to prevent damaging wire insulation and causing
a short circuit.
4. Insert plastic sleeves without the magnet or switch into the counter sunk side
of the selected hinge holes, A1/A2 or B1/B2 (Figure 2).
5. Using your thumb to hold the plastic sleeve in place, insert an o-ring over each
of the sleeves and push them against the hinge (Figure 5).
6. Push the magnet into the sleeve. The o-ring will hold the sleeve against
the hinge.
NOTE: For wood doors and frames, use the low gauss (plain) magnet. For steel
doors and frames, use the high gauss (colored) magnet.
7. Insert the switch into a sleeve, as shown. The o-ring will hold the sleeve against
the hinge.
8. The magnet position might result in greater door travel than desired as
measured by the monitoring system in some applications, particularly in
wood construction. If this occurs, adjust to the desired leaf angle when switch
activates/deactivates by measuring the switch resistance while opening and
closing the hinge leaves while pulling out slightly on the switch.
NOTE: If necessary, place tape (not provided) around the diameter of the magnet
and the switch where they protrude from the sleeves to hold each in place.
Begin adjustment only after both switch and magnet are inserted completely
into sleeves.
9. After adjustment, if you are not using connectors, connect switch wires to wires
in the frame hole.
Close hinge leaves and position the hinge with the magnet and switch lined up
with the 5/8” hole on the door and frame respectively. Open hinge leaves care-
fully so that the magnet and switch slide unobstructed into the 5/8” screw hole.
10. Install screws in the remaining screw holes to secure hinge onto the door
and frame.
NOTE: The DPS switch and Magnet are interchangeable. Either can be located
on the door or the frame.
O-ring
Copyright © 2008, Sargent Manufacturing Company, an ASSA ABLOY Group company.
All rights reserved. Reproduction in whole or in part without the express written
permission of Sargent Manufacturing Company is prohibited.
A8005A