Disassembly / assembly of bearing housing, Installation of bushings, Disassembly – Viking Pump TSM635.3: Q-QS Universal Mag Drive User Manual
Page 7: Assembly, Carbon graphite
SECTION TSM
635.3
ISSUE
C
PAGE 7 OF 13
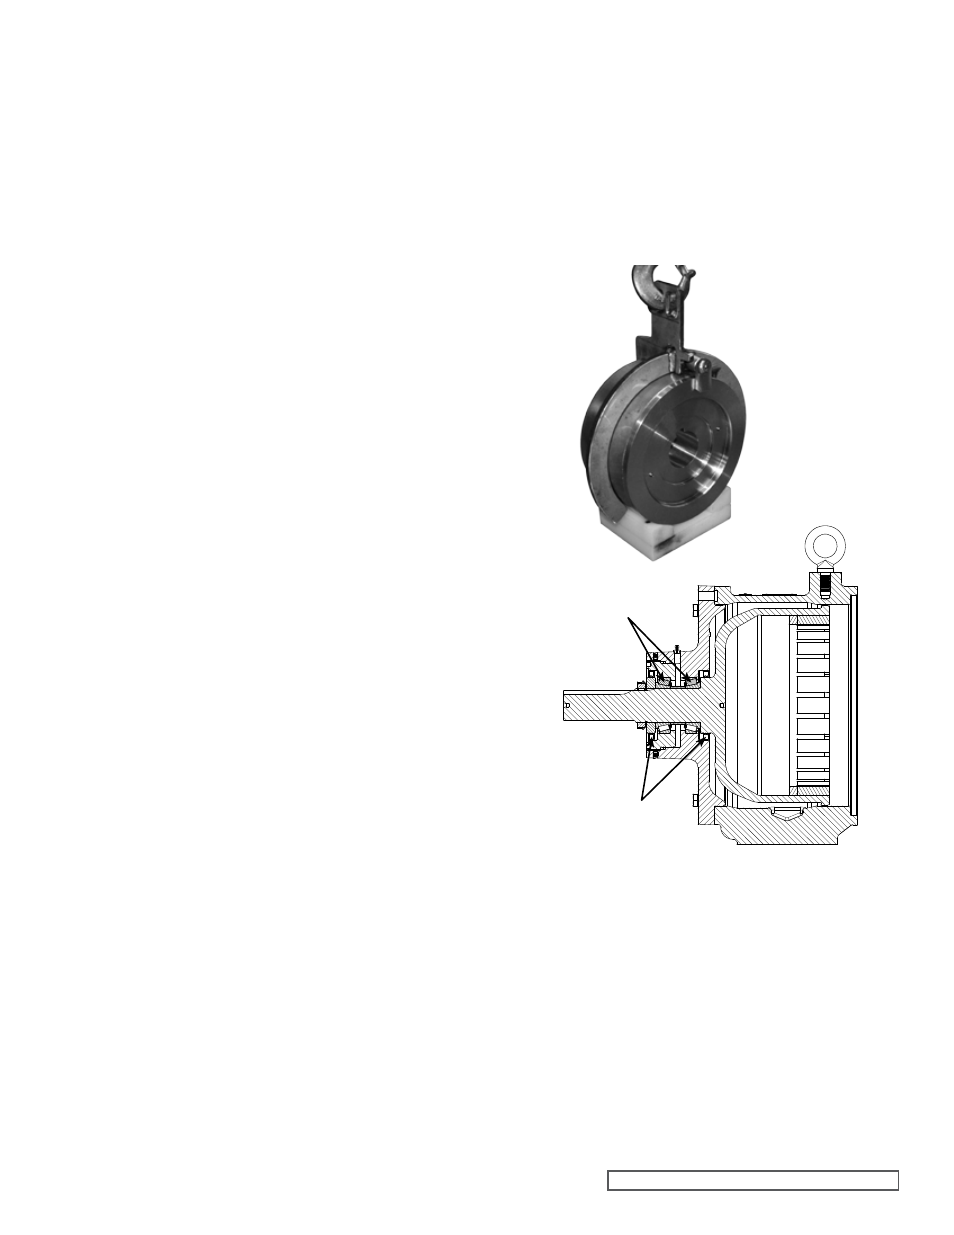
FIGURE 11
DISASSEMBLY / ASSEMBLY oF
BEARING HoUSING
DISASSEMBLY
The bearing carrier assembly features two tapered roller
bearings, two lipseals, and one spacer. If further disassembly
of this unit is required, proceed as follows:
1. Remove locknut (1) and washer (2).
2. Loosen the setscrews holding the end cap (3) in the
bracket. Screw the end cap out of the bracket.
3. Inspect the bearings (6) for wear; replace as needed.
4. Inspect the lipseals (5) for wear; replace as needed. The
lipseals will need to be replaced if removed.
5. If the bearings are worn it is recommended to replace
the entire bearing. Remove the inner bearing spacer
collar (8). Press the inner bearing cup out of the bearing
housing and the outer bearing cup out of the end cap.
The bearings will need to be replaced if the cups are
removed.
ASSEMBLY
1. If the bearing cups were removed, press the cup of the
outer bearing into the end cap. Press the cup of the inner
bearing into the bearing housing.
2. Press the inner lipseal into the bearing housing and
the outer lipseal into the end cap and then lubricate the
lipseals, see
Figure 12 for lipseal and bearing orientation.
3. Screw the end cap into the bearing housing (clockwise)
until it contacts. Do not over-tighten the end cap.
4. Inspect the outer magnet to make sure it has not picked
up any foreign particles, which could damage the pump.
Slide the inner roller bearing onto the shaft, followed by
the inner bearing spacer.
5. Slide the outer magnet assembly into the bearing
housing. Slide the outer roller bearing onto the shaft.
Slide the outer bearing spacer collar onto the shaft and
into the outer lipseal, followed by the lockwasher and locknut.
6. Tighten the locknut to 170-190 ft-lbs of torque and then
bend over the appropriate lockwasher tab.
7. Unscrew the end cap (counterclockwise) by hand until
there is considerable drag on the bearings. Mark the end
cap and bracket in the same spot. Then screw in the end
cap (clockwise) 5/16”, radially from the mark. Tighten the
end cap setscrews.
8. Grease the bracket using the bracket fitting with NLGI #2
grease. Make sure the shaft freely rotates by hand.
FIGURE 12
BRACKET BEARING AND LIPSEAL oRIENTATIoN
TAPERED RoLLER
BEARINGS
LIPSEALS
care that the thrust washer on the rotor does not come
off. Remove the thrust washer from behind the rotor if
worn, cracked or the rotor and shaft is being replaced.
Remove and check the casing side adaptor plate thrust
washer for cracks or wear; replace if necessary.
16. Inspect the adaptor plate bushing (25). If the bushing
needs to be replaced, see
“Installation of Bushings”
on page 7. If the pump is leaking between adaptor plate
and casing (31), remove the socket head capscrews
(13) from the adaptor plate. Slide the adaptor plate out
of the casing.
17. Inspect the O-ring (33). Do not remove the O-ring
from the plate adaptor / casing unless it is damaged,
especially if it is PTFE encapsulated. If a new O-ring is
required, See
“Pump Assembly” on page 8.
18. Inspect the casing for wear, particularly in the area
between the ports. Clean all other parts thoroughly and
examine for wear or damage.
When making major repairs, such as replacing a rotor and
shaft, it is advisable to also install a new head and idler
pin, idler and bushing, and adaptor plate bushing. See
“Installation of Bushings” on page 7.
INSTALLATIoN oF BUSHINGS
CARBoN GRAPHITE
If attempting to install the carbon graphite idler, canister
or adaptor plate bushings, extreme care must be taken
to prevent breaking. Carbon graphite is a brittle material
and easily cracked. If cracked, the bushing will quickly
disintegrate. Using a lubricant on the bushing and mating
part will help facilitate installation.
ADAPTOR PLATE:
The groove in the ID of the bushing should line up with the
groove in the adaptor plate.
Figure 14 on page 8 shows the
proper position of the adaptor plate bushing after installation.