Installation, Door and glass frame, Log installation – Regency Classic C34 Small Gas Stove User Manual
Page 30
30
Regency
®
CLASSIC C34-3 Direct Vent Freestanding Gas Stove
INSTALLATION
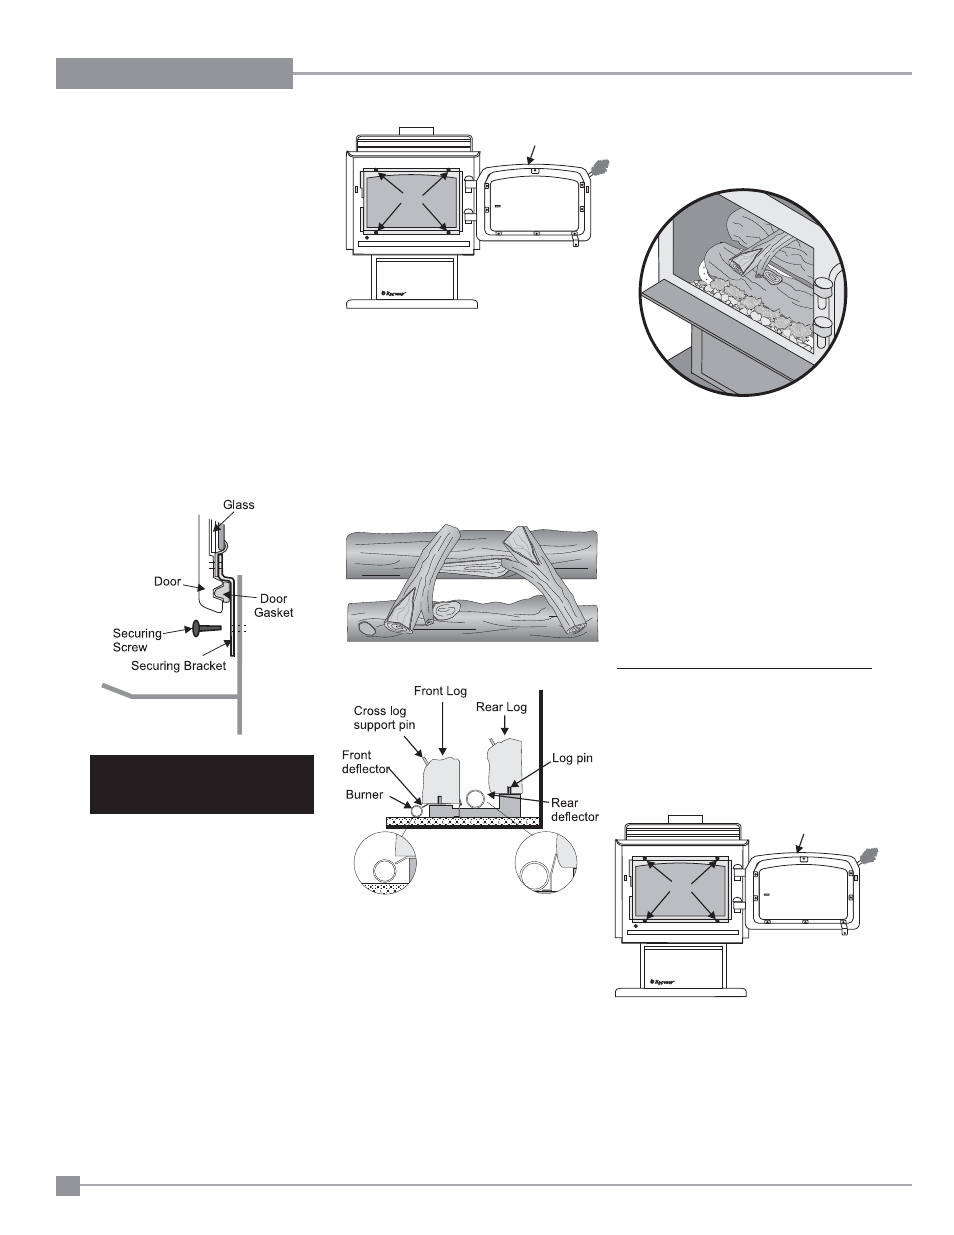
Diagram 1
Diagram 5
Diagram 2
Note: If the fl ame hesitates at any point,
check the area of hesitation and see
if there is an ember or rock wool
blocking a burner port or ports. If so,
move the obstruction and then check
the fl ame fl ow again.
10) Replace the glass. Secure door in the closed
position using the door securing bracket and
the screw provided, Figure 1. See door and
glass frame instructions.
Note: Door securing bracket is there for
safety.
DOOR AND GLASS
FRAME
1) The glass frame fastens with four screws.
See diagram 1.
Door
Screws
Diagram 4
Diagram 3
Diagram 1
Note: The door must be kept closed at all
times, except during maintenance.
The unit must never be operated
without the glass in the door, or with
the door open.
2) Remove the glass frame from the stove by
removing four screws (support glass so it
doesn't fall out). See diagram 1.
3) Ensure that the front and rear defl ectors are
installed.
4) Remove the logs from the box and carefully
unwrap them. The logs are fragile, handle
with care. Do not force into position.
5) Place the rear log on the rear log support
pins in the back of the unit. The fl at side of
the log facing the back of the unit. Carefully
push the log down onto the pins. See diagram
3.
LOG INSTALLATION
WARNING: Dangerous operating con-
ditions may occur if these logs are not
positioned in their approved locations.
Read the instructions below carefully
and refer to the diagrams. If logs are
broken do not use the unit until they are
replaced. Broken logs can interfere with
the pilot and burner operation.
The gas log kit contains the following:
a)
Front
Log
b)
Rear
Log
c)
Small Cross Logs (2)
d)
Bag of embers
e)
Bag of rockwool
f)
Bag of platinum embers
(supplied with
packaged manual)
1) Remove securing screw from bracket as
shown.
DO NOT TRY TO TURN DOOR
HANDLE! IT IS NOT DE-
SIGNED TO BE MOVED.
6) Place the front log in the front of the unit,
aligning the holes on the underside of the
log with the log support pins in the front of
the unit. Carefully push the log down onto
the pins. See diagram 3.
7) Place the cross logs on top of the larger
logs aligning the holes on the underside of
the cross log with the log pins in the larger
logs. See diagrams 3 & 4. Carefully push
the cross logs onto the pins.
8) Distribute the embers along the mesh em-
ber tray but do not cover the burner ports.
(Burner ports are the little holes on the top of
the burner tube.) Pull off ember size pieces
from the rockwool. Gently place the pieces
on top of the embers. See diagram 5.
Do not put the rock wool directly on the
burner. Before putting the glass back on,
turn the unit on as per lighting instructions
pg. 29. Watch the fl ame to see if it fl ows
smoothly around from one end to the other.
(Use Extreme Caution and ensure proper
light off of burner.)
Door
Screws
Note: The unit must never be operated
without the glass in place. (One ex-
ception is made during the log and
ember installation.)
2) The securing bracket keeps the door
closed.
9) Separate platinum embers and place on the
mesh ember tray along side embers. Avoid
stacking platinum embers.