Step 9 - fitting the rear cover, Step 5 - mounting on the door step 6 - wiring, Step 8 - fitting the batteries – Paxton Net2 PaxLock User Manual
Page 3: Step 7 - wiring (contact switch option)
Page 3
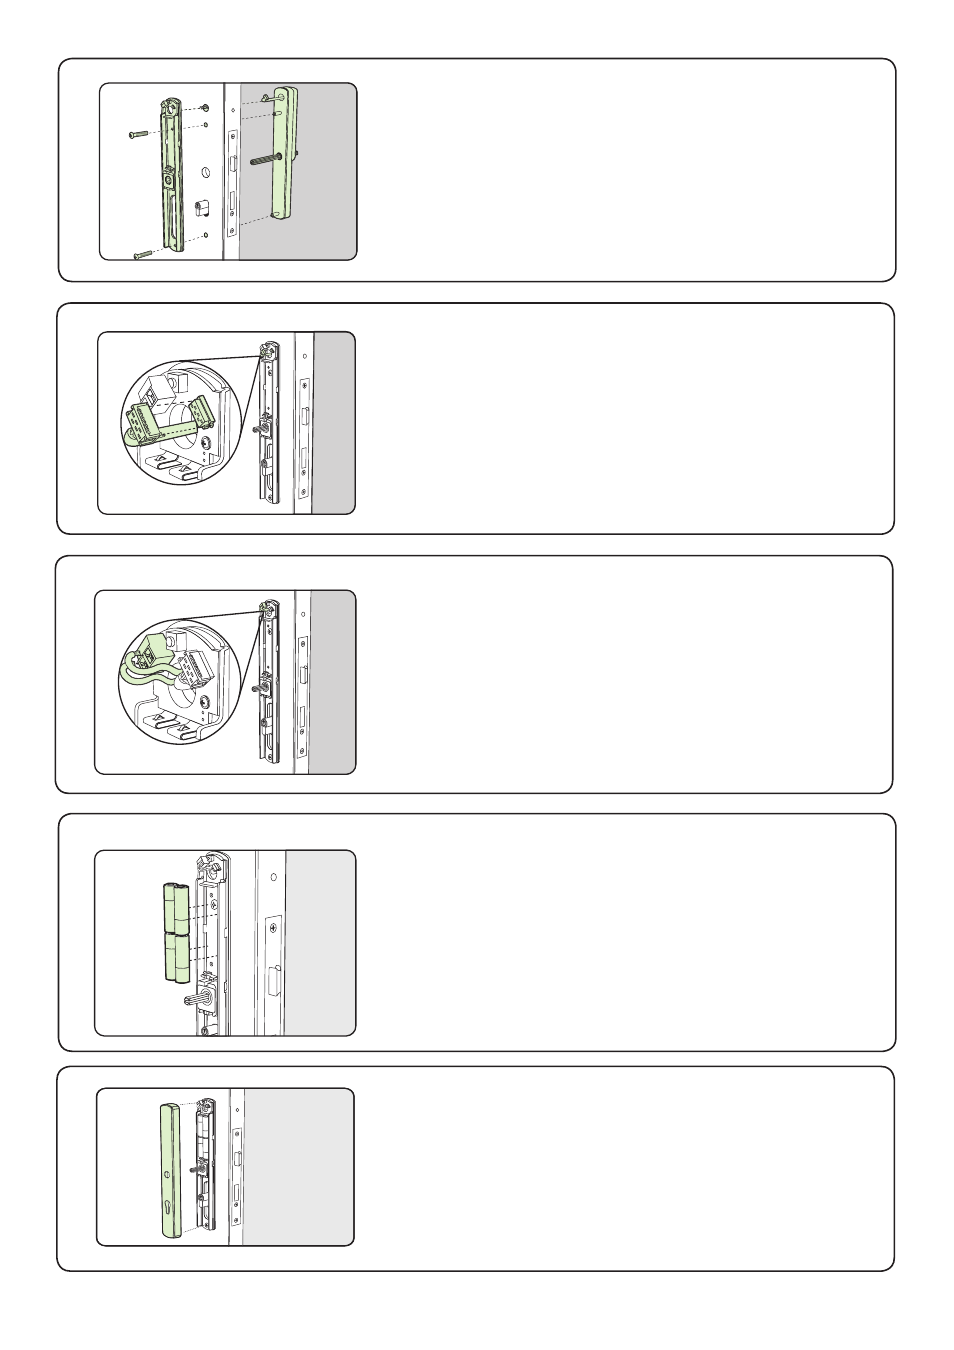
Step 9 - Fitting the rear cover
Present the front lock assembly to the door passing
the wiring harness through the 16 mm hole.
Present the rear lock assembly to the door and join
the two parts together with the two mounting screws.
Step 5 - Mounting on the door
Step 6 - Wiring
Plug the wiring harness into the socket in the rear
lock assembly.
Locate the top of the cover over the housing and push
flush to the door.
Clip in the 4 x AA Alkaline batteries with reference to
the label displayed below the holder assembly.
Step 8 - Fitting the batteries
Where a contact switch is fitted, connect the wires to
the terminal block provided on the pcb.
Step 7 - Wiring (contact switch option)
Mounting screws are provided in three lengths.
Short - Door width 35 mm to 45 mm
Med
- Door width 40 mm to 50 mm
Long - Door width 45 mm to 60 mm
- Net2 PaxLock Demo Case (2 pages)
- Net2 Entry - Control unit (4 pages)
- Net2 Entry - Panel (7 pages)
- Net2 Entry - Monitor (9 pages)
- Net2 Entry - Extension switch (4 pages)
- Net2 Entry (4 pages)
- Net2 Entry – VR panel (7 pages)
- Net2 PaxLock - Scandic (7 pages)
- PROXIMITY Mullion HID reader (4 pages)
- PROXIMITY panel mount HID reader (4 pages)
- PROXIMITY metal HID reader (4 pages)
- PROXIMITY panel mount reader EM4100 Wiegand output (4 pages)
- PROXIMITY metal reader EM4100 Wiegand output (4 pages)
- PROXIMITY energy saving reader demonstration kit (4 pages)
- Hands free demonstration unit (5 pages)
- PROXIMITY Mullion reader (3 pages)
- Net2 Caller ID reader (4 pages)
- OEM PROXIMITY Mifare reader 34bit Wiegand (4 pages)
- PROXIMITY backbox reader (4 pages)
- PROXIMITY backbox reader (3 pages)
- 24V AC/DC power supply with Net2 ACU (3 pages)
- 12V DC PoE+ power supply in cabinet with Net2 plus (3 pages)
- PROXIMITY P series Wiegand output - Biomet (4 pages)
- 24V AC/DC power supply with battery charger (3 pages)
- OEM Magstripe Clock and Data reader with Buzzer option (2 pages)
- SONY number plate reader (11 pages)
- Easyprox nano (8 pages)
- Net2 Evaluation Kit (5 pages)
- Vandal resistant compact metal keypad (4 pages)
- OEM Vandal resistant metal keypad (2 pages)
- Net2 nano starter kit (2 pages)
- PROXIMITY P series Mifare reader (4 pages)
- LCD reader image uploader, USB (2 pages)
- Easyprox nano starter kit (12 pages)
- Net2 desktop reader USB - MultiFormat (2 pages)
- PROXIMITY energy saving reader (3 pages)
- LCD PROXIMITY reader kit (10 pages)
- OEM marine reader (2 pages)
- PROXIMITY LCD reader demonstration unit (10 pages)
- Magstripe 25 shadow card pack (2 pages)
- Easyprox compact keypad (9 pages)
- Hands free keyfob for Net2 (2 pages)
- 2A/12V DC boxed power supply (3 pages)
- Hands free read range tester (1 page)