Clip-loc – Metal Sales Clip-Loc Installation User Manual
Page 34
© Metal Sales Manufacturing Corporation/ Subject to change without notice/ Effective Date 2/03
812.246.1935 (Corporate Offi ce) • www.mtlsales.us.com
33
CLIP-LOC
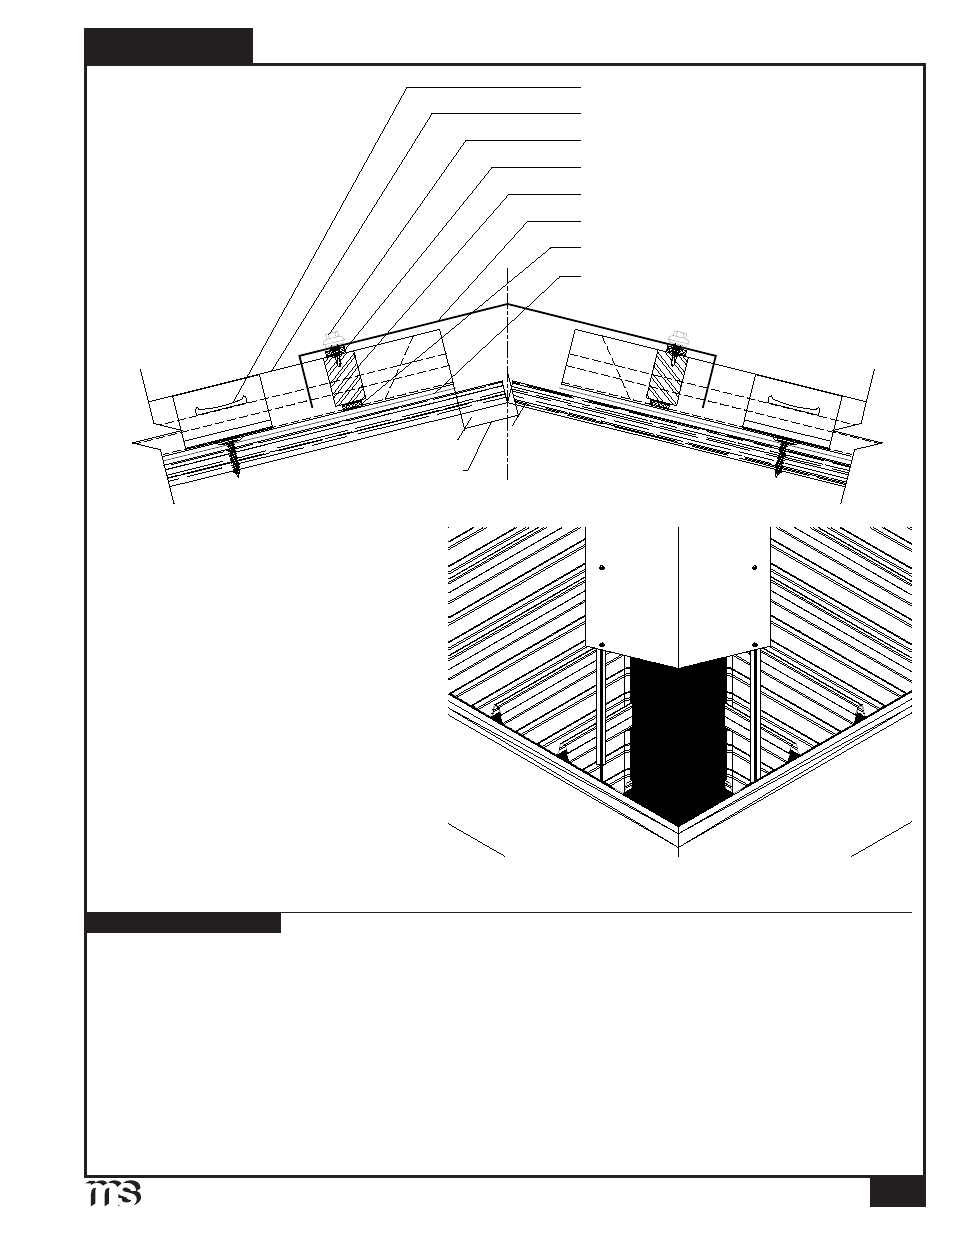
H
IP
(O
PTIONAL
) O
VER
D
ECKING
1. Once panels have been installed, slide Clip-Loc Turn-up Tool over end of panel and bend pan up until flush with top of panel
rib. Turn up all Clip-Loc pans on both sides of hip (see page 19).
2. Apply a row of Double Bead Tape Sealant across panel, up and over all ribs approximately 2"-4" from panel end on both sides
of
hip.
3. Install a Clip-Loc Outside Hip Closure over tape sealant. Before continuing make sure closure placement will accommodate
Clip-Loc Hip flashing. Set closure in tape sealant.
4. Once all closures have been installed, place a row of Double Bead Tape Sealant across the top of closures on both sides of hip.
5. Place Clip-Loc Hip on top of panel ribs and mark the hip flashing at the center of each panel rib as a guide for notching. Use
Clip-Loc Notching Tool to notch out hip flashing (see page 19).
6. Install Clip-Loc Hip flashing and secure to Clip-Loc panel rib with a ¼-14 x
7
/
8
" Stitch XL at every rib.
7. If two or more flashings are required, lap the flashing over the previously installed flashing by a minimum of 2" placing a bead
of tube sealant between the flashings and securing with pop rivets 2
1
/
2
" o.c.
Double Bead Tape Sealant
#
1
/
4
-14 x
7
/
8
" Stitch XL (each rib)
Clip-Loc Panel
Moisture Barrier (by others)
Clip-Loc Clip
Clip-Loc Hip
Double Bead Tape Sealant
Clip-Loc Outside Hip Closure
2" MAX.
C
L
1:12 Slope
Minimum
INSTALLATION NOTES
Clip-Loc panel must be anchored to solid deck behind outside closure at all ridge, hip, endwall, and peak
conditions to fi x the panel when using this fl oating eave detail.