Joint making, Offset fence applications, Jointing – INCRA Intelli-Fence User Manual
Page 7
Jointing
Most woodworking projects require that your boards begin
with at least one straight edge. This one straight edge then
becomes the reference surface for subsequent
perpendicular or parallel cuts. By using your Intelli-Fence
and the technique described below, you’ll be able to put a
perfectly straight edge on your board at the router table
and, because of the higher RPM of the router, you’ll find
the freshly jointed edge far smoother than any jointer
machine can produce.
Install a
1
/
2
" diameter (or larger) straight bit and set
the depth of cut to slightly greater than the thickness
of stock to be joined.
Adjust fence gap as necessary (see Gap Adjustment
on page 5).
Adjust infeed/outfeed fences to the in-line/mid-range
position as described on page 5.
Adjust the location of the Intelli-Fence at your router
table to place the outfeed fence in line with the
outermost cutting arc of the router bit. (A straight edge
placed against the outfeed fence can be used to help
align the fence with the cutter.) Fig. 15.
Micro adjust the infeed fence backward (-). The
reading on the scale will represent the amount of
stock you wish to remove from the board’s edge on each
pass. A light cut (infeed cursor reading between -1 and -2)
will yield the smoothest results.
Adding an INCRA Jig Ultra or Pro to your
Intelli-Fence makes precise placement of
multiple side-by-side cuts a cinch. One such
operation requiring this kind of precision is
joint making. Once placed in the
in-line/mid-range position, your new
Intelli-Fence becomes a perfect replacement
for the standard straight fence commonly
used with the INCRA Jig. It is completely
compatible with all of the INCRA joint-
making accessories, including the INCRA
Right Angle Fixture, Stop, and joinery
templates. The setup follows, see Fig 13:
Adjust infeed/outfeed fences to the
in-line/mid-range position as described
on page 5.
Position fence bridge and adjust fence
gap as described on page 6.
Follow the instructions for the joint you
wish to cut as detailed in the INCRA
Master Reference Guide and Template
Library.
One of the most valuable features of the Intelli-Fence is
the ability to offset the infeed and outfeed fences. The
offset fence adds a whole new dimension to the router
table, allowing it to perform two new operations—
jointing, and shaping.
2
FIG. 14
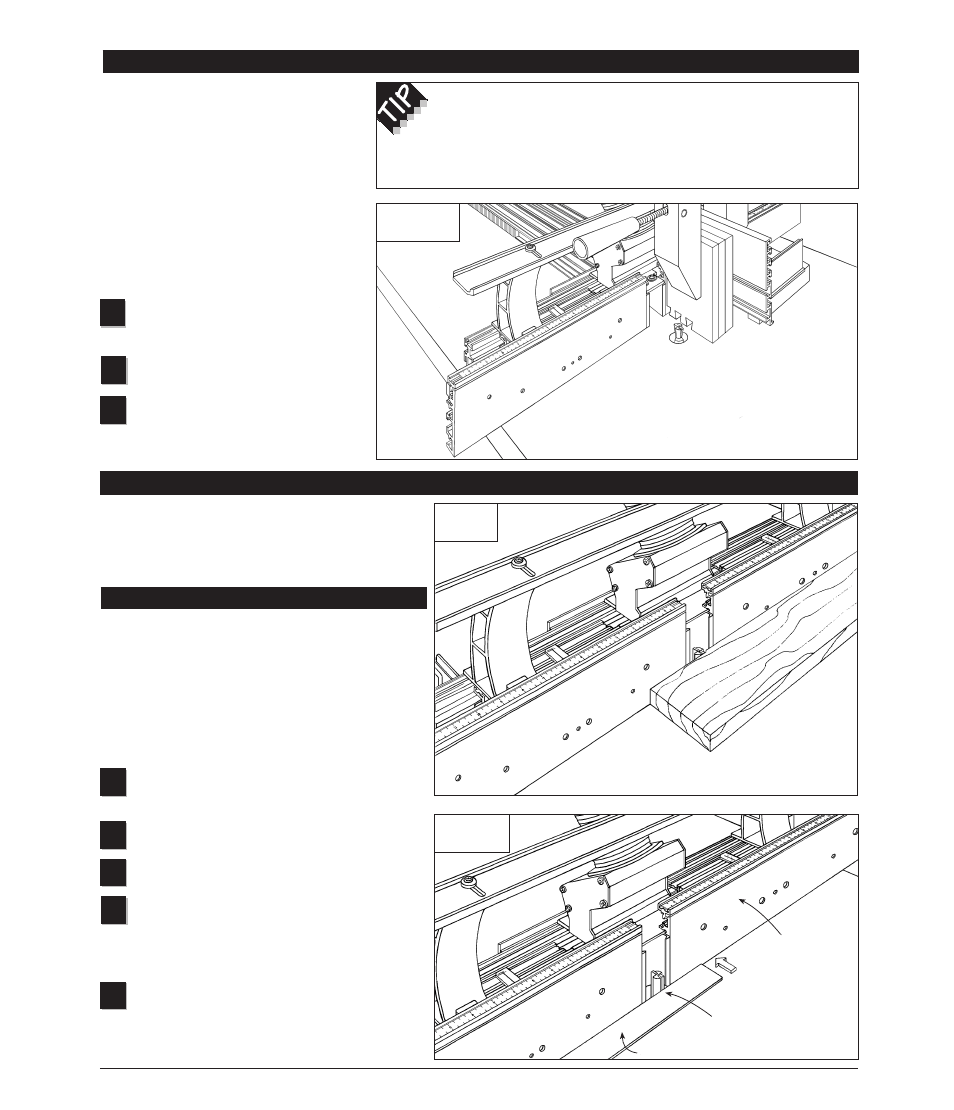
Jointing
7
OFFSET FENCE APPLICATIONS
1
FIG. 15
Jointing setup
First: Position Intelli-Fence to
align fence with cutting wing
on the router bit
Second: Micro
adjust infeed fence
backward (-)
Straight edge
3
4
5
3
1
2
FIG. 13
Joint Making
Joint Making (INCRA Jig Ultra or Pro required)
Clearance is provided for between the Hi-Rise fence cap, the braces and
all INCRA joint-making accessories. However, since the Hi-Rise fence cap and
braces are not necessary for joinery, you may remove them from the Intelli-Fence
if you prefer. Just reverse the assembly instructions described on page 2.
Outfeed fence
Infeed fence