Assembly, Install incra racks on infeed/outfeed fences, Attach hi-rise fence cap – INCRA Intelli-Fence User Manual
Page 2: Assemble incra stop
Second: Position inner rack 1" from outer racks
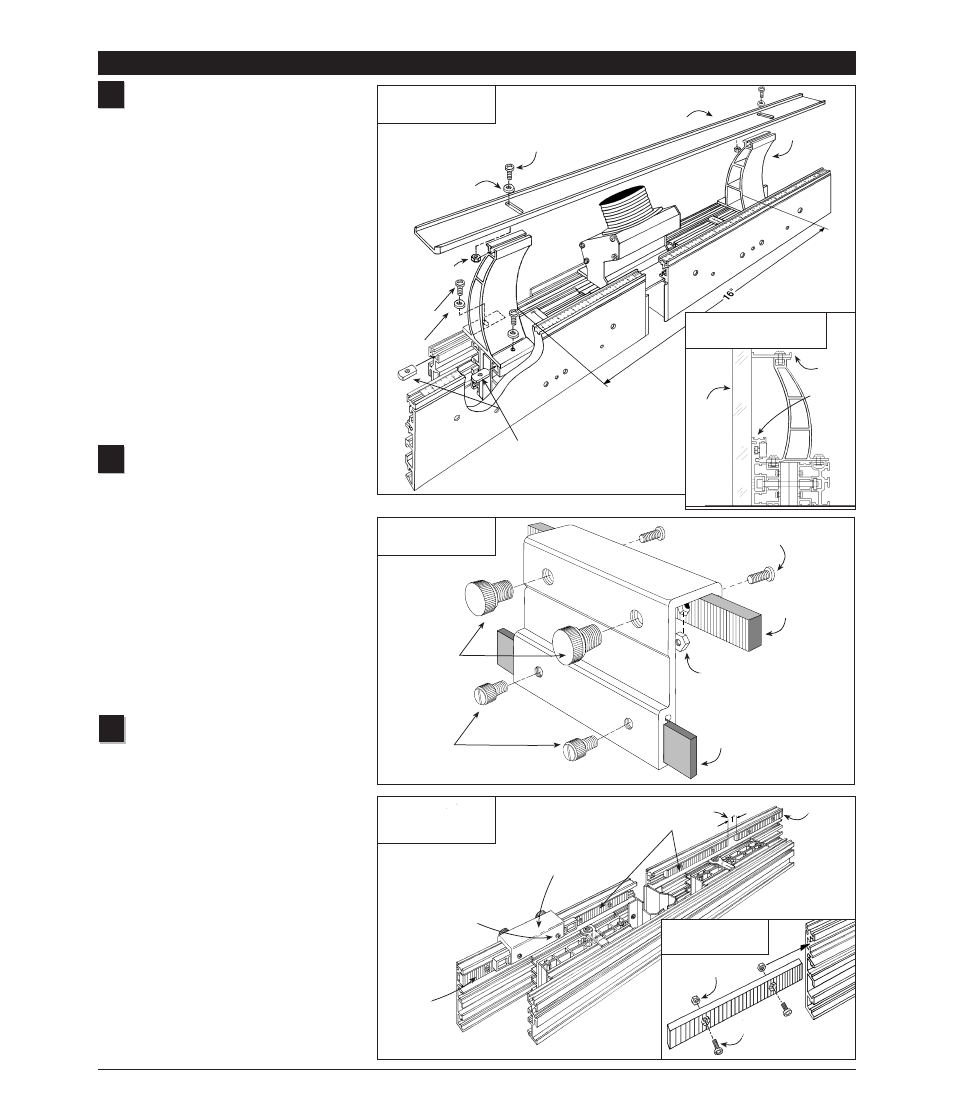
Attach Hi-Rise fence cap
Attach the two Hi-Rise fence cap braces
using (2) #10-32 x
3
/
8
" phillips pan head
screws, #10 washers and #10-32 rectangular
nuts. See Fig. 1. Loosely attach the
rectangular nuts to the screws then slide the
nuts into the two T-slots provided. See Fig 1A.
The two braces should be approximately
centered on the length of the fences and
spaced 16" apart.
Using the (2) #10-32 x
1
/
2
" phillips pan head
screws,
5
/
8
" o.d. nylon washers, and #10-32
hex nuts, attach the Hi-Rise fence cap to the
two braces as shown in Fig. 1 The slotted
holes in the fence cap should be aligned to
provide access through the slots to the front
brace mounting screws. Use a straight edge
to align the leading edge of the fence cap
with the front face of the infeed and outfeed
fences and tighten the two cap mounting
screws, Fig. 1A.
Assemble INCRA Stop
Using the (2) #8-32 x
3
/
8
" phillips pan
head screws and #8-32 hex nuts, fasten one
of the blue INCRA racks to the INCRA Stop
and tighten the screws. See Fig. 2. Slide the
3
/
4
" x 5" plastic strip into the slot in the stop
and secure with two
1
/
4
-20 x
1
/
2
" nylon
thumbscrews. Thread the (2)
3
/
8
-16 x
1
/
2
"
nylon thumbscrews into the INCRA Stop as
shown. One or both of these thumbscrews
can be used to clamp the INCRA Stop to the
fence. In use, the plastic strip provides a
non-metallic stop surface which can be
shaped for special stop setups and can be
micro adjusted by loosening the smaller
thumbscrews.
Install INCRA racks on
infeed/outfeed fences
Insert the #8-32 x
3
/
8
" phillips pan head screws
through the blue INCRA racks as shown in
Detail 3A and loosely attach the #8-32 hex
nuts. Slide the hex nuts on the racks into the
small T-slots on the back of each infeed/outfeed
fence. Place two racks on each fence.
Position the outer racks flush with the fence
ends and tighten the mounting screws.
Loosely position each of the inner racks about
1" from the ends of the outer racks. Now
clamp the INCRA Stop to the infeed fence so
that it bridges the gap between the inner and
outer racks and tighten the inner racks’
mounting screws. Repeat for the outfeed
fence. This bridging process aligns the inner
and outer racks with one another for accurate
INCRA Stop operation.
Caution: Tighten both screws on each rack.
1
2
ASSEMBLY
2
3
FIG. 1
Attach Hi-Rise fence
FIG. 1A
Align fence cap with fence
FIG. 2
Assemble INCRA Stop
FIG. 3
Install INCRA racks on
infeed/outfeed fences
Straight
edge
Hi-Rise fence cap
Fence cap brace
#10-32 x
1
/
2
" phillips pan head screw
#8-32 x
3
/
8
" phillips pan
head screw
1
/
4
-20 x
1
/
2
" nylon thumbscrews
3
/
8
-16 x
1
/
2
"
nylon thumbscrews
Plastic stop strip
INCRA rack
#8-32 hex nut
Outer
rack
First: Align outer racks flush
with fence end and tighten
mounting screws
Third: Bridge gap with INCRA
Stop and tighten inner racks’
mounting screws
Outer
rack
INCRA Stop
Note: Hi-Rise fence cap, braces,
and dust collection part not shown for clarity
5
/
8
" o.d. nylon
washer
#10-32 hex nut
Inner racks
DETAIL 3A
Detail of installation
#10-32 x
3
/
8
"
phillips pan
head screw
#10 flat
washer
#10-32 rectangular nuts
#8-32
hex nut
#8-32 x
3
/
8
" phillips
pan head screw
Fence
cap
Fence