Lamp socket assembly – ETC Source Four CE jr and jr Zoom Assembly Guide User Manual
Page 5
CE Source Four jr / jr Zoom Assembly Guide
5
Tools required: Open-end adjustable wrench or a 7/16" socket,
needle-nose pliers, screwdriver.
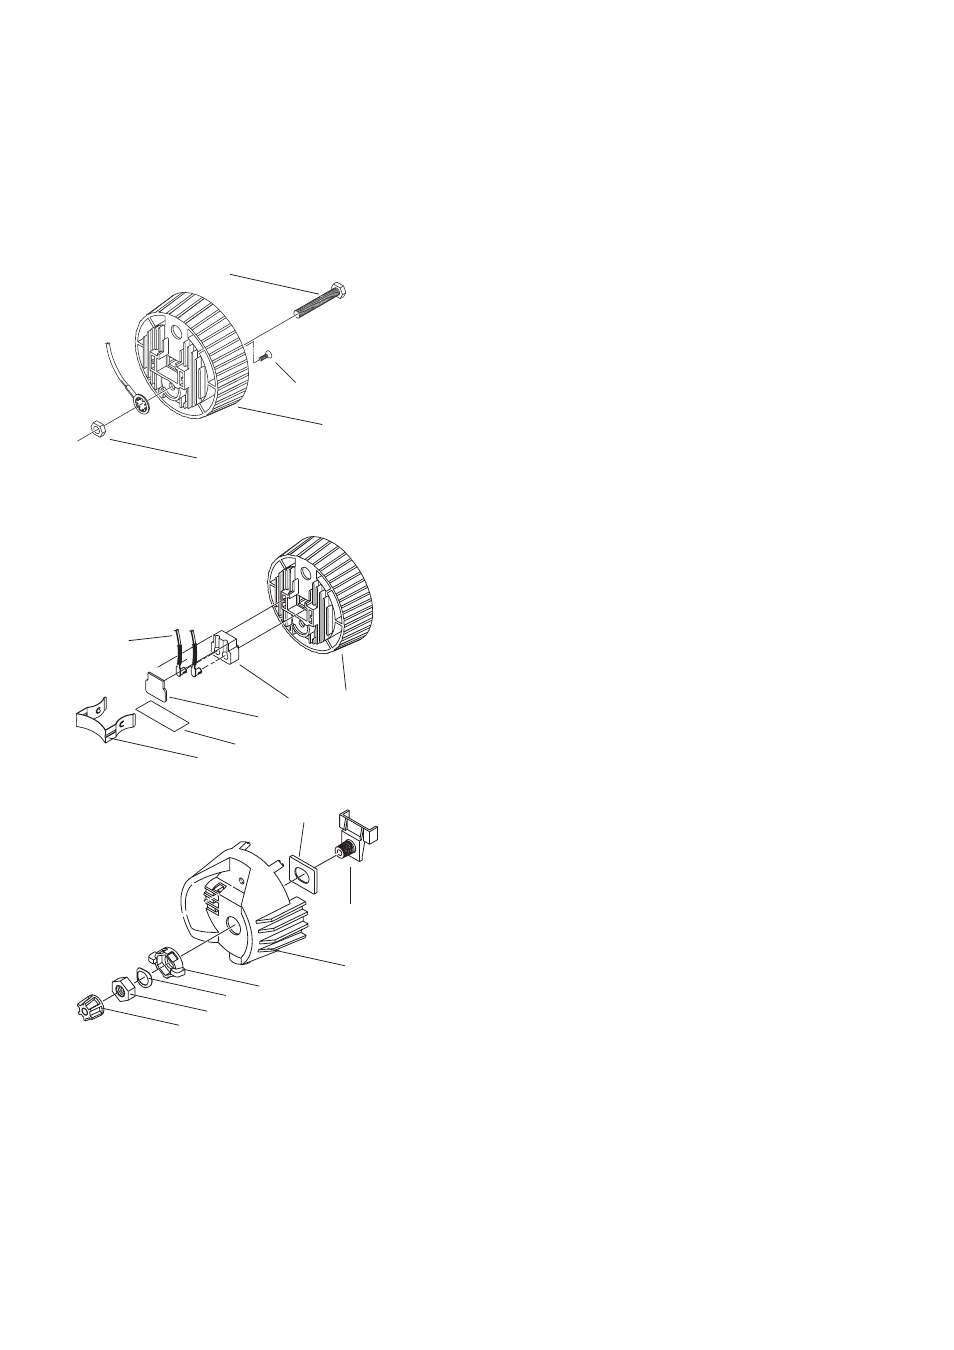
1.
Install the screw (20) into the light socket baffle casting as
shown in figure 1. (Also see figure 7 on page 7.)
2.
Insert the bolt (19) through the light baffle socket casting (2).
3.
Install the green ground wire assembly (21) on the bolt (19) with
the prongs on the crimped connector toward the casting. Run
the wire through the indent in the lip around the bolt hole.
Secure with nut (12) and torque to 60 inch pounds.
4.
Place the Kapton tape (29) between the lamp retainer (7) and
the mica TP22 assembly (9) to hold the socket in place.
5.
Place the ceramic TP22 socket (11) into the light baffle socket
casting (2) as shown in figure 2. Be sure it is well seated. Firmly
push the connectors on the white TP22 leads (10) into the
grooves in the socket.
6.
Place the TP22 mica (9) over the leads, then install the lamp
retainer spring (7). The lamp retainer spring secures the mica.
Insert the spring one end at a time, making sure the rectangular
slot in each side of the spring seats on the corresponding tab in
the casting.
Important: If the spring does not seat correctly, coax it into
place with a screwdriver or needle-nose pliers.
7.
Install the bushing cup (5) into the housing socket casting (1) as
shown in figure 3. The cup should slide smoothly up and down,
but not side to side.
8.
Insert the threaded end of the index hub (6) through the holes in
the bushing cup and the back of the housing socket casting (1).
9.
Slide the X-Y knob (3) over the exposed index hub bolt (6), then
insert the wave washer (16) on the bolt and secure with the 9/
16 hex nut (15). Hand tighten the X-Y knob (3).
Note: Install the wave washer with the upward curve toward
the hex nut.
Lamp socket assembly
16
4
1
3
15
2
10
11
9
Figure 1
Figure 2
Figure 3
12
2
20
21
19
29
7
6
5