Self-cleaning surfaces, Caution, Oven cleaning – Neff B45C52N3GB User Manual
Page 30: Risk of burns, Preparing for oven cleaning, Starting oven cleaning, Set the operating mode selector to zoven cleaning, Ending/cancelling oven cleaning, Press the clock function button, Removing and fitting the appliance door
30
Self-cleaning surfaces
The rear wall, ceiling and side walls of the cooking
compartment are coated with self-cleaning enamel. This
coating absorbs and disintegrates splashes from baking and
roasting while the oven is in operation.
Large splashes only disappear after the oven has been used
several times.
Discolouration on the self-cleaning surfaces does not affect the
self-cleaning function.
Caution!
Damage to surfaces on self-cleaning areas due to applying
oven cleaner.Never clean the self-cleaning surfaces with oven
cleaner.
If oven cleaner accidentally gets onto self-cleaning surfaces,
remove it immediately with a sponge and plenty of water.
Caution!
Damage to surfaces on self-cleaning areas due to the use of
abrasive and acidic cleaning agents and aids.
Do not use cleaning agents containing abrasive substances or
acids.
Do not use abrasive cleaning aids such as steel wool or
scourers.
Oven cleaning
The back wall, ceiling and side walls of the cooking
compartment are coated with a highly porous ceramic layer.
This coating absorbs and disintegrates splashes from baking
and roasting while the oven is in operation.
If these self-cleaning surfaces (rough surfaces) in the oven no
longer clean themselves adequately, they can be regenerated
using the
z
Oven cleaning operating mode.
:
Risk of burns!
The appliance becomes very hot during Oven cleaning. Keep
children away from the appliance.
Preparing for oven cleaning
1.
Remove accessories and hook-in racks, telescopic shelves
or separate fitting systems from the cooking compartment.
2.
Clean the enamel surfaces (smooth surfaces) to avoid any
lasting stains (see section: Cleaning and care).
Starting oven cleaning
1.
Set the operating mode selector to
z
Oven cleaning.
2.
Turn the temperature selector to set the desired cleaning
setting.
Your setting is automatically accepted after 10 seconds and
Oven cleaning starts.
x
and the selected operating time
setting light up on the clock display. The operating time cannot
be changed.
You can activate the preselection mode in the 10 seconds
before Oven cleaning starts.
When the operating time has elapsed, a signal sounds,
‹
:
‹‹
appears on the clock display and the
y
symbol flashes.
Ending/cancelling oven cleaning
1.
Turn the operating mode selector back to the
Û
position.
2.
Press the clock function button.
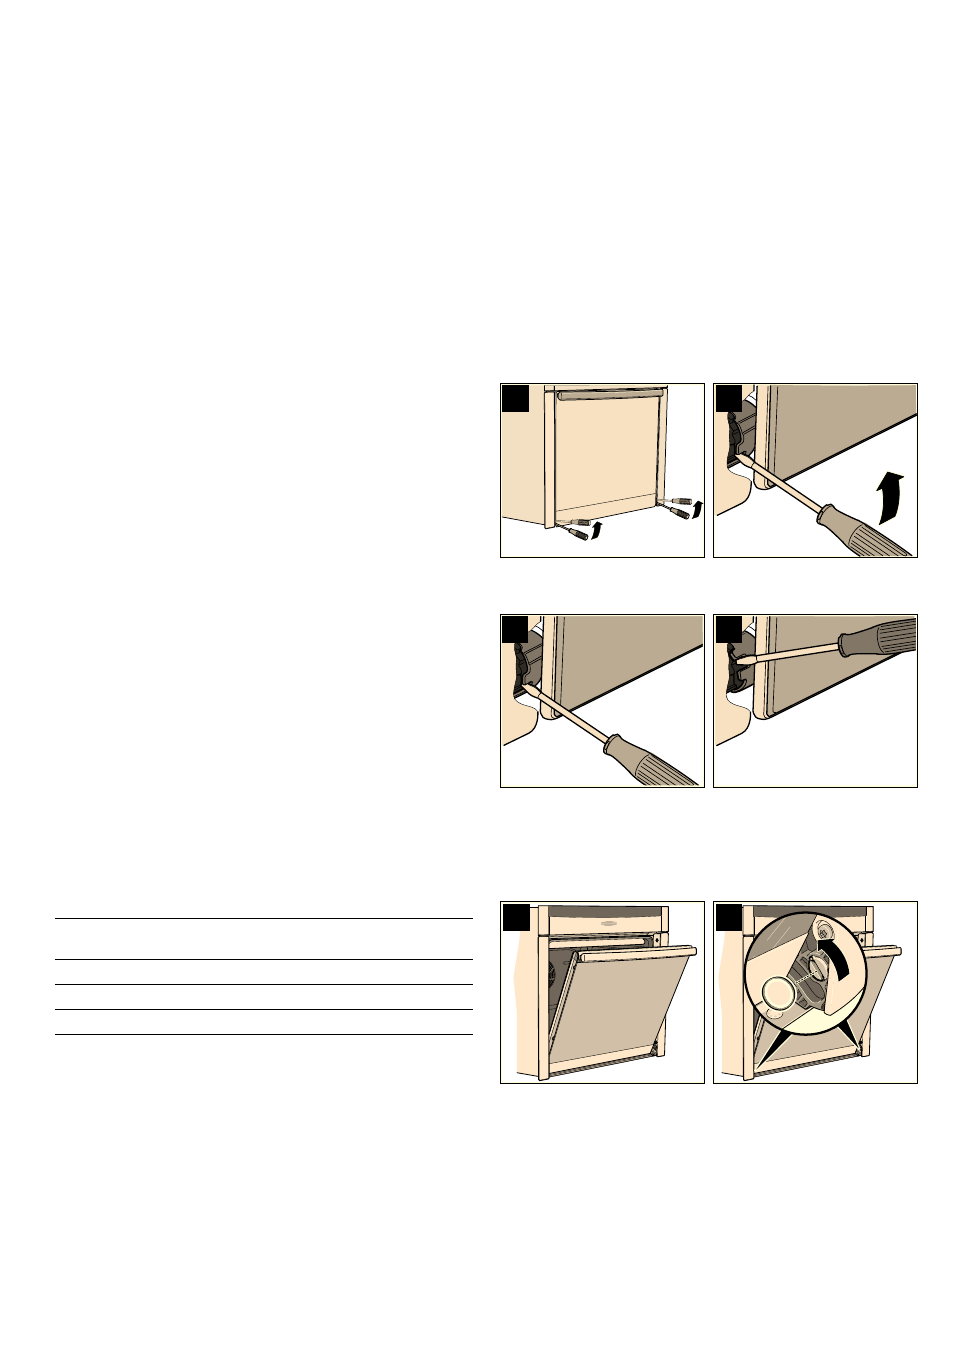
Removing and fitting the appliance door
You can remove the appliance door to clean it more
thoroughly.
:
Risk of injury!
The hinges of the appliance door may snap shut with great
force. Always fully turn the two locks for fitting and removing the
appliance door.
:
Risk of injury!
If the appliance door has been removed without turning both
locking levers to their limit stops, the hinge may snap shut. Do
not reach into the hinge. Call the aftersales service.
Removing the appliance door
1.
Open the left and right-hand hinge lock (Fig. A).
To do this, push the hinge lock (Fig. B) fully upwards on both
sides with a screwdriver.
Hinge lock closed (Fig. C)
Hinge lock open (Fig. D)
2.
Open the appliance door a little (Fig. E).
3.
Using a coin, fully turn both the left and right-hand locks on
the inside of the appliance at the bottom (Fig. F).
Left lock: clockwise
Right lock: anti-clockwise
Cleaning set-
ting
Temperature
display
Clock display (operating
time in hours)
low
‚
‹
:
…†
medium
ƒ
‚
:
‹‹
intensive
„
‚
:
‚†
$
%
&
'
(
)