Vaddio WallVIEW CCU Kit for AW HE-120 User Manual
Page 9
Quick Connect CCU Kit and WallVIEW Kit for the AW-HE120
© 2012 Vaddio - All Rights Reserved. Document Number 342-0498 Rev A Page 9 of 16
Step 3:
Take the Wall Mount, with the EZIM CCU and break out cable installed, and place it against the drywall anchors
or 3-gang wall box, making sure to pull the three Cat-5 cables through the oval pass-through hole. Finger-tighten
the screws to the mount and confirm that the base is level. Tighten the screws firmly. If the bracket is to be
mounted on a 3-gang wall box, use the screws supplied with the electrical box.
Step 4:
Confirm that the Cat-5 cables are terminated correctly, by testing them with a continuity tester. Connect the
break out cables to the appropriate ports on the AW-HE120. The break out cable for the HE 100 has an RS-232
to RS-422 adapter in-line, with a 1 ft. CAT-5 cable, which connects to the Controller port on the back of the
camera. Push the camera into place and dress the cables. Secure the camera to the mount and using the ¼”-20
screws.
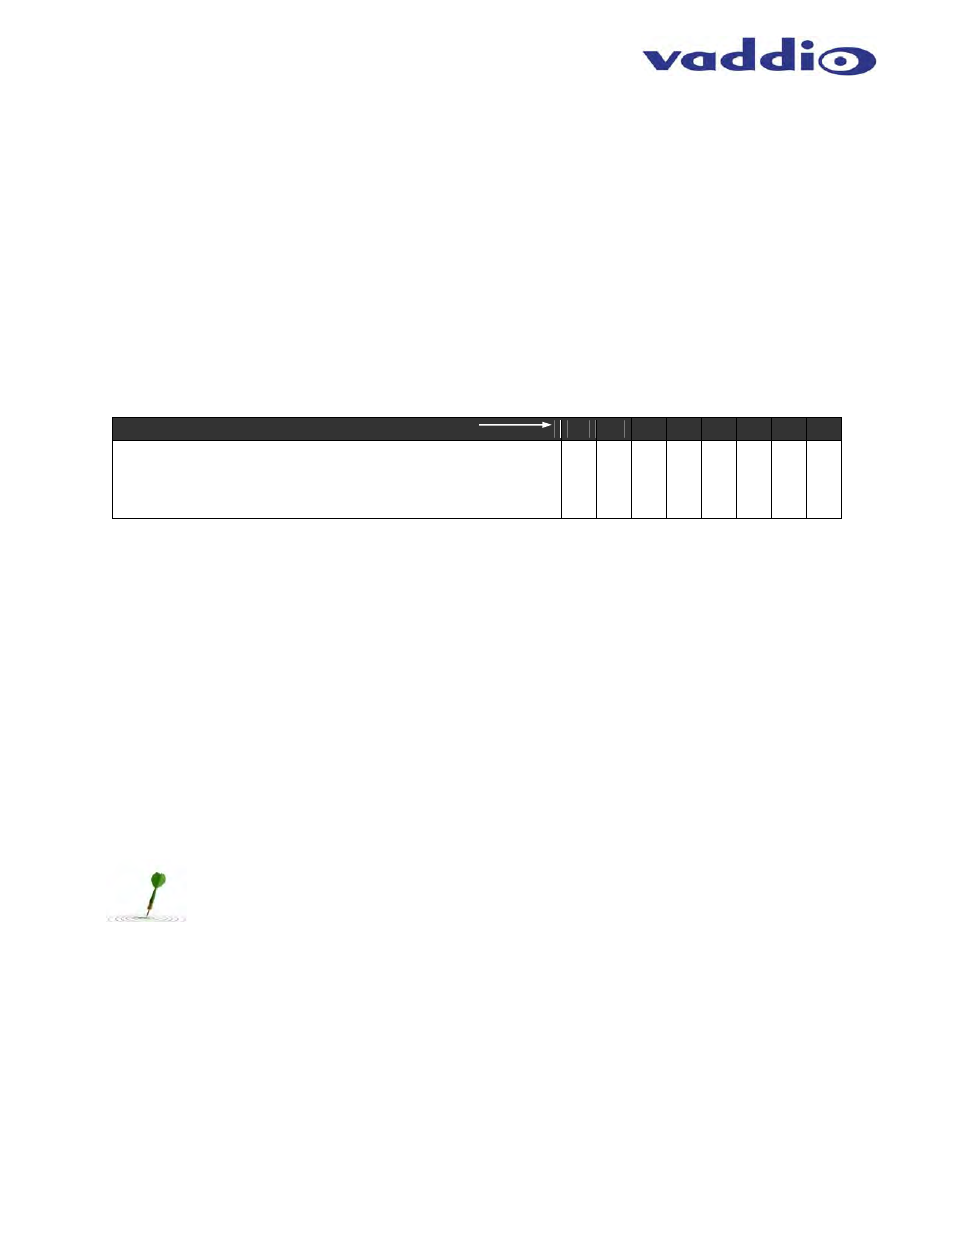
Step 5:
The Quick-Connect CCU interface has an 8-position dip switch on the rear panel (see page 4). Set Dip Switch 2
to the UP position. All other switches should be in the DOWN position.
Description Dip Switch (Up = ON)
1
2
3
4
5
6
7
8
Panasonic AW-HE120
Setting the #2 dip switch to the UP position allows
Vaddio’s ProductionVIEW controllers and switchers to
recognize the camera.
D
N
UP
D
N
D
N
D
N
D
N
D
N
D
N
Step 6:
The Quick-Connect CCU is a 1-RU rack mount interface that breaks out the signals from the Cat. 5 cables back
to the standard connectors. Connect the other side of the appropriate Cat-5 cable to the CCU except for power.
Note: Plugging the POWER CAT-5 Cable into the wrong RJ-45 may cause damage to the camera system and void the
warranty.
Completing the Installation:
Connect the Power Cat-5 cable to the CCU and connect the Vaddio 36 VDC power supply to an AC outlet.
Power will travel down the Power Cat-5 cable to the EZIM CCU, powering the camera. The camera will “Home”
to a centered position ready for control information from the IR Remote or camera controller. To insure proper
continuity of control and operation of the cameras, the RS-232 controller (control system or joystick) must be
powered on after the camera. Move the camera and test the video.
Setting the AW-HE120 Video Format and Output Settings:
With the IR Remote Control, enter the camera’s menu system and set the camera’s Picture Format, which ranges
from 480/29.97psF to 1080/30p.
NOTE: Not all of the resolution options on the AW-HE120 will be recognized by the receiving
device (ProductionVIEW HD or HD video monitor, etc.), so be sure to select an appropriate
resolution for your external device that is connected to the Quick-Connect CCU.
Setting the Camera Output Mode:
The modes are RGB, YPbPr and Y/C Use only YPbPr with the Quick-Connect CCU.
Connecting the Tally Port (optional)
The CCU system is capable of illuminating a Tally light on the front of the Quick-Connect enclosure. This light
provides a visual indicator to the equipment operator to know which camera is live during a broadcast. In
addition the tally function will illuminate the tally light on the front of the camera lens, to allow the presenter to
know which camera is live.
The basic system connectivity is illustrated on the next page.