Overview – Vaddio WallVIEW CCU Kit for AW HE-120 User Manual
Page 3
Quick Connect CCU Kit and WallVIEW Kit for the AW-HE120
© 2012 Vaddio - All Rights Reserved. Document Number 342-0498 Rev A Page 3 of 16
Overview:
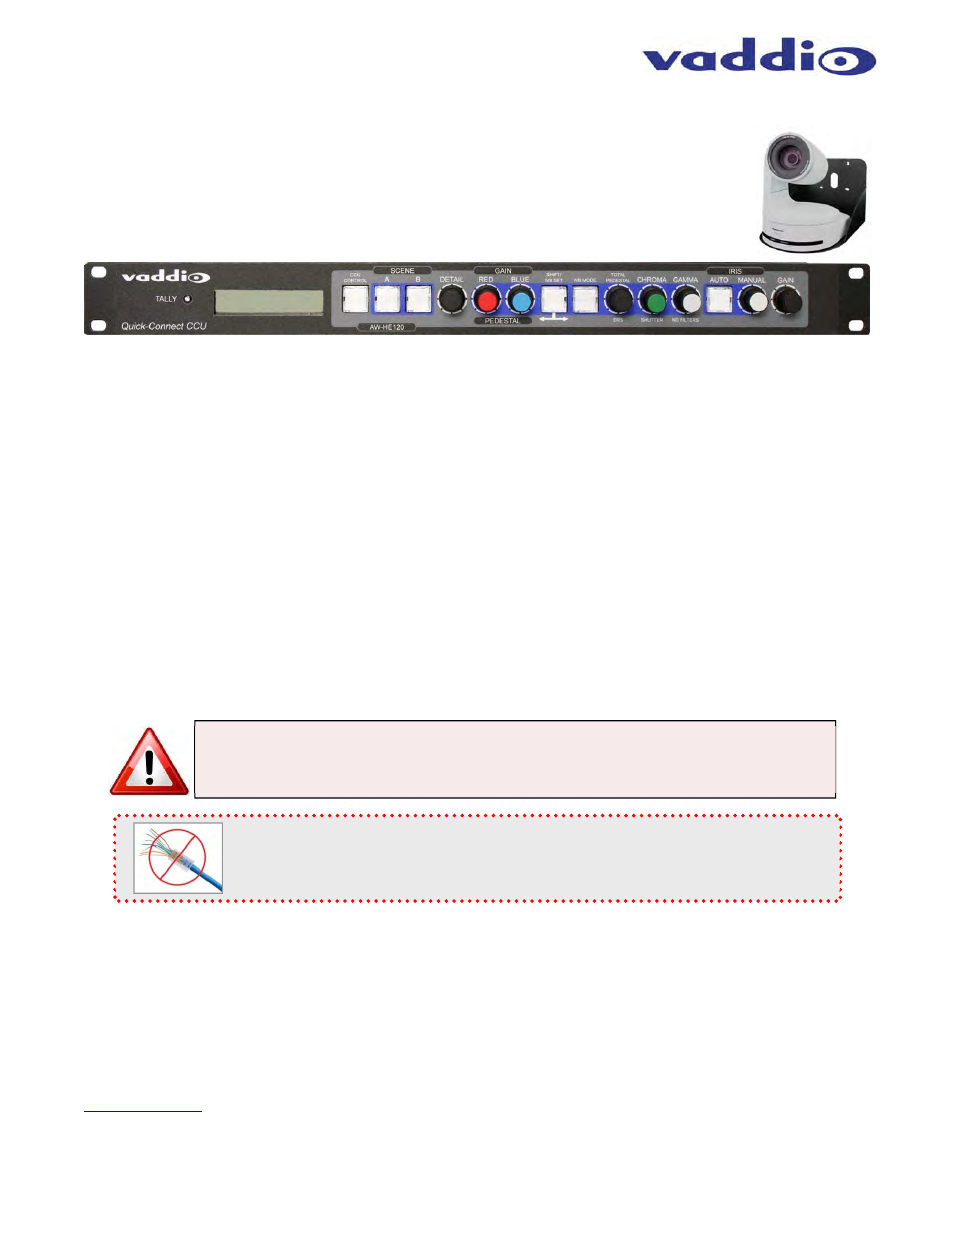
The Vaddio Quick-Connect CCU system for the AW-HE120 camera allows the user to control
the color output of the camera’s image sensor through both Red and Blue Gain controls, Detail,
Chroma, Gamma, Total Pedestal, as well as Iris and Gain levels, to provide a higher quality
image. In addition, there are also Red and Blue Pedestal parameters. In addition, there are
also Pedestal, Gamma and Chroma adjustments for added fine-tuning of the camera’s image.
Figure: Front Panel of the Quick-Connect CCU for the AW-HE120 Camera
The Panasonic AW-HE120 uses standard RS-422 control protocol. To be 100% compatible with Vaddio
equipment, everything is included to convert Vaddio’s RS-232 to RS-422. This allows for the operation with the
complete line of Vaddio ProductionVIEW™ consoles (Precision Camera Controller, ProductionVIEW HD,
ProductionVIEW HD MV and the ProductionVIEW HD-SDI MV with integrated multi-viewers.
The CCU has many features, including Tally illumination on the front panel and on the on the camera which
allows the presenter to know which camera is live and what CCU to adjust if a tweak is needed. Genlock is
delivered to the camera over Cat-5 with a level adjustment on the EZIM CCU. The ability to store settings on two
discrete Scene buttons is included, and buttons for Auto White Balance, One Push White Balance and Auto Iris
programming are also available.
The AW-HE120 HD PTZ Camera features a 20x zoom lens and a three (3), 1/3-type 2.2 megapixel CMOS imager
sensors.
The systems are available as a WallVIEW CCU HE120 System with the camera included, or as a Quick-
Connect CCU Kit, without the camera. The Quick-Connect CCU for the AW-HE120 has the
ability to produce
remarkable video in a wide range of shooting conditions
Important Safeguards:
Read and understand all instructions and warranty statements before using. Do not operate any device if it has
been dropped or damaged. In this case, a Vaddio technician must examine the product before operating. To
reduce the risk of electric shock, do not immerse in water or other liquids and avoid extremely humid conditions.
Intended Use
Before operating the device, please read the entire manual thoroughly. The system was designed, built and
tested for use indoors, and with the provided power supply and cabling. The use of a power supply other than the
one provided or outdoor operation has not been tested and could damage the device and/or create a potentially
unsafe operating condition.
Save These Instructions
The information contained in this manual will help you install and operate your product. If these instructions are
misplaced, Vaddio keeps copies of Specifications, Installation and User Guides and most pertinent product
drawings for the Vaddio product line on the Vaddio website. These documents can be downloaded from
www.vaddio.com
free of charge.
General Safeguard: Use only the power supply provided with the system. Use of any
unauthorized power supply will void any and all warranties. Please do not cut the
secondary side (or the DC side) of the power supply and attempt to extend the power to the
camera. The warranty is voided when the cable is cut.
Please do not use “pass-thru” type RJ-45 connectors. These pass-thru type connectors do not
work well for professional installations and can be the cause of intermittent connections which,
can result in the RS-232 control line failing and locking up, and/or compromising the HSDS™
signals. For best results please use standard RJ-45 connectors and test all cables for proper pin-
outs prior to use and connection to Vaddio product.