Ashcroft, Current type 1009 duralife, Calibration procedure – pressure and vacuum range – Ashcroft 1036 Gauge with 1037 Fitting User Manual
Page 14
14
© 2010 Ashcroft Inc., 250 East Main Street, Stratford, CT 06614-5145, USA, Tel: 203-378-8281, Fax: 203-385-0499, www.ashcroft.com
All sales subject to standard terms and conditions of sale. I&M008-10081-05/10 AMR 05/10
ASHCROFT
®
Current Type 1009 Duralife
®
Calibration Procedure – Pressure and
Vacuum Range
Calibration – 1009 Duralife
®
Gauge –
Inspect gauge for accuracy. At times gauges are simply
“off zero” and opening the ventable plug at the top of the
gauge will relieve internal gauge pressure and correct the
offset. If this is not adequate and inspection shows that
the gauge warrants recalibration to correct zero, span
and/or linearity errors, proceed as follows:
Remove ring, window, and gasket using Ashcroft Ring
Removal Tools P/N 101B220-02 and 101B221-02 for 2½”
gauges and 101B220-01 and 101B221-01 for 3½” gauges.
Positive Pressure Ranges –
1. Adjust pointer with a slotted screwdriver until it is in the
center of the zero box. This is often all that is required
it correct calibration issues.
2. Apply full scale pressure. If error exceeds 1% rotate
the black span adjustment device with a #0 square
drive bit. Clockwise increases span, counterclockwise
decrease span.
3. Fully exhaust pressure and check that pointer still is
still in the zero box. If not, repeat step 1 and 2
4. Once 0 and full scale are within tolerance, pressurize
gauge to mid-scale.
5. If gauge is within 1%, calibration is complete. If not
loosen the dial screw and rotate dial left or right to
adjust midpoint. Retighten dial screw.
6. If an adjustment was made in step 5, recheck the
gauge at zero and full scale, adjust accordingly until
zero, mid and full scale points are in tolerance.
Vacuum Range –
1. Adjust pointer with a slotted screwdriver until it is in
the center of the zero box. This is often all that is
required it correct calibration issues.
2. Apply 25 inches Hg vacuum. If the error exceeds 1%
adjust pointer with a slotted screwdriver until gauge is
within tolerance.
3. Vent to 0 pressure and check pointer position in the
zero box. If error exceeds 1% rotate the black span
adjustment device with a #0 square drive bit.
Clockwise rotation moves pointer clockwise, counter-
clockwise rotation moves the pointer counterclockwise.
4. Repeat step 1 and 2 until 0 and 25 inches of Hg are
within gauge tolerance.
5. Apply 15 inches Hg vacuum. If gauge is within 1%,
calibration is complete. If not loosen the dial screw
and rotate dial left or right to adjust midpoint.
Retighten dial screw.
6. If an adjustment was made in step 4, recheck the
gauge at zero and 25 inches of Hg vacuum, adjust
accordingly until zero, 15 and 25 inches Hg are in tol-
erance.
7. Continue below.
Re-assemble window and ring to gauge:
a. If plastic window is used, push window back into front
of gauge, ensure the o-ring does not roll out of win-
dow groove (lubricate if necessary). Align the tabs of
the window with the tabs of the case front. Once win-
dow is in place, install ring and tighten with tools refer-
enced above and shown on page 10.
b
If safety glass is used, reinstall window, gasket, and
ring. Ensure that the gasket is seated properly under
all four tabs of the ring and does not wrinkle when ring
is tightened.
Note: Tighten ring: Apply 120-200inlb of torque. Rotate
ring clockwise to tighten. Warning: over tightening of safe-
ty glass may induce cracking.
Notes: See page 10 for any tools required to calibrate.
For model s pr oduced af t er
Sept ember 2008 f or 2
1
⁄
2
˝ ver si on and
December 2008 f or 3
1
⁄
2
˝ ver si on.
Back of gauge will have a date code sticker.
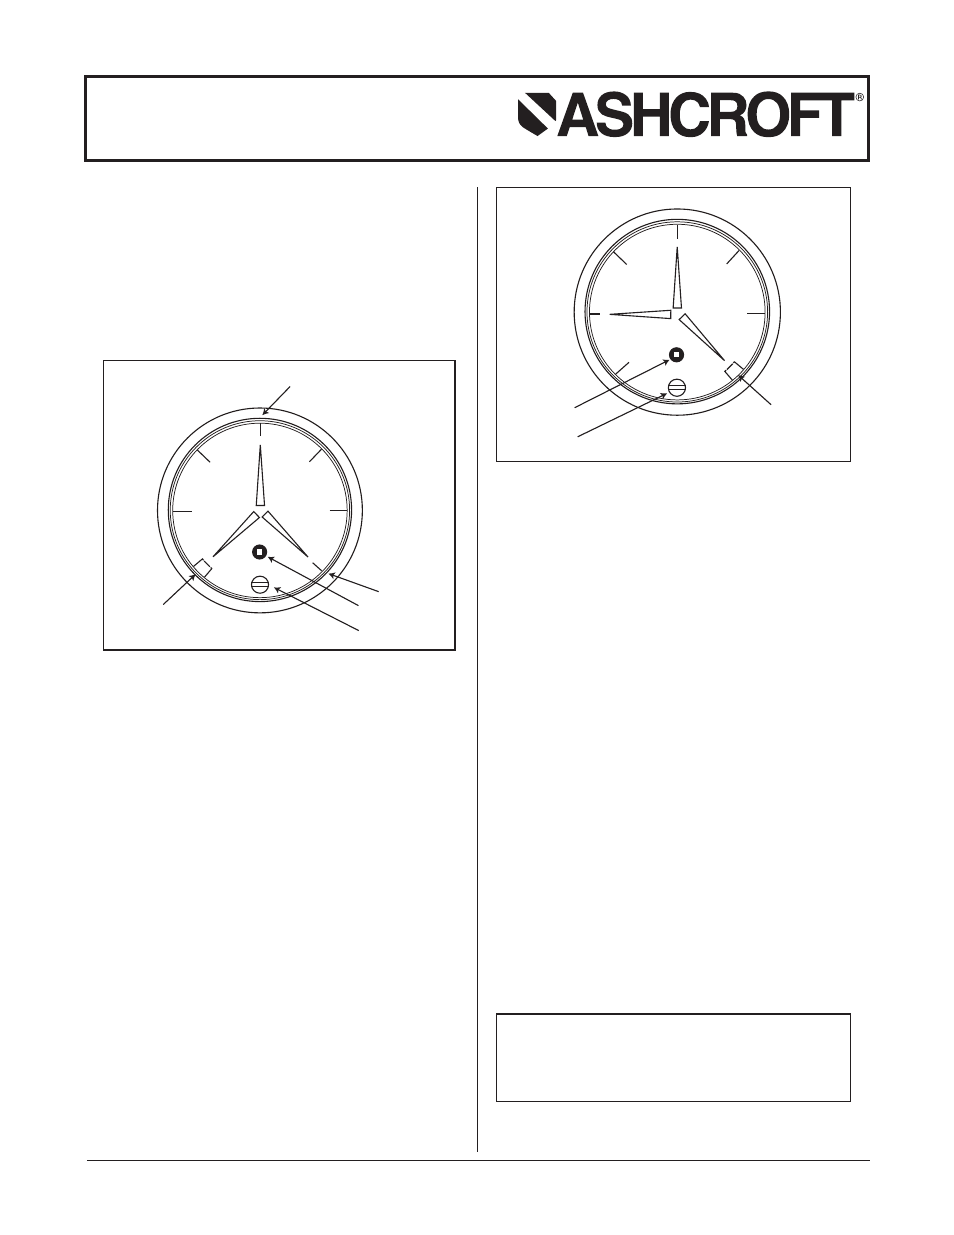
10
0
Mid-scale mark
Full scale mark
Span adjust
Dial screw
Zero box
0
50
PRESSURE
15
25
0
Zero box
Zero adjust
Dial screw
VACUUM
- 1009 - Stainless Steel Pressure Gauge 1008S/SL - Stainless Steel Pressure Gauge 1008S - Stainless Steel Pressure Gauge 1189 - Low Pressure Bellows Gauge 1188 - Low Pressure Bellows Gauge 1187 - Low Pressure Bellows Gauge 1150H - Reid Vapor Gauge 1122 - Industrial Gauge 1220 - Industrial Gauge 1017 - Industrial Gauge 1220 - Receiver Gauges 1017 - Receiver Gauges 1010 - Receiver Gauges 1009 - Receiver Gauges 1220 - Refrigeration Gauges 1017 - Refrigeration Gauges 1010 - Refrigeration Gauges 1009 - Refrigeration Gauges 1220 - Hydraulic Gauges 1017 - Hydraulic Gauges 1010 - Hydraulic Gauges 1009 - Hydraulic Gauges 1010 - Industrial Gauge 2462 - Duragauge® Pressure Gauge 1379 - Duragauge® Pressure Gauge 1377 - Duragauge® Pressure Gauge 2462 - Receiver Gauges 1377 - Receiver Gauges 1379 - Receiver Gauges 1279 - Receiver Gauges 1259 - Pressure Gauge 1082 - Pressure Test Gauge