73 camaro tigercage main hoop installation, Warning – Ridetech 41180000 User Manual
Page 10
Air Ride Technologies
Wire Trough Cover
Scuff Plate
Wire Trough
Body Seam
Upper Tab
Lower Tab
Main Hoop Mounting
Bracket (8090)
Preexisting
Hole Location
Mounting Hole
Locations
41180000
8
70-73 Camaro TigerCage
Main Hoop Installation
Step 5. Remove the package tray bars and
install the package tray cover. Mark the eight
package tray bar mounting holes and drill the
package tray cover using a 3/8” bit. Reinstall
the package tray bars but
Do not tighten yet.
NOTE: Remember to install all bars before
final tightening.
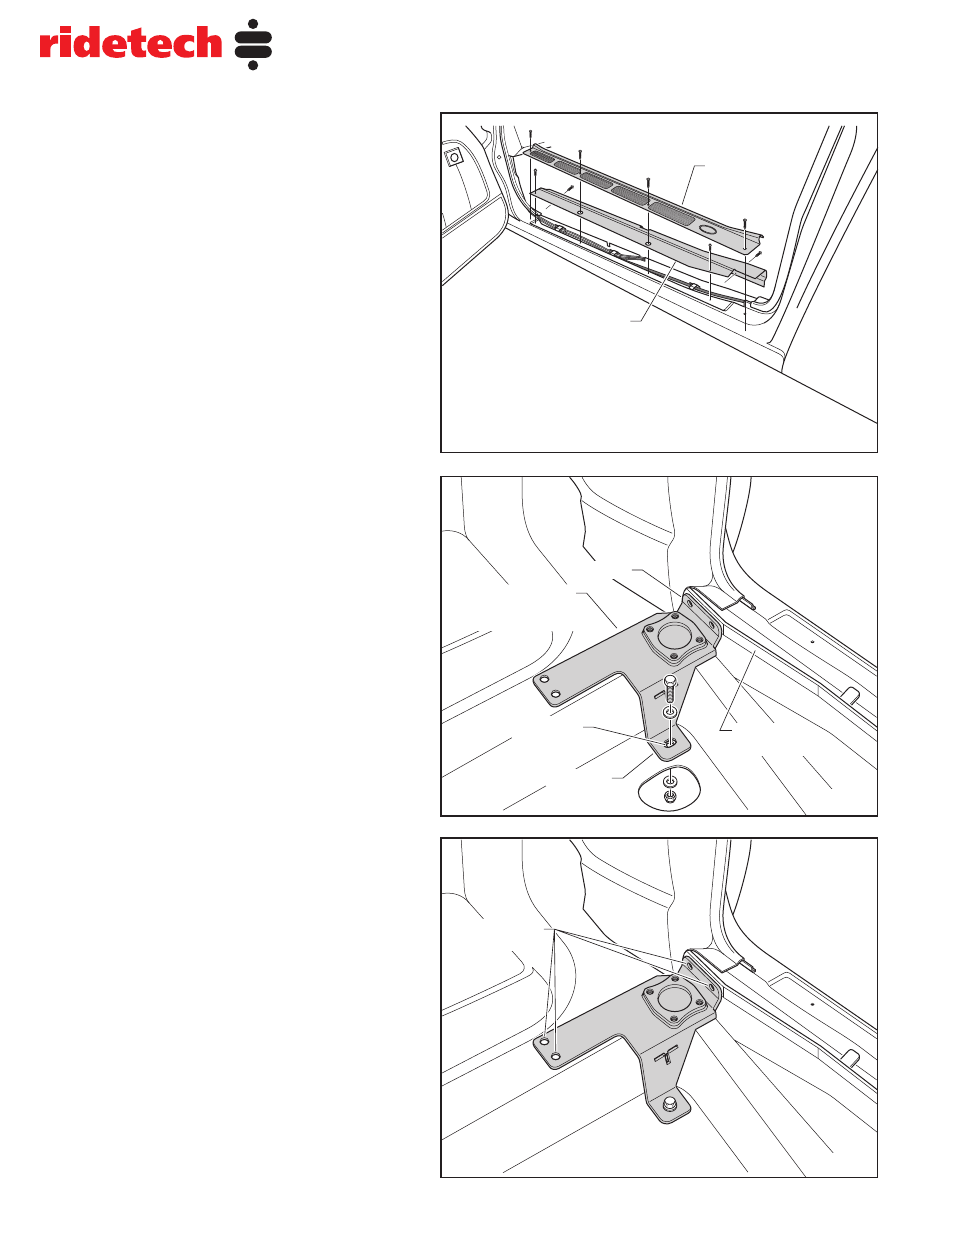
Step 6. Remove all screws attaching the
scuff plate and wire trough cover to the door
sill (See Fig 15). Retain the screws for
reinstallation.
WARNING:
When performing step 18 caution
must be taken not to puncture or damage any
fuel or brake lines while drilling through the
floor pan. Remove screws and clamps fasten-
ing the brake or fuel lines to the frame rail or
floor pan allowing them to be moved out of the
way. Both the driver and passenger sides lines
must be moved before drilling.
Step 7. Roll back the carpet in the rear seat
exposing the floor pan. Initial fitment of the
main hoop mounting brackets must be done
under the carpet. Final installation can be done
under or over the carpet. Place the driver side
main hoop mounting bracket
Part # 8090
on the floor pan with the upper and lower tabs
flush against the wire trough body seam and
floor pan. Align the hole in the lower tab of the
mounting bracket with a preexisting 5/16 hole
in the floor pan (See Fig 16). Secure the
bracket to the floor pan using the 5/16” x 1 ¼”
bolt, Nylok nut and flat washer.
Do not tighten
yet.
Step 8. Mark and drill the remaining four
mounting holes using a 3/8” bit (See Fig 17).
Drill pilot holes first to ensure proper mounting
location of the bracket. We suggest using a
center punch to aid in drilling.
Fig 5
Fig 6
Fig 7