Merit Medical ReSolve Locking Drainage Catheter User Manual
Page 3
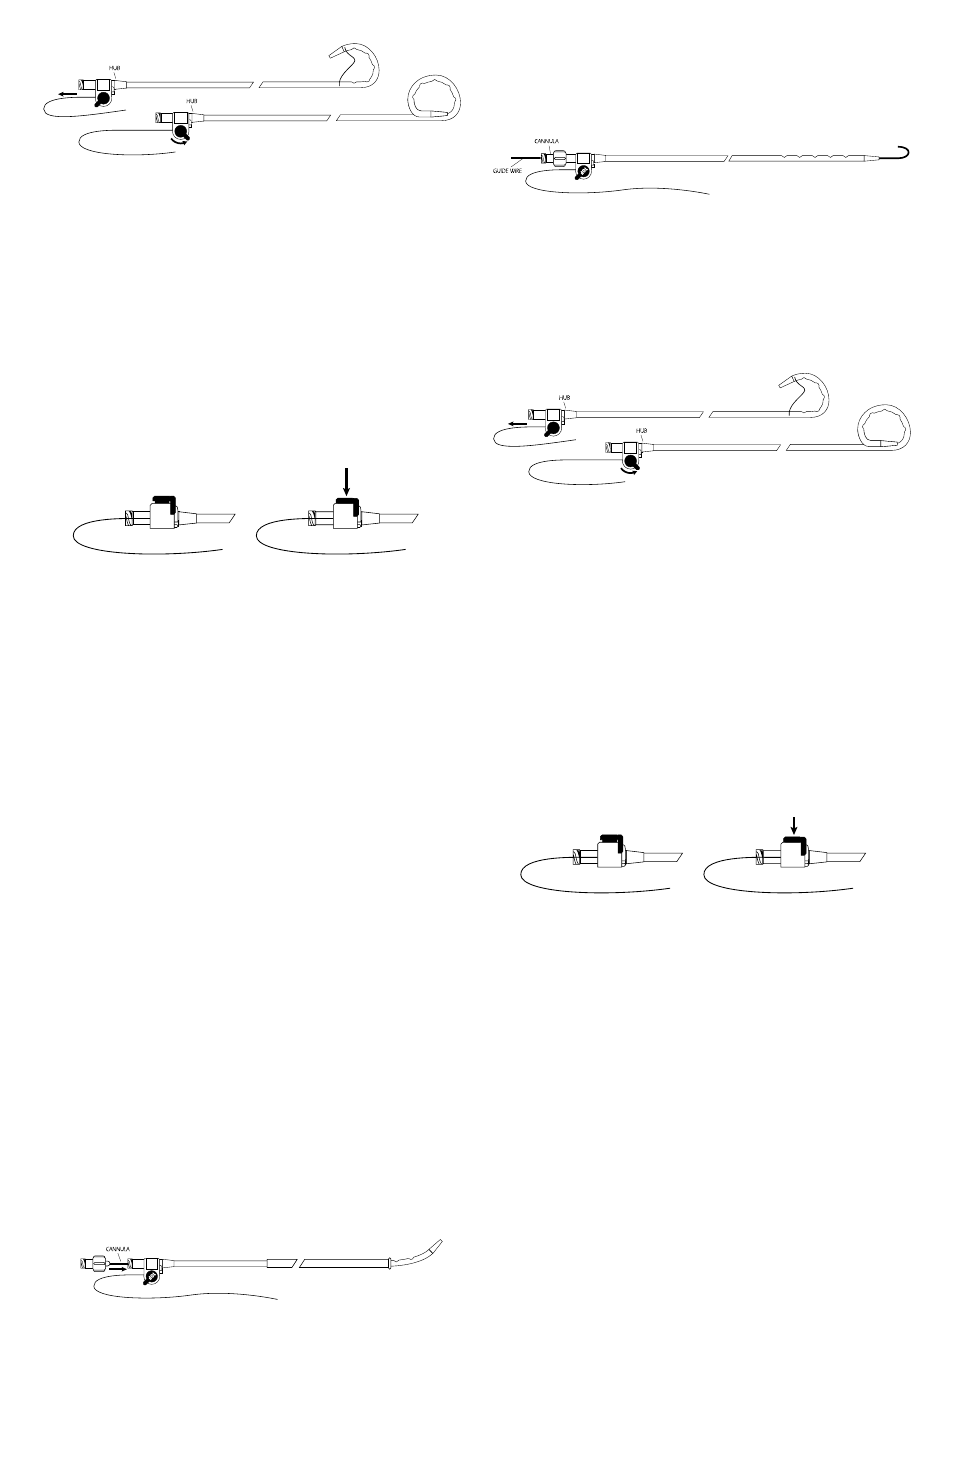
Figure 3
Note: If the catheter needs to be repositioned, unlock the
suture locking mechanism by rotating the arm proximally
to the point of resistance.
Precaution: Do not rotate the suture locking mechanism
beyond the point of resistance. Rotating the suture locking
mechanism beyond the point of resistance will not release
the suture to allow the pigtail to straighten upon removal.
8. Once placement is confirmed, and the suture locking
mechanism has been rotated to the most distal position,
press the suture locking mechanism into the hub to secure
it. The suture locking mechanism is now locked into posi-
tion. See Figure 4.
Figure 4
9. The ReSolve Locking Drainage Catheter is now ready to
be connected to appropriate drainage bag, tubing or dead
end cap.
WARNING: If using alcohol to clean the catheter hub, allow
sufficient time for alcohol to dry before connecting the
drainage tubing or dead end cap.
WARNING: DO NOT over tighten the connection between
the drainage catheter and drainage tubing or dead end
cap.
Note: A flush regimen should be designed for the circum-
stances of each patient and the protocol of the physician.
Note: Instruct patient or other healthcare personnel in
appropriate device function and/ or maintenance.
INSTRUCTIONS FOR USE OPTION 2:
SELDINGER ENTRY TECHNIQUE OR GUIDE WIRE EX-
CHANGE
1. Remove the stiffening cannula and trocar stylette assem-
bly from catheter.
2. Ensure that the distal portion of the catheter is wet prior
to placement. Wet the distal portion of the ReSolve Locking
Drainage catheter prior to use with sterile water or saline.
Keep the distal portion of the catheter wet during place-
ment.
WARNING: DO NOT wipe catheter with dry gauze or any
solvents because it may damage the catheter coating.
3. Slide pigtail straightener along distal portion of catheter
to straighten curve prior to placing the stiffening cannula
into the catheter. Place the stiffening cannula into the
catheter and tighten the luer lock fittings. See Figure 5.
Figure 5
4. Remove pigtail straightener from catheter prior
to insertion.
5. Place catheter/cannula assembly over appropriate guide
wire and advance into the fluid collection site. The catheter
accommodates a 0.038” (0.97 mm) wire. See Figure 6.
Note: Placement should be confirmed with diagnostic
imaging.
Figure 6
6. After placement is confirmed, remove the stiffening
cannula and guide wire.
7. To engage the suture locking mechanism: Pull the suture
until desired pigtail is formed. Rotate the suture locking
mechanism distally to hold the suture in place. See Figure 7.
Figure 7
Note: If the catheter needs to be repositioned, unlock the
suture locking mechanism by rotating the arm proximally
to the point of resistance.
Precaution: Do not rotate the suture locking mechanism
beyond the point of resistance. Rotating the suture locking
mechanism beyond the point of resistance will not release
the suture to allow the pigtail to straighten upon removal.
8. Once placement is confirmed, and the suture locking
mechanism has been rotated to the most distal position,
press the suture locking mechanism into the hub to secure
it. The suture locking mechanism is now locked into
position. See Figure 8.
Figure 8
9. The ReSolve Locking Drainage Catheter is now ready to
be connected to appropriate drainage bag, tubing or dead
end cap.
WARNING: If using alcohol to clean the catheter hub, allow
sufficient time for alcohol to dry before connecting the
drainage tubing or dead end cap.
WARNING: DO NOT over tighten the connection between
the drainage catheter and drainage tubing or dead end
cap.
Note: A flush regimen should be designed for the circum-
stances of each patient and the protocol of the physician.
Note: Instruct patient or other healthcare personnel in
appropriate device function and/ or maintenance.
CATHETER EXCHANGE, REPOSITIONING OR REMOVAL
1. Disconnect catheter from drainage bag, tubing or dead
end cap.
2. To release the pigtail loop choose one of the following
options:
Option 1:
• Using the Repositioning Tool align the opening of the
round section of the Repositioning Tool in line with the
handle of the suture locking mechanism.
10
F
10F
10
F
10F