Dwyer STFLO User Manual
Page 4
1. Remove the reading scale by removing the two set screws in the black
rings attaching the reading scale to the sight tube. Lift the reading scale up
and off of the meter. Set the screws aside where they will not be lost.
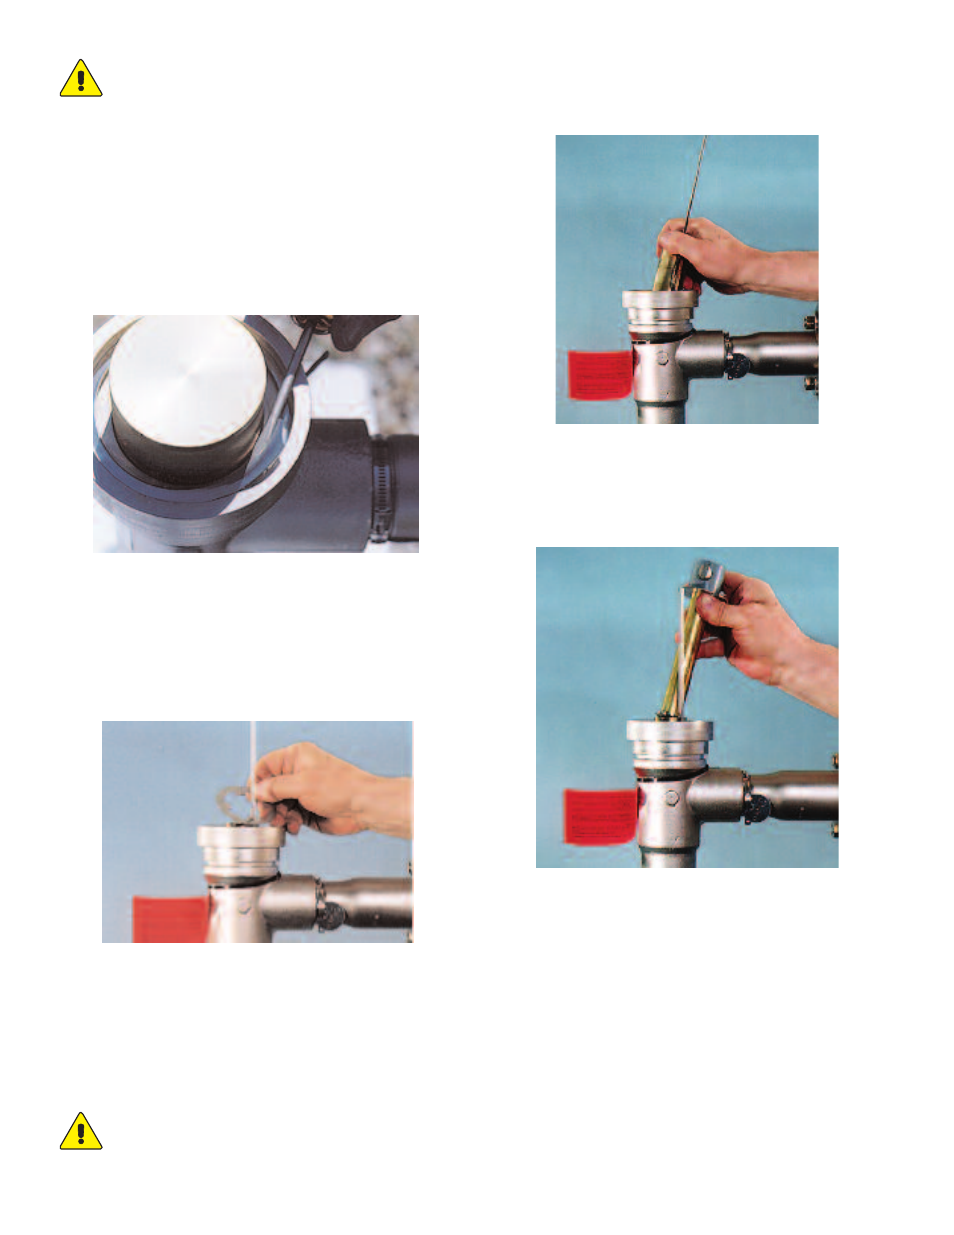
2. Using a screwdriver, carefully pry the notched end of the spiral retaining
ring out of the body groove. Move the screwdriver blade under the ring- the
action is very much like putting a key on a key ring. Continue until the entire
spiral ring has been removed from the groove (please see the photo
below).
3. Using hands only, pull the sight tube straight up out of the body with a
slight twisting motion, lifting it clear of the body and snorkel. The inner
flange ring will lift off with the sight tube.
4. Remove the float assembly by lifting it up and away from the snorkel.
The core tube assembly may then be lifted out. If stuck, CAREFULLY pry
at the top of the slot with a brass rod, taking care not to damage the body
or core tube. The spider ring and O-ring will come out with the core tube. If
the core tube is stuck, try removing the metal spider ring first (please see
the photo below).
INSPECTION & CLEANING
Inspect parts for nicks, scratches, chips, wear, and contaminant build-up.
The edges of the core tube slot, ID of the core tube and OD of the piston
(largest section at the float assembly bottom) are precision machined.
Damage to these areas can destroy the meter’s accuracy. Also inspect the
O-ring, the bottom section of the sight tube, and the inside of the upper
body section. Damage to these areas may result in leaking. Clean, rinse,
and dry all parts carefully, including the O-ring, preferably with a mild
detergent and water and a soft cloth or soft tube brush. If solvents are
used, make sure they are compatible with meter parts.
FLOWMETER ASSEMBLY
In general, replace all parts in reverse order of the disassembly.
1. Place the slotted meter tube into the body, aligning the “key” at the
bottom of the tube with the keyslot in the bottom of the body.
2. Place the spider over the meter tube with the “notched leg over the
snorkel tube or guide rod. Slide the spider down to the meter tube’s
shoulder.
3. Place the meter float in the meter tube, aligning the notch in the indicator
disk with the snorkel.
4. Seat the O-ring on the sight tube, lubricating it with a small amount of
service-compatible silicone grease or petroleum jelly to facilitate
replacement.
CAUTION: BE SURE PRESSURE IS FULLY VENTED AND FLUIDS
COMPLETELY DRAINED BEFORE DISASSEMBLING THE
FLOWMETER. DISCONNECT POWER TO ELECTRONIC
ACCESSORIES. WEAR SAFTEY GLASSES AND PROTECTIVE
CLOTHING IF THERE IS A CHANCE OF EXPOSURE TO
HAZARDOUS FLUIDS!
CAUTION: DO NOT SCRAPE OR USE ABRASIVE
MATERIALS FOR CLEANING!