SHIMPO FG-3000 User Manual
Page 3
3
3.3 Select Test Mode
The FG-3000 has 3 types of Test Modes.
Track: The real time measuring mode. Under this mode, press the
ZERO key to tare any initial reading being displayed.
Peak: In Peak mode, the maximum force will be recorded and
displayed. Press the ZERO key to reset the peak value.
Preset: Enables the setting of an upper and lower limit to com-
pare to the measured force value. A simple GO/NG analysis is
displayed on screen via icon indicators for quick pass/fail testing.
To guarantee an accurate test, make sure to zero the display and
tare any small force being displayed before beginning the test.
There are two means to select your appropriate Test Mode. At the
home screen simply press the MODE key to scroll through the
three measuring modes.
You can also select the mode under the Measurement menu in
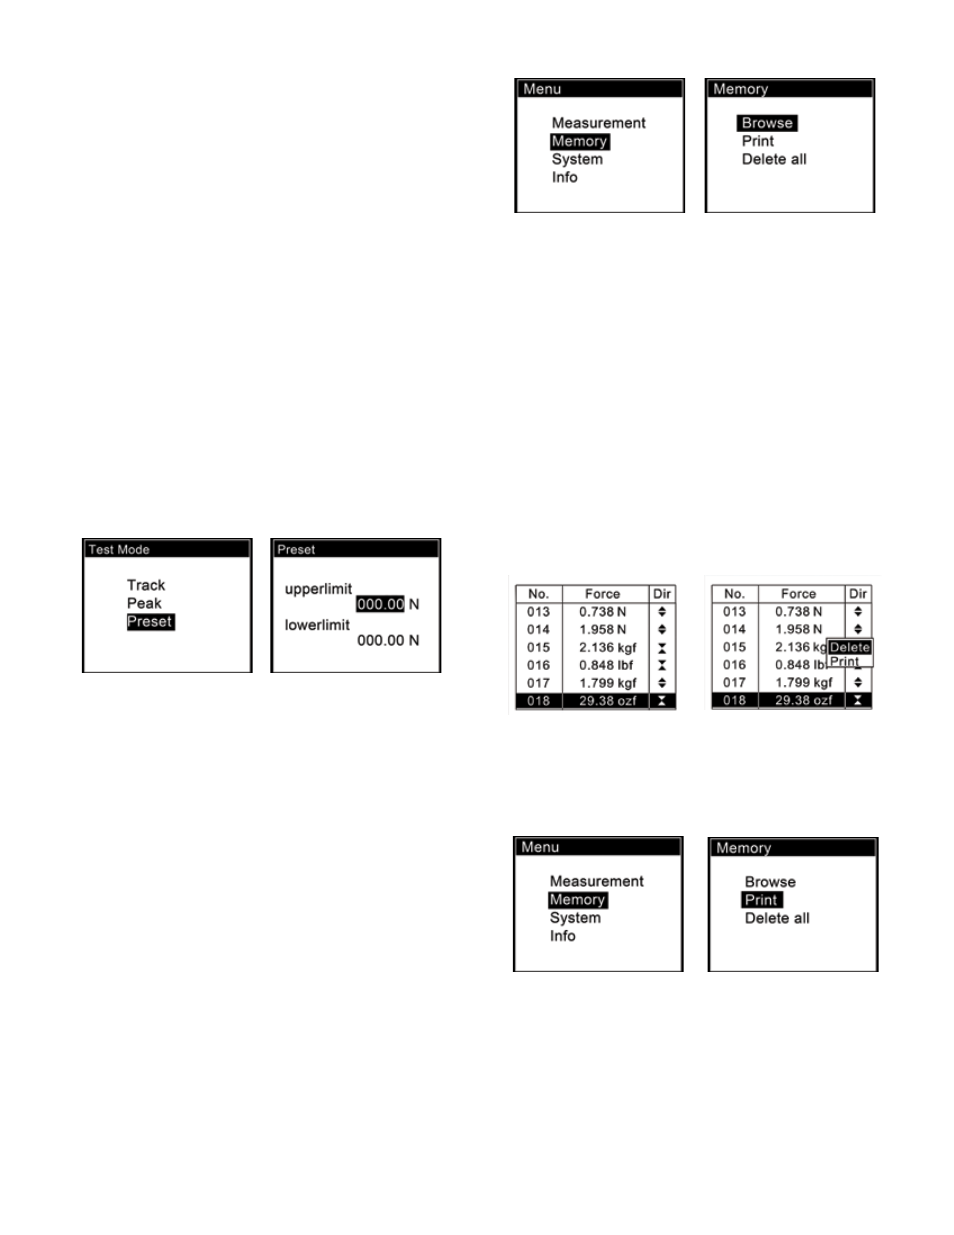
the Test Mode sub-menu. See Fig. 3-3(a)
If the Preset is selected, a new screen will pop up where you can
set the Upper and Lower limits. See Fig 3-3(b)
Press ZERO to adjust the number and press MODE to move to
the next digit.
Fig. 3-3(a) Fig. 3-3(b)
Note:
1) The upper limit can not exceed 110% capacity of the force
gauge.
2) The lower limit must not be less than 10% of capacity.
3) The upper limit must exceed the lower limit
4. SAvINg THE MEASURED vALUE
Measured results can be stored in the force gauge’s memory. You
can review or print the stored data at a later time.
At the home screen press the LOG key to store a value. The stor-
age icon will be displayed.
The data stored is the current displayed force value in Track and
Preset modes. In Peak mode it is the peak value shown on the
display.
4.1 Memory
Fig. 4-1
Memory menu contains three submenus: Browse, Print, Delete
all, as shown in Fig. 4-1.
You can browse stored data or print all the data via the FG-PRINT
mini-printer (sold separately). You may also delete all the records
in the Delete all sub-menu.
4.2 Browse
In the Browse sub-menu. The data in memory can be reviewed in
the order saved which is oldest to newest. See Fig. 4-2(a)
Press ZERO/UP or MODE/DOWN to scroll.
Press MENU. A small window will pop out. Here you can select
Delete or Print. See Fig. 4-2(b).
If you select Delete, a confirm window will appear asking you to
confirm. Press MENU to confirm or LOG to exit.
Fig. 4-2(a) Fig. 4-2(b)
4.3 Print
You can print the data in memory. Enter Print. (Fig. 4-3) Choose
Selected or All.
Fig. 4-3
If Selected is chosen, the total Range of available data points will
be indicated. Adjust the value points to be printed to the right of
Select. Fig. 4-3(a)
If All is selected, a confirm window will appear asking you to con-
firm. See Fig. 4-3(b).