Program setup – for light schedule, Light clock setup, Light schedule – Hired-Hand Evolution Series 3000/3001: Light Control Relay Assembly User Manual
Page 4
HIRED-HAND, INC.
• 1733 County Road 68 • Bremen, AL 35033 USA • Phone 256-287-1000 • Fax 256-287-2000
Manual Part No. 4802-5109 rev 2-07 Page
4 of 6
Light Schedule: 1
Start Day = 22
Number of On/Off Cycles = 4
CYCLE START RUNTIME INTENSITY RAMP
1
12:00a 2:00 100% 0:00
2
10:00a 2:00 100% 0:00
3
5:00p 2:00 100% 0:00
4
10:00p 2:00 100% 0:00
INTENSITY RAMP
100% 0:00
100% 0:00
100% 0:00
100% 0:00
4.0 Setup Evolution Light Clock Programming for use with CCS Panel
The following details provide programming instructions for allowing the Light Control Relay accessory to operate
correctly when connected to the VAR #1 or VAR #2 Variable Output PCB terminal blocks.
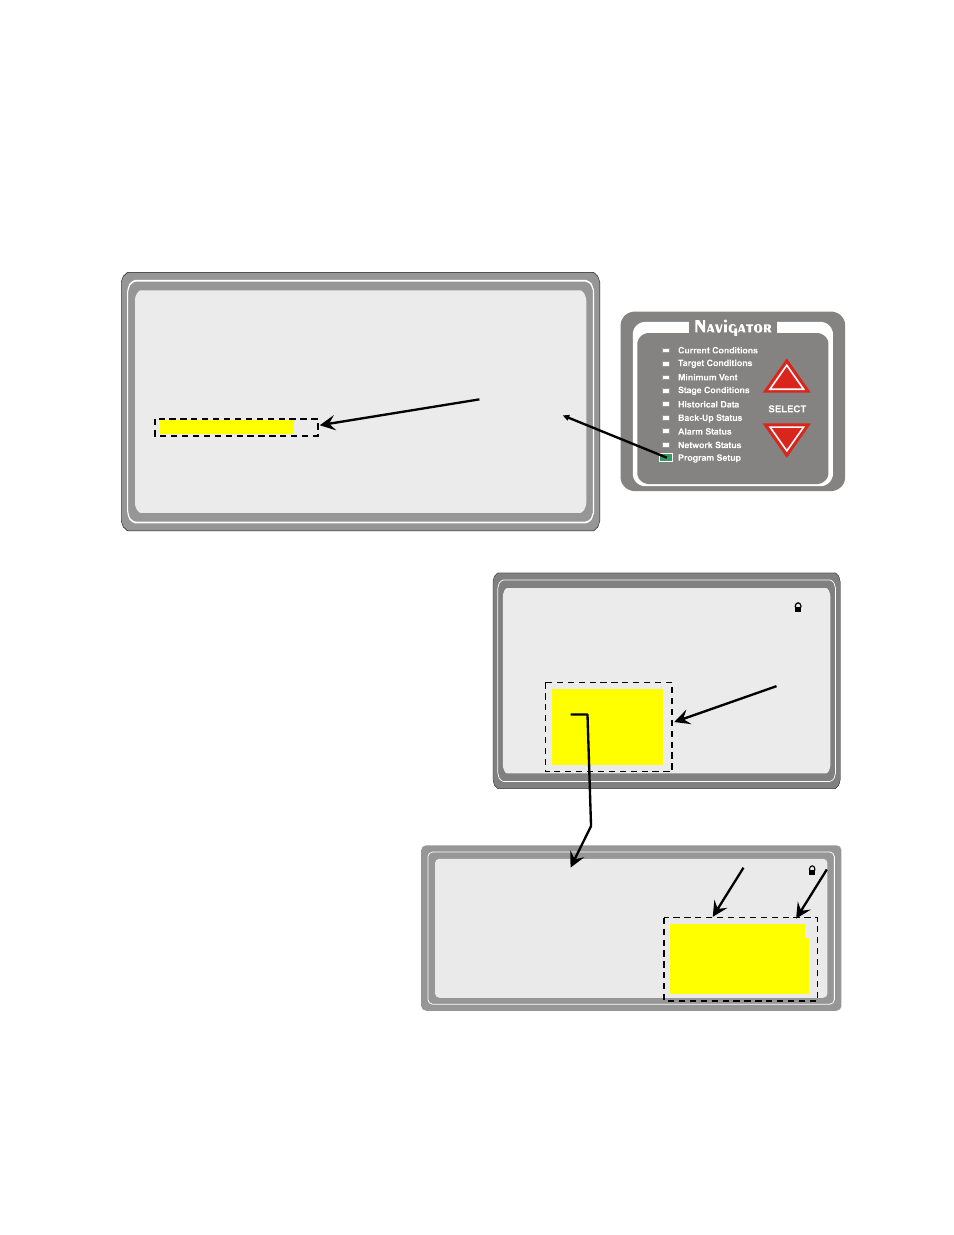
Program Setup – For Light Schedule
A. Select the Program Setup screen using the Navigator Select buttons. Highlight Light Clock Setup and press
the ENTER button.
Light Clock Setup
B. Select the individual Schedules in the Light
Clock Setup screen until all of the affected
schedules are correctly updated. Refer to the
EV-1200 controller manual for details on
additional Light Clock Setup screen options.
Light Schedule
C. Each of the Cycles within the Light
Schedules MUST be set to 100%
Intensity and 0:00 Ramp. Refer to the
EV-1200 or EV-3000/3001 controller
manual for details on additional Light
Schedule screen options.
** FREQUENTLY ADJUSTED SETTINGS **
"
GENERAL SETTINGS
STATIC PRESSURE
SENSOR SETUP
PROGRAMS & SECURITY
** INITIAL SETUP **
TEMP/TIMER% RAMP
TUNNEL SETUP
FEED CLOCK SETUP
ON/OFF STAGES
LIGHT CLOCK SETUP
VARIABLE STAGES
STAGE PROPERTIES
NATURAL VENT
DIAGNOSTICS
EXPANSION STAGES
FEED LEVEL
Light Clock Setup
**LIGHT CLOCK SETUP**
Feed Cycle Light Override = No
Feed Cycle Light Intensity = 25%
Growout Schedules used by Ramp 1-4
SCHEDULE START DAY
1
1
2
17
3
19
4
22
5
25
1
1
2
17
3
19
4
22
5
25