Hired-Hand Mega-Cool: Float Valve Replacement User Manual
Float valve replacement, Directions, Mega-cool
HIRED-HAND, INC. • 1733 Co Rd 68 • Bremen, AL 35033 • Phone 256-287-1000 • Fax 256-287-2000
Sheet Part No. 4801-5306 Rev 7-01
Tools Required:
Screwdriver, Wire pliers, Drill & Bit
Directions
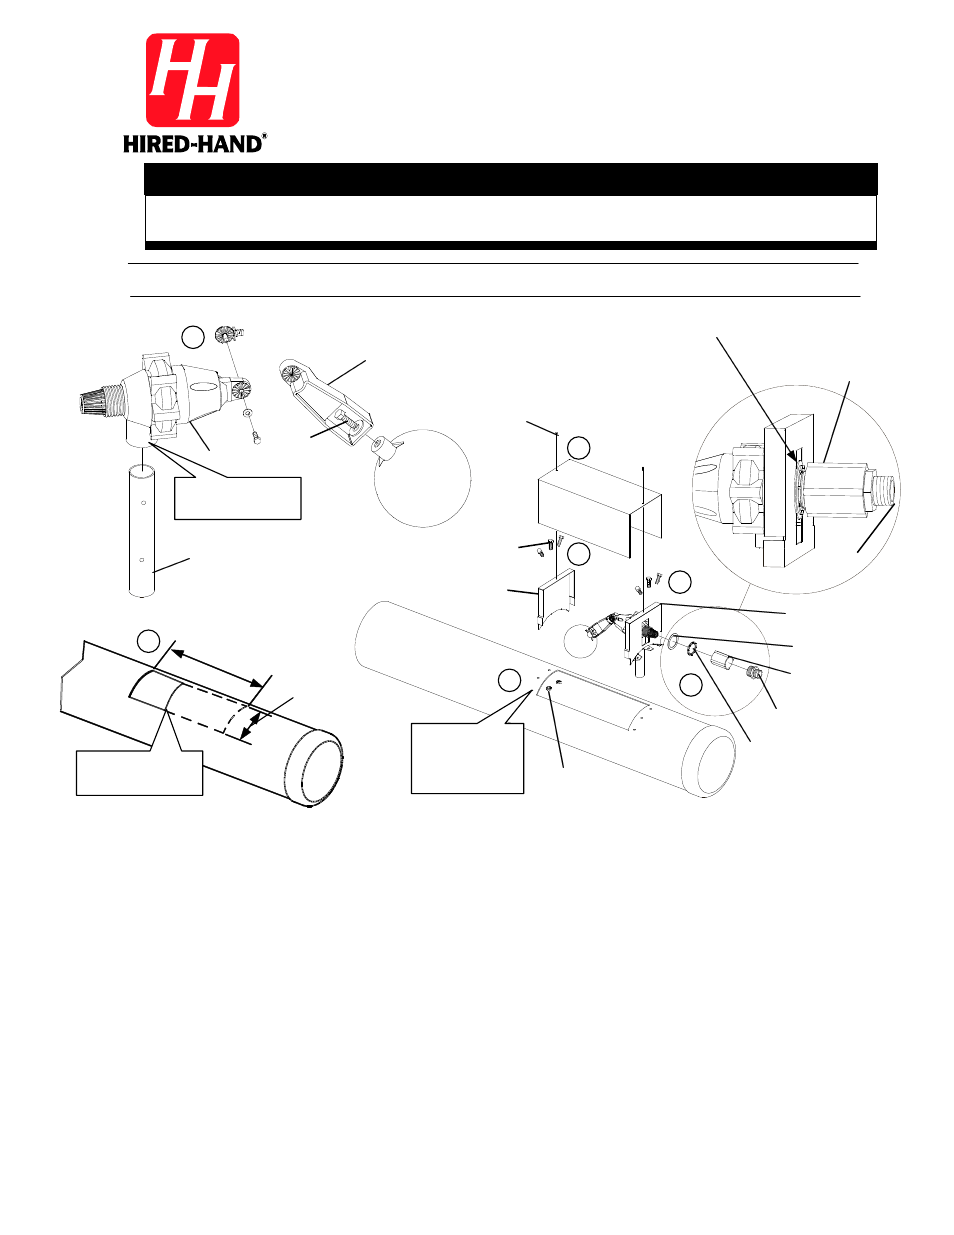
1. Disconnect electrical power to pump.
2. Adjust water level in reservoir to 1 in. (2.5 cm)
below pads.
3. Turn off water supply. Remove existing float
valve from system. Unscrew water supply hose.
4. Use cutting tool. Cut toward end of PVC pipe.
Enlarge length of cut-out (A) to EXACTLY 14 in.
(35.6 cm). DO NOT CUT BEYOND 14 in. (35.6
cm). Remove excess material from cut-out.
5. After enlarging length of cut-out, trim one side of
cut-out to give width of 4-1/2 in. (11.4 cm).
6. Assemble new cover and brackets with screws
provided. Place cover/bracket assembly over float
valve cut-out. Mark hole positions of brackets.
Drill 1/4" holes through PVC pipe at hole
positions (B).
7. Assemble new float valve (C). Set float valve
arm at 45
°
angle.
8. Attach brackets/cover assembly to screw holes
drilled in (B) with nuts & screws provided (D).
Slotted bracket should be nearer end of pipe.
Remove cover.
9. Insert threaded fitting of float valve through slot
in bracket (Detail AA). Attach ring nut to fitting
(F). Tighten nut.
10. Screw adapter onto threads of float valve inlet.
Do not tighten adapter all the way against bracket
(See Detail AA).
11. Screw water supply hose onto hose fitting.
12. Install cover onto brackets (E).
13. Installation complete.
Float Valve Replacement
Mega-Cool
Evaporative Cooling
Warning!
Warning!
Disconnect All Electrical Power Sources To Pump Before Installing Float Valve
Valve
(1009-0105)
Water ejection
tube
Friction fit tube
into opening.
Arm Assembly
(1009-0106)
14 in.
(35.6 cm)
A
Enlarge existing
float valve cut-out
4-1/2 in.
(11.4 cm)
B
Use brackets
as template.
Drill screw
holes into PVC.
Bolt
C
D
D
E
Detail AA
Ring Nut
(1001-5008)
Adapter
(1021-7004)
Hose fitting
(1021-6002)
F
IMPORTANT! Do Not Contact
Bracket When Screwing On
Adapter! Leave enough space
to tighten or loosen ring nut!
Washer
(0404-4975)
Nut
(1001-1445)
1/4" x 1/2" Screw
(1004-1401)
Cover
(0404-4972)
Float Bracket
(0404-4974)
#8 Screw
(04041130)
End Bracket
(0404-4973)
Adapter
(1021-7004)
Hose
Fitting
(1021-6002)