En g l is h english, Stop – Pfister GT34-4NSS User Manual
Page 3
E
N
G
L
IS
H
ENGLISH
10
7
8
9
Go To Step 13
Go To Step 13
STOP
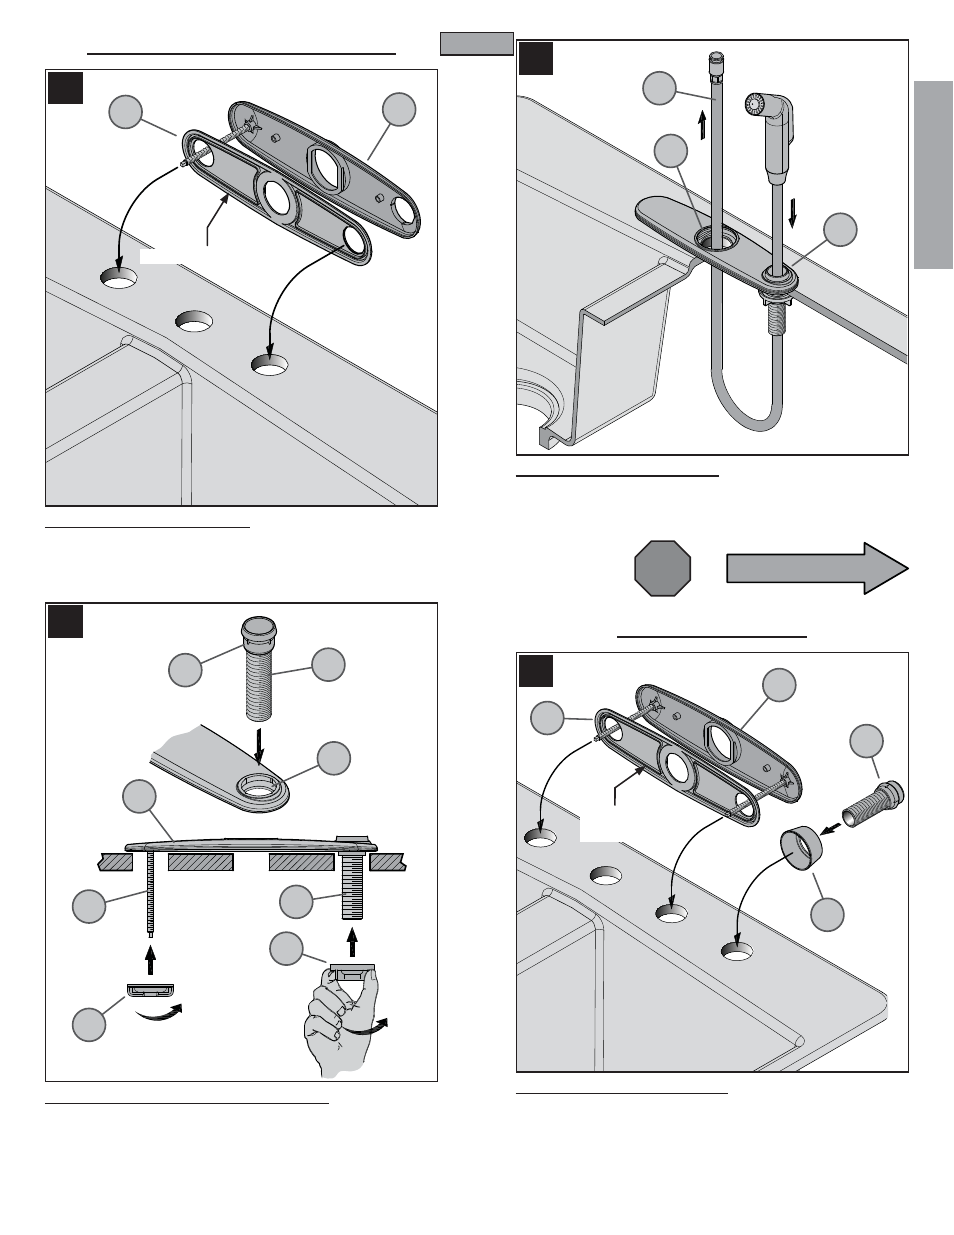
3 HOLE INSTALLATION WITH SIDE SPRAY
7 DECKPLATE INSTALLATION
Ensure that the Plastic Putty Plate (7A) is pressed on the Deckplate (7B). Place
a bead of plumber’s putty in the groove along the outer edge of the Putty Plate
(7A). Install the Deckplate (7B) over the three holes in your sink.
8 SECURING DECKPLATE & HOSE GUIDE
Insert Hose Guide (8A) into the side hole in the Deckplate (8B) and onto the
sink hole. Align the hose guide Tabs (8C) to those in the Deckplate Hole (8B).
From underneath sink, secure the Hose Guide (8A) by screwing the Plastic
Locknut (8D). Secure Deckplate (8E) by screwing Wing Nut (8F) to Mounting
Post (8G). Hand tighten. Caution: do not over-tighten. Remove any excess
putty from around the outside edge of Deckplate (8E).
9 SIDE SPRAY INSTALLATION
Insert the Side Spray Hose (9A) through the Hose Guide (9B). From underneath
sink, feed the Side Spray Hose (9A) back up through the center hole of sink
and through Deckplate (9C) so that it is above the sink.
4 HOLE INSTALLATION
10 DECKPLATE INSTALLATION
Ensure that the Plastic Putty Plate (10A) is pressed on the Deckplate (10B).
Place a bead of plumber’s putty in the groove along the outer edge of the Putty
Plate (10A). If desired, place a small bead of plumber’s putty to the underside
of the Hose Guide Flange (10C). Insert Hose Guide (10D) into Hose Guide
Flange (10C) and onto the sink hole. Install the Deckplate (10B) over the
holes in the sink.
3
ENGLISH
10B
10A
BOTTOM
GROOVE
10C
7A
7B
9A
9C
9B
8B
8A
8C
BOTTOM GROOVE
8A
8D
8E
8G
8F
10D