Harrington Hoists and Cranes ED-DA Hoist - (ED3) User Manual
Page 18
18
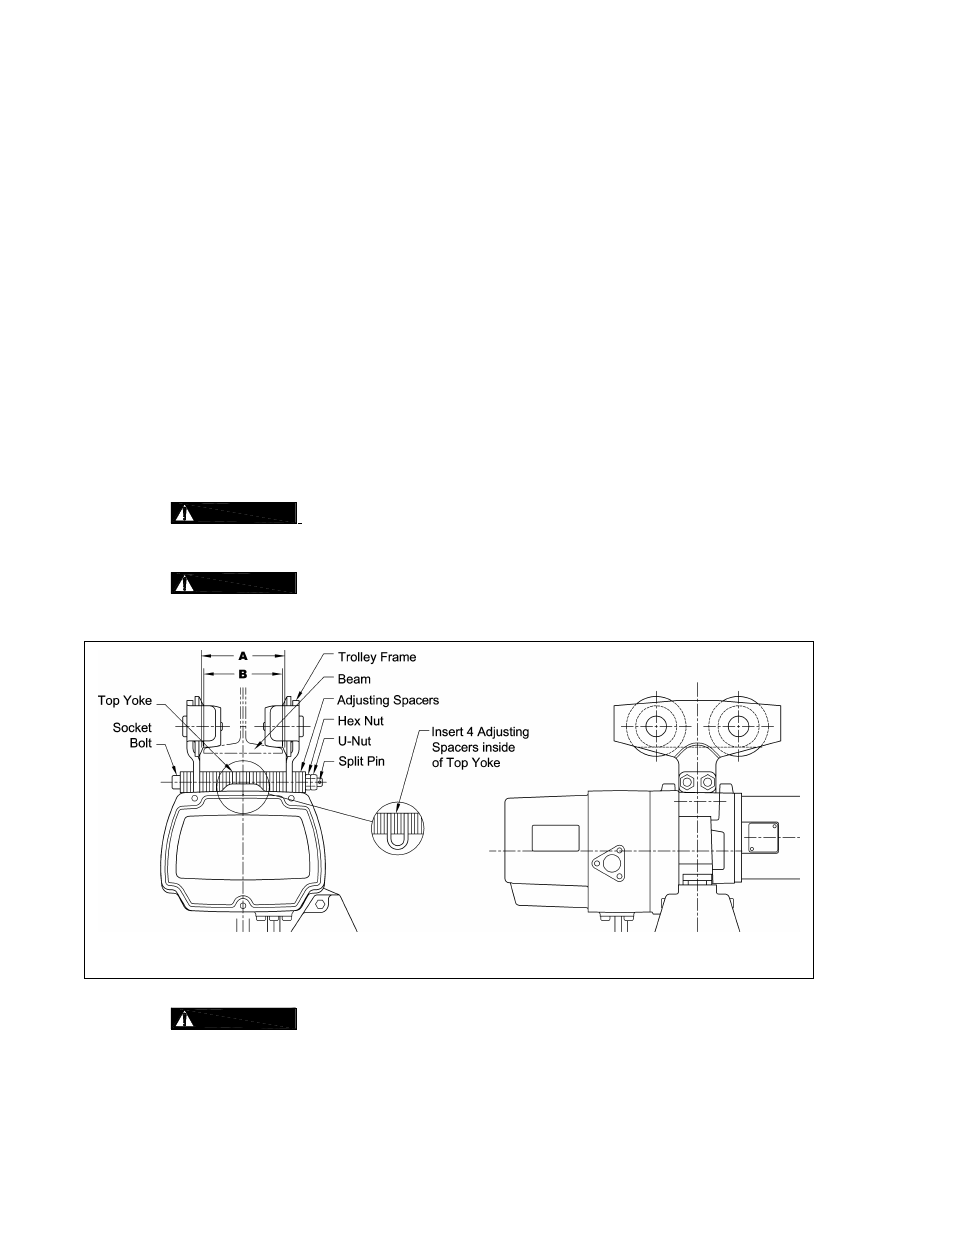
3) Refer to Figure 3-6 and assemble the Trolley Frames, Adjusting Spacers and Socket Bolts onto the
Top Yoke. Install and hand tighten the Hex Nuts on the Socket Bolts. Verify that dimension “A” is
approximately 0.12 - 0.16 in (3-4mm) greater than “B” (flange width). If "A" does not fall within the
specified range, move Adjusting Spacers from the inside of the Trolley Frame to the outside or from the
outside to the inside as necessary to obtain the proper "A" dimension, irrespective of the numbers in
Table 3-3.
4) Install the trolley and hoist onto traversing beam using one of the following 2 methods:
Preferred Method – Sliding adjusted the trolley connected with hoist onto the traversing beam
from the beam end is the most convenient and recommended method. If the trolley can be
mounted from the end of the beam then: Remove the trolley end-stop from the beam and set
the trolley on the beam from the end. Securely re-install the trolley end stop on the beam.
Optional Method – If the trolley cannot be mounted from the end of the beam, loosen the Hex
Nuts and spread the trolley Frames. Lift the trolley and hoist onto the beam from below. Push
the trolley frames together, adjust the spacing as in accordance with Step 3 and hand tighten
the hex Nuts.
5) Check for contact between all four Trolley Wheels and the rail surface. Shift the Trolley Frame until all
Trolley Wheels rest on the rail surface. Tighten the Hex Nuts and install the two (2) U-Nuts onto the
Socket Bolts tighten against the Hex Nuts. Install the Split Pins onto the Socket Bolts and bend
securely.
6)
Incorrect number of Adjusting Spacers may cause the trolley to not move or to
drop. To avoid these hazards, always make sure to use all 32 spacers and confirm that A - B = 0.12 -
0.16 in (3-4mm).
7)
To prevent the trolley from dropping, firmly fasten the Socket Bolt, Nut and U-Nut.
Insert Split Pin and bend the ends 90 degrees or more.
Figure 3-6 Mini Trolley Installation
3.8.2
For all trolley suspended electric chain hosts, rail stops must be installed at each
end of the rail. Failure to install rail stops will allow the hoist and trolley to fall off the end of the rail and
thus cause and accident that could resutt in injury and/ or property damage. The stops must be
positioned so as to not exert impact force on the electric chain hoist frame or trolley wheels. They must
contact the ends of the trolley side frames.