Mr. Gasket 95P Electric Fuel Pumps User Manual
Page 3
3
Mr. Gasket www.mr-gasket.com
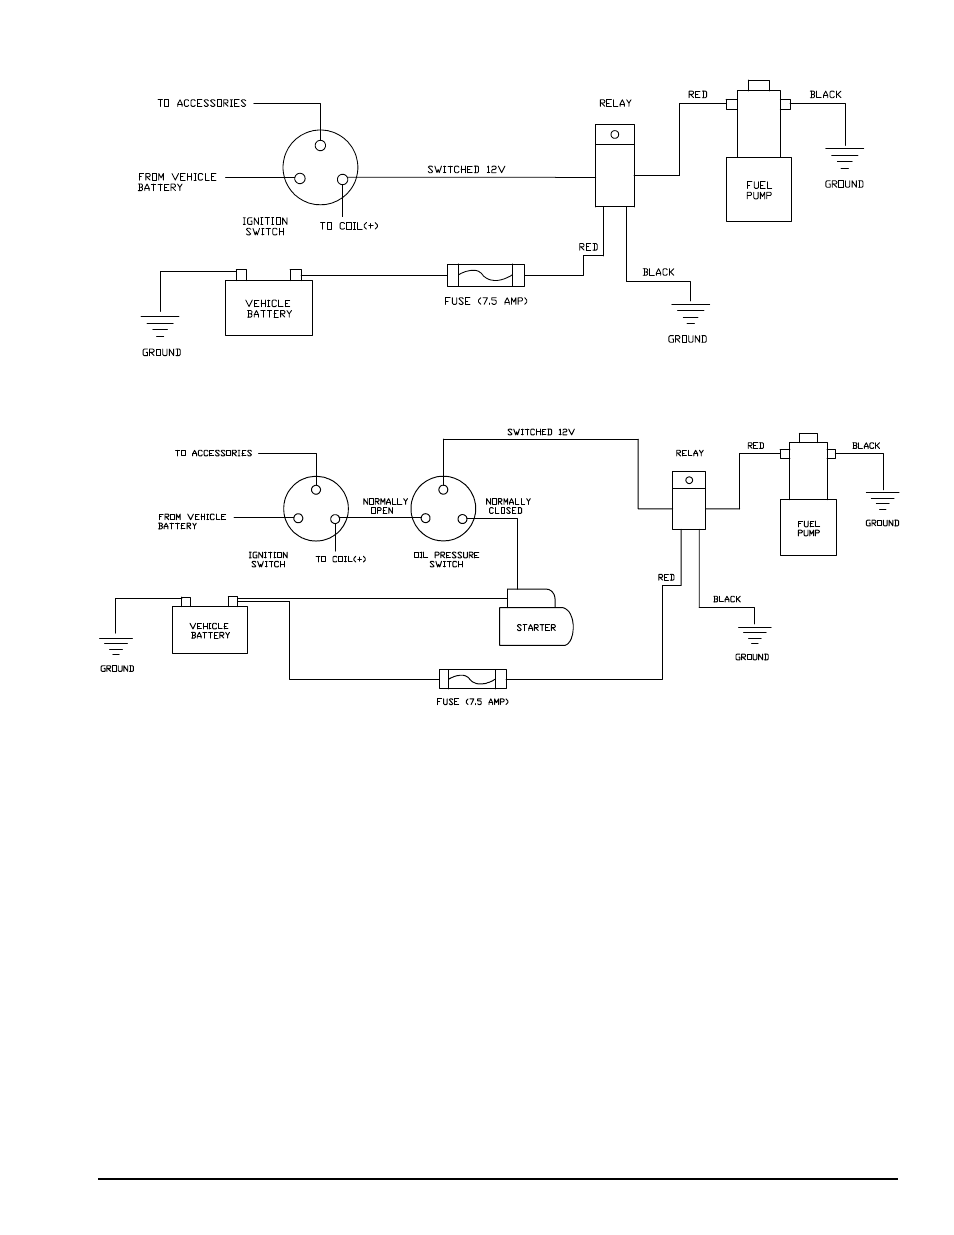
FIGUre 3 - reCOMMeNDeD
WIrING WItH reLaY
FIGUre 4 - PreFerreD
WIrING WItH reLaY aND OIL PressUre saFetY sWItCH
MaINteNaNCe – PUMP DIsasseMBLY
If your pump fails to produce acceptable pressure, it may need
cleaning. Follow the steps below to dissemble and clean your
Mr. Gasket Electric Fuel Pump. Refer to Figure 5 while performing
the following steps.
step 1
Remove the pump from the vehicle and clean pump exterior.
DO NOT immerse the unit in any liquid, as it could damage
the pump, resulting in malfunction. Place the pump on a clean
work surface.
step 2
Remove the 5 bolts from the bottom of the pump, then the end
plate and gasket. Next, remove the rotor stop plate.
IMPORTANT:
Take note of the direction of the rotor vane chamfer for proper reas-
sembly and pump performance. The chamfer should be on the trailing
edge, facing out.
step 3
Remove the flame arrestor screen and observe the exact loca-
tion of the screen. Remove the rotor vanes and rotor by turning
over the pump.
step 4
Unscrew the bypass screw and be careful as the bypass spring
behind it is biased outwardly. Once bypass spring is removed,
take out bypass plunger.
step 5
Clean the housing, rotor and vanes, plunger and bore with car-
buretor cleaner. Next, use compressed air to blow the housing
and components dry.
step 6
To reassemble your Mr. Gasket Electric Fuel Pump, first install
the rotor, and then the vanes in the correct direction (see Step
2). The vanes should slide easily into the rotor slots. Then place
the rotor stop plate over the rotor. Next, install the screen
ensuring that it is secured behind the screen stop. Install the
gasket and end plate making sure the gasket is positioned in
the housing recessed cavity. Next, install the plunger, making
sure it slides freely in the bore. Then install the spring and plug
with seal. Finally, install the 5 bolts into the bottom of the pump.
step 7
Install the fuel pump on your vehicle. Start the engine and verify
there are no leaks.
step 8
Verify there are no leaks after running engine.