Getting started, Caution, Montaje/instalación – Level Mount PT900 User Manual
Page 6
6
www.levelmount.com
1-888-229-1459
EU: +0044 844 567 2657
UK: 0844 567 2657
©2011 Level Mount - Patents Pending
1. Do not begin the installation of the TV Wall Mount until you have read and understood the instructions and warnings
contained in these Installation Instructions. Failure to read, thoroughly understand and follow the instructions can
result in serious personal injury and damage to equipment and property. It is the installer’s responsibility to make
sure all components are properly assembled and installed using the instructions provided.
2. If you have questions that do not appear to be covered in these Installation Instructions, please review the
frequently asked questions in the “Helpful Hints” section of the detail page for the TV Wall Mount or contact us
as described under the “Need Help” section above. If you are at all unsure about any step in these instructions
or your ability to install the TV Wall Mount safely and securely, you should seek professional help from a qualified
contractor.
3. If you are in China, you must have the TV Wall Mount installed by a professional installer.
4. This TV Wall Mount contains small items that could be a hazard if swallowed. Keep these items away from
children.
5. Under no circumstances may the TV Wall Mount be used outdoors. Use of this product outdoors could lead to
product failure and may result in serious personal injury or damage to equipment and property.
6. The TV Wall Mount must be attached to wood studs or to properly installed anchors in concrete. Do not install the
TV Wall Mount only to drywall or plasterboard. If mounting to wood studs, make sure that mounting screws are
anchored into the center of the studs. See Stud Finder Instructions, included below. Do not use the TV Wall Mount
for devices other than as specified in these instructions.
7. Make sure all screws and bolts are tightened before allowing the TV Wall Mount to bear the full weight of the TV.
Tighten screws and bolts firmly but do not over-tighten them. Once the screw is flush against the TV and the
screwdriver is more difficult to turn and will not turn further, stop; otherwise there is a risk of over-tightening the
bolt. Over-tightening the screws or bolts could damage the TV Wall Mount, greatly reducing its holding power.
Periodic tightening may be required.
8. Screws should easily and completely thread into the TV mounting holes. If any of the screws provided are not
suitable for the TV Wall Mount system, the installer must not under any circumstances drill holes into the TV or into
the TV Wall Mount components. Using screws of improper size can damage the TV.
9. Do not lift more weight than you can handle. Use at least two people when lifting and positioning the TV on the TV
Wall Mount.
10. Before installing, check to make sure all parts of the TV Wall Mount indicated in these Installation Instructions
are included and undamaged. Never use damaged parts or try to install the TV Wall Mount if you do not have all
needed parts.
11. It is the installer’s responsibility to select the appropriate installation location and the supporting surface on which
to mount this TV Wall Mount and to ensure that the TV Wall Mount is anchored properly to the wall. It is also the
installer’s responsibility to ensure that the TV is properly and securely attached to the TV Wall Mount using only the
enclosed fasteners and components and to verify that the screws and power cords do not touch wires, pipes, or
metal parts within the wall (since this could cause damage to these items or cause electrical shock).
12. Level Mount has made every effort to make these Installation Instructions accurate and complete. However,
Level Mount makes no claim that the information contained herein covers all details, conditions or variations, nor
does it provide for every possible contingency in connection with the installation, assembly or use of this product.
Level Mount makes no representation or warranty, express or implied, regarding the accuracy, completeness or
sufficiency of the information contained in this document. Level Mount is not responsible for any damage or injury
caused by incorrect mounting, assembly, installation or use.
Getting Started
These Flat Panel TV Wall Mounts are designed to hold Flat Panel TVs that fit the following
specifications (for Fixed and Tilt series only):
Using this product with a TV heavier than the maximum weight, or that exceeds these dimensions,
may result in serious personal injury and damage to equipment and property.
!
CAUTION!
• 10” - 30” (25cm - 76cm) with a maximum weight of 200lbs (90.7kg)
• 10’’ - 40” (25cm - 101cm) with a maximum weight of 200 lbs (90.7 kg)
• 32’’ - 55’’ (81cm - 140cm) with a maximum weight of 200 lbs (90.7 kg)
• 34” - 65” (86cm - 165cm) with a maximum weight of 200 lbs (90.7kg)
• 25cm - 76cm with a maximum weight of 20kg
• 25cm - 101cm with a maximum weight of 27kg
• 81cm - 140cm with a maximum weight of 36kg
• 86cm - 165cm with a maximum weight of 45kg
Ratings (for the US)
Ratings (for the EU)
39
www.levelmount.com
1-888-229-1459
EU: +0044 844 567 2657
UK: 0844 567 2657
©2011 Level Mount - Patents Pending
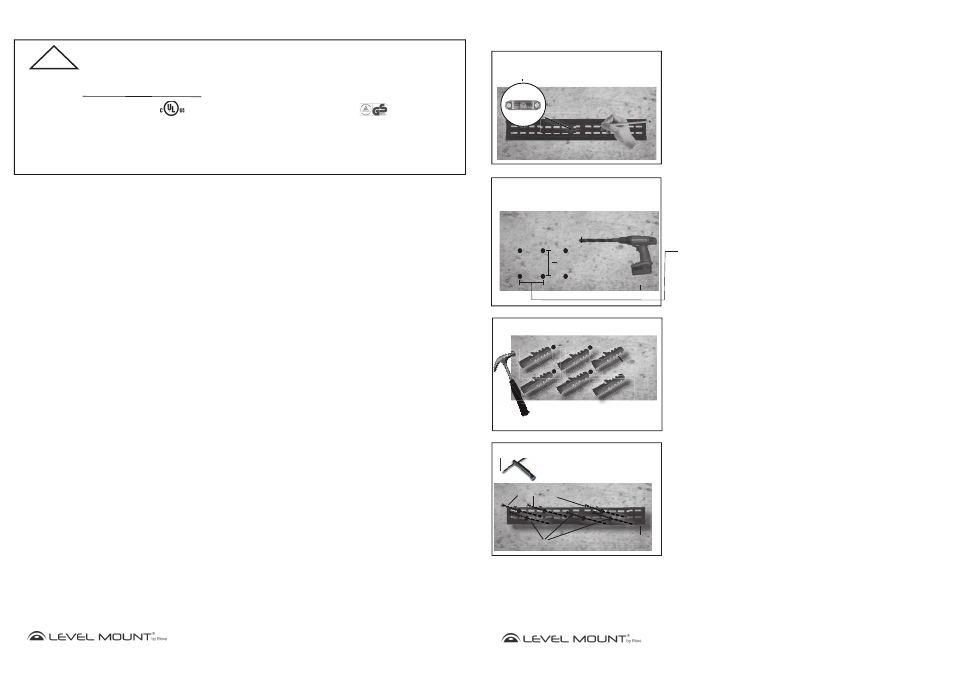
Montaje/Instalación
Imagen 13
Pared de hormigón
Pared de hormigón
Placa de soporte
Placa de soporte
Nivel de burbuja
incorporado/Nivel
Imagen 16
Placa de
Placa de
soporte
soporte
Llave hexagonal
Tornillo hexagonal y arandela
Tornillo hexagonal y arandela
Tornillo hexagonal y arandela
Tornillo hexagonal y arandela
Pared de
Pared de
hormigón
hormigón
Imagen 14
Pared de
Pared de
hormigón
hormigón
Taladro
Taladro
Broca para madera
Broca para madera
12 mm
12 mm
Mín. 3 cm entre la
Mín. 3 cm entre la
altura del agujero
altura del agujero
Opción B – Si las paredes son de hormigón
Para fijar la Placa de soporte al hormigón, colóquela a la altura deseada. Marque
los 6 agujeros con un lápiz cuando haya nivelado la Placa de Soporte usando el
Nivel de burbuja que viene incorporado o el nivel, tal y como muestra la Imagen
13.
Deje la Placa de soporte a un lado. Taladre 6 agujeros en el hormigón, en el lugar
marcado, tal y como muestran las Imágenes 14A. Para taladrar los agujeros de los
tacos para hormigón (Bolsa 6) en el hormigón, utilice un taladro eléctrico con una
broca de 12 mm para madera.
Cuidado:
No utilice un martillo neumático, pues rompería y debilitaría el
hormigón.
Inserte los tacos para hormigón (Bolsa 6) en los agujeros, tal y como muestra la
Imagen 15, e introdúzcalos con un martillo hasta que queden a ras de la pared de
hormigón, como muestra la Imagen 15.
Para fijar la Placa de soporte a la pared de hormigón, utilice la llave hexagonal
para atornillar los 6 tornillos hexagonales con arandelas (Bolsa 6) en cada uno de
los tacos de hormigón, tal y como muestra la Imagen 16. Atornille bien, hasta que
quede fijo, pero con cuidado de no pasarse de rosca, pues de lo contrario podría
dañar el soporte o los tornillos.
Cuidado:
Debido al peso del televisor de pantalla plana, es fundamental
que utilice los 6 tornillos para fijar la Placa a la pared.
Nota:
200F/PT200 como mínimo 4” (10 cm) entre los brazos.
400F/PT400 como mínimo 6” (15 cm) entre los brazos.
600F/PT600 como mínimo 12” (30 cm) entre los brazos.
900F/PT900 como mínimo 15.7” (40 cm) entre los brazos.
Para 200F/400F/600F/900F y PT200/PT400/PT600/PT900
Imagen 15
Martillo
Pared de
Pared de
hormigón
hormigón
Tacos para
Tacos para
hormigón
hormigón
ar