Cashco 3171 User Manual
Page 3
IOM-3171
3
VI. MAINTENANCE
SYSTEM UN DER PRES SURE. Prior to performing
any maintenance, isolate the reg u la tor from the
system and relieve all pres sure. Failure to do so
could result in personal injury.
WARNING
A. General:
1. Maintenance procedures hereinafter are
based upon removal of the regulator unit from
the pipe line where installed.
2. Owner should refer to owner's procedures for
removal, handling, cleaning and disposal of
non reuseable parts, i.e. gaskets, etc.
3. Refer to Figure 2 for the basic regulator, item
number reference ( ).
B. Diaphragm Replacement:
1. Secure the body (1) in a vise with the spring
chamber (2) oriented upwards. Ensure that
the body (1) is not held in the vise by the end
connection fl anges.
SECTION VI
WARNING
SPRING UNDER COMPRESSION. Prior to re-
mov ing spring chamber, relieve spring compres-
sion by back ing out the ad just ing screw. Failure
to do so may result in fl ying parts that could cause
personal injury.
2. Relax range spring (16) by turning adjusting
screw (5) CCW until removed from spring
cham ber (2).
3. Loosen spring chamber (2) by placing wrench
on “fl ats” and rotating CCW mak ing sure not
to use the fl ats on either side of the vent
hole.
4. Remove spring chamber (2), range spring
(16) and spring button (4).
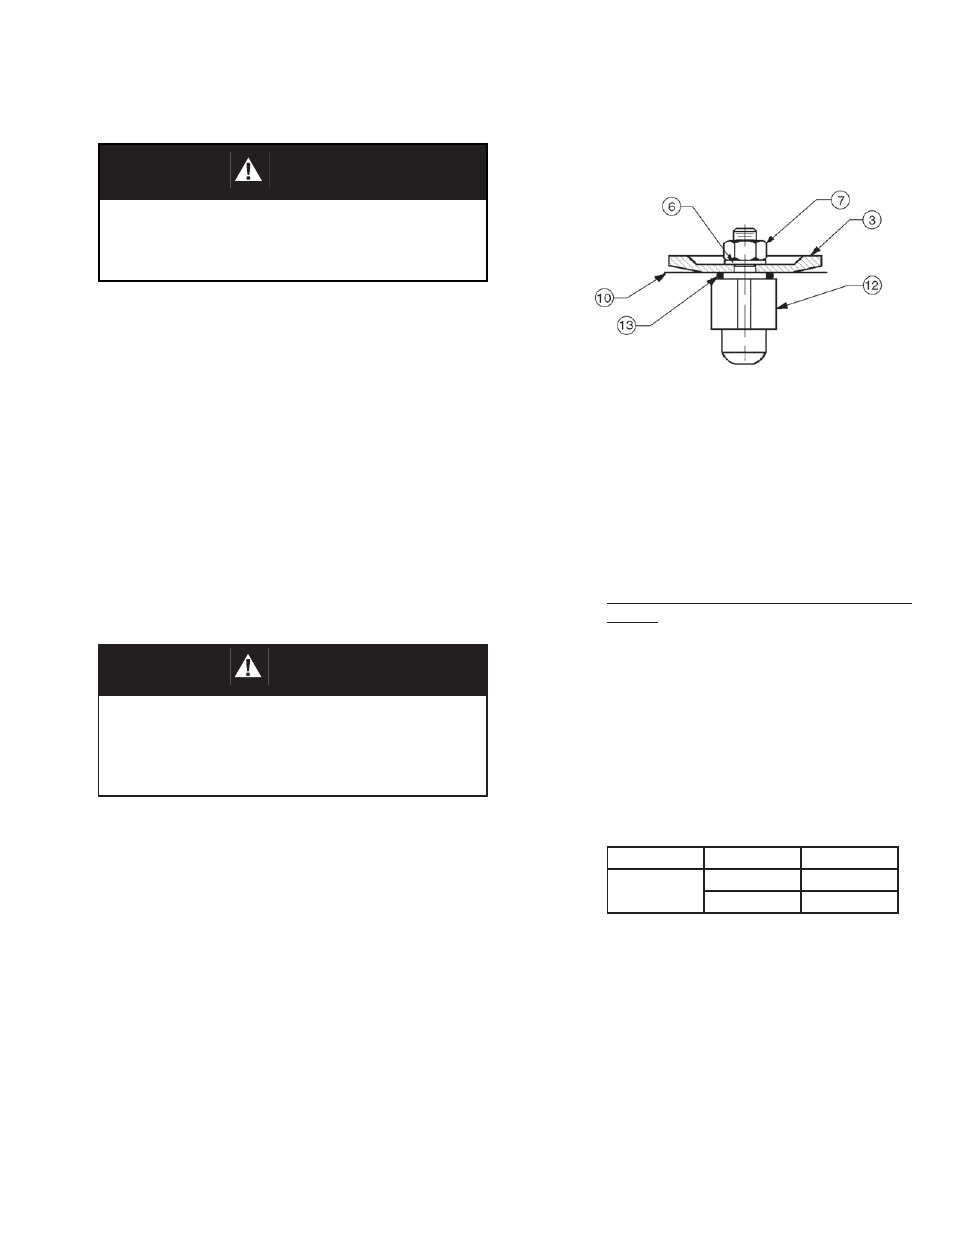
5. Remove the diaphragm subassembly con-
sist ing of the pressure plate nut (7), lock
wash er (6), pressure plate (3), di a phragm
(10), piston O-ring (13) and pis ton (12).
NOTE: Refer to the quan tity of dia phragms
(10) in cor po rated per the bill of ma te ri als
list ing. De pend ing on inlet pressure level,
mul ti ple metal diaph ragms may be “stacked”.
6. Loosen pressure plate nut (7) and separate
all parts (3, 6, 7, 10, 12 &13) of the diaphragm
sub as sem bly.
FIGURE 1: Diaphragm Subassembly
7. Inspect pressure plate (3) to ensure no
de for ma tion due to over-pressurization. If
de formed, replace.
8. Remove diaphragm gasket (11). (If a com-
position di a phragm is used there is no di a-
phragm gasket.
9. Clean body (1) and diaphragm fl ange in ac-
cor dance with owner's cleaning procedures.
Do not scratch di a phragm O-ring seating
surface NOTE: Maintenance must in clude a
level of clean li ness equal to Cash co clean ing
stan dard #S-1576. Con tact fac to ry for details.
10. Reassemble diaphragm subassembly by
plac ing pis ton O-ring (13), diaphragm(s)
(10), pres sure plate (3) and lock washer (6)
over thread ed post of piston(12). Ensure the
pres sure plate (3) is placed with curved outer
rim down next to the diaphragm (10) surface.
Tighten the pressure plate nut (7) to the fol-
low ing torques:
Sizes
Diaphragm
Torque
ALL
Metal
60 in #
Composition
15 in #
11. For metal diaphragm(s) (10), place dia-
phragm gas ket (11) into body re cess (none
re quired for com po si tion di a phragm). Set
di a phragm sub as sem bly into the body.
12. Place the range spring (16) over the pressure
plate nut (7) of the diaphragm subassembly.
13. Place multi-pupose, high temperature grease
into de pres sion of spring button (4) where
ad just ing screw bears. Set spring but ton (4)
onto range spring (16); ensure spring button
is laying fl at on top of spring.