Burkert Type BBS-4S User Manual
Page 3
5
6. INSTALLATION
WARNING!
Danger – high pressure and discharge of medium.
Leak and danger of bursting due to damaged components.
• Do not bend or kink hose in excess of its natural bending radius.
Kinked, crushed or damaged hoses as well as damaged hose nip-
ples or nuts must not be used and must be replaced.
Risk of injury from improper installation.
• Installation must only be carried out by authorized technicians and
with the appropriate tools!
6.1. Cutting the hose
WARNING!
Risk of fire due to flying sparks.
Depending on the reinforcement of the hose, flying sparks may
occur. when cutting the silicone hose.
• No flammable materials are permitted in the working area.
• Observe safety standards.
• Before beginning work, make sure that sufficient extinguishing
agents are available.
Hoses without connections can be cut off with a hose cutter, a
suitable saw or a cutting-off wheel. Depending on the reinforcement of
the hose, flying sparks may occur.
→
Observe safety standards and clean the hose from dirt after
cutting.
english
6
6.2. Installation of the connections sterile
standard with hose nut (with and
without union nut)
WARNING!
Danger of bursting caused by damaged or incorrectly installed
hoses.
The hose must not be peeled.
• Be careful not to damage the hose when faceting.
The hose must not be kinked (breakage of vulcanization).
• Do not use kinked or leaking hoses.
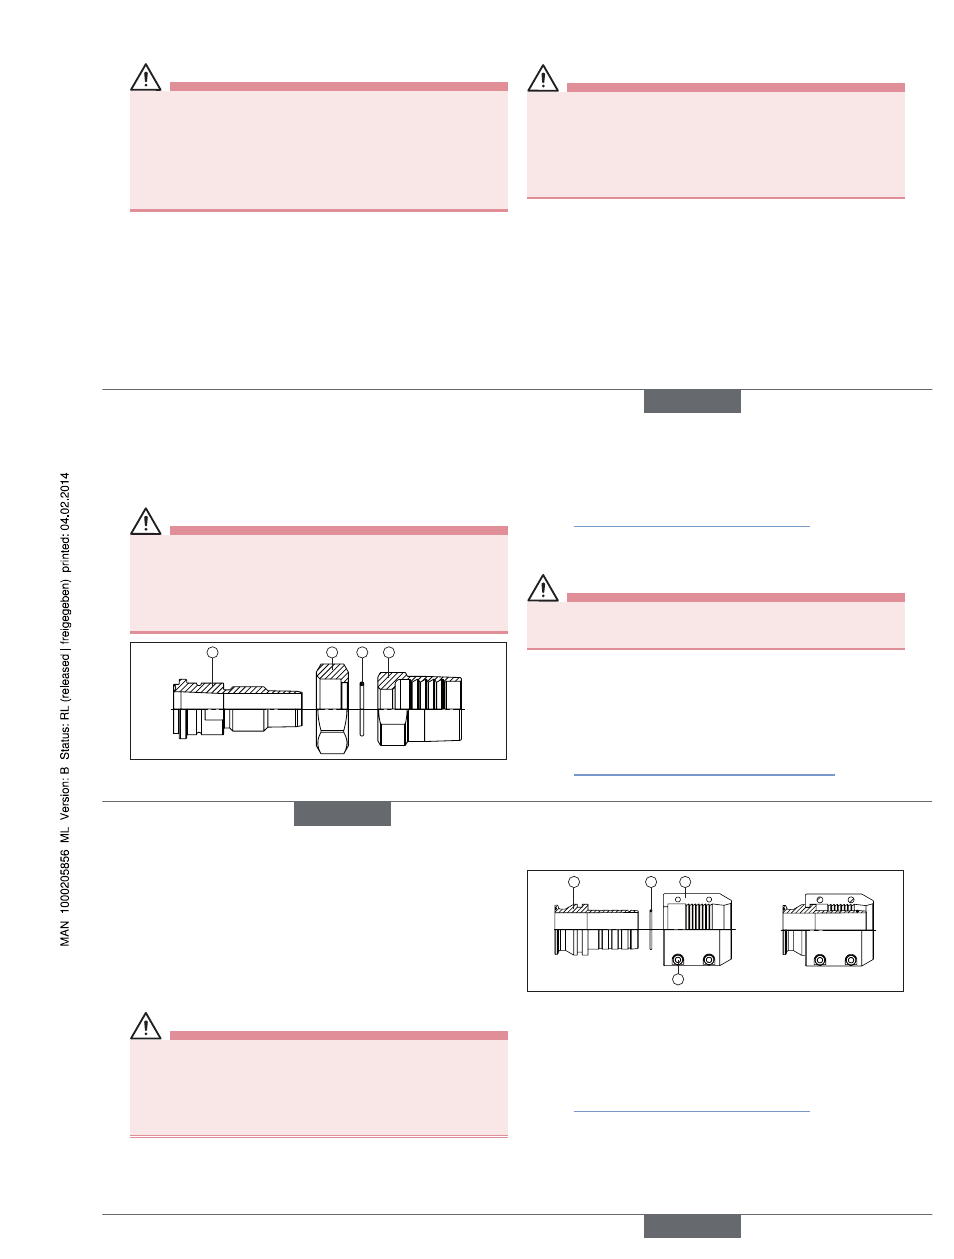
1
2
3
4
Fig. 2:
Installation of the connections sterile standard with hose nut
→
Facet the inside at the end of the neatly cut hose, using a sharp
knife (faceting:
1
/
3
hose thickness, 45°).
→
Prior to the installation, it is recommended to lubricate the contact
points on the hose nipples and the hose well with glycerin
(see "Recommended auxiliary materials", page 12). Caution:
Only use glycerin if it is safe for the application.
→
Insert the faceted hose all the way into the hose nut (4). For this
purpose, if may be necessary to use a device and/or press.
CAUTION:
Risk of injury from improper installation.
• Installation and construction of the device may be carried out by
trained personnel only and in consideration of the safety standards.
→
Use a ball-point pen to mark the point where the hose protrudes
from the hose nut. This marking is important to measure how far
the hose extends by the clamping.
→
Slide the union nut (2) over the hose nipple (1) and secure with the
retaining ring (3) (this step is only required for couplings with union
nut).
→
Wet the thread of the hose nipple with mounting paste
(see "10. Recommended auxiliary materials", page 12) and
screw into the hose nut.
english
7
→
Check marking on hose. It should be located approx. 5 mm away
from the beginning of the hose nut. In case this guide value is
exceeded considerably, there is a risk that the hose no longer sits
far enough in the connection.
In this case, removal and a new installation have to be carried out.
6.3. Installation of the connections sterile
standard with half nuts
WARNING!
Danger of bursting caused by damaged or incorrectly installed
hoses.
The hose must not be peeled.
• Be careful not to damage the hose when faceting.
The hose must not be kinked (breakage of vulcanization).
• Do not use kinked or leaking hoses.
1
3
2
4
Fig. 3:
Installation of the connections sterile standard with half nuts
→
Facet the inside at the end of the neatly cut hose, using a sharp
knife (faceting:
1
/
3
hose thickness, 45°).
→
Carefully push O-ring (3) over the hose nipple (1) into the O-ring
groove.
→
Prior to the installation, it is recommended to lubricate the
contact points on the hose nipples and the hose well with glycerin
(see "Recommended auxiliary materials", page 12). Caution:
Only use glycerin if it is safe for the application.
→
Push the faceted hose all the way over the hose nipple. For this
purpose, if may be necessary to use a device and/or press.
english
Type BBS-04