Cla-Val 750-60 User Manual
Page 7
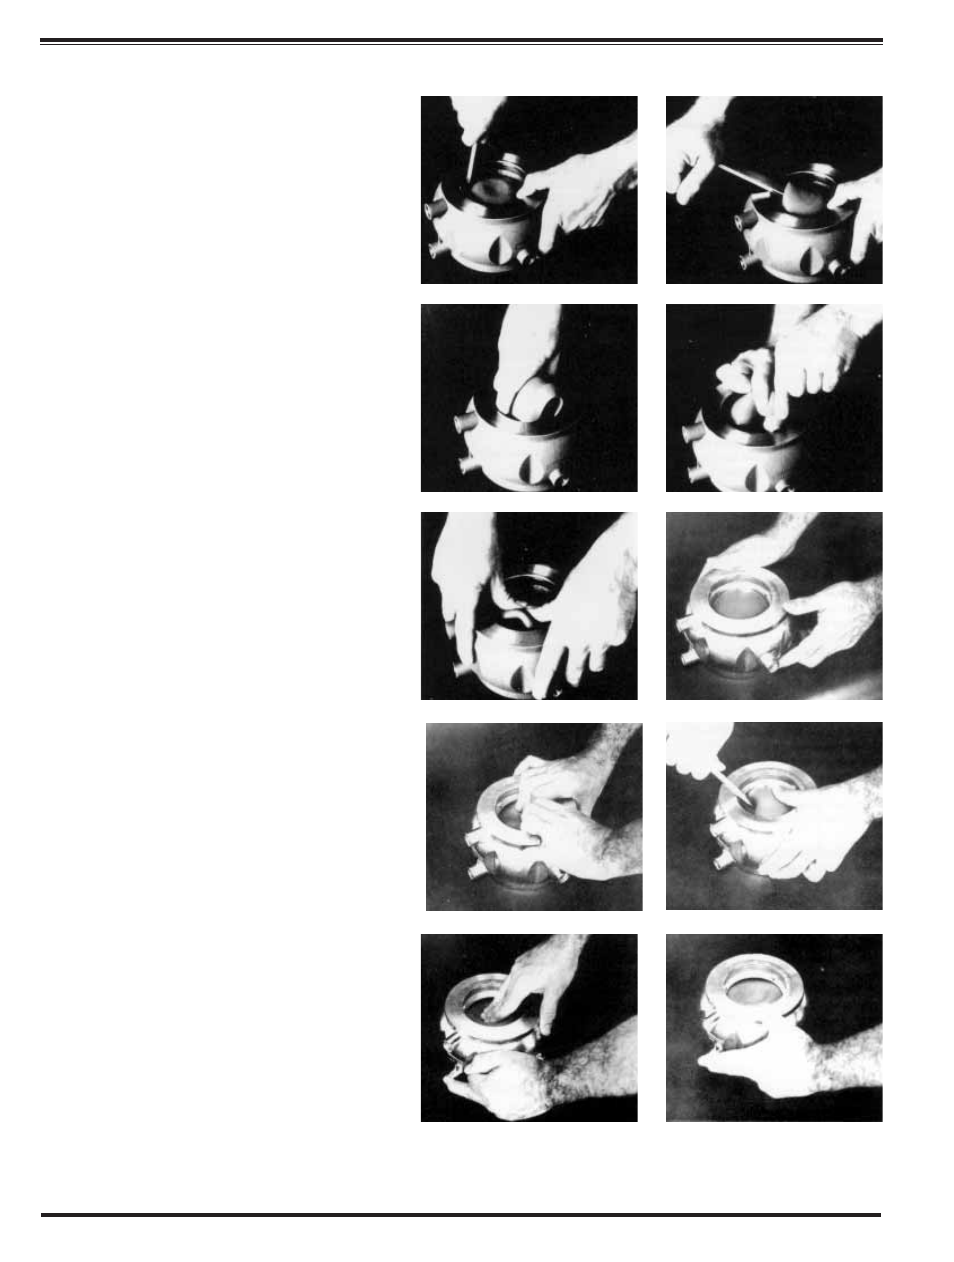
Liner Retainer Removal 2"-12" Sizes
The 2" and 3" liner retainer is secured to the valve with an Allen
screw. Loosen the Allen screw, pull the locking pin back towards
center of retainer, and remove the retainer from valve.
To install, insert the retainer, (do not block inlet feed hole), push
locking pin into position and tighten Allen screw.
The 4"-12" liner retainers are secured with a snap ring. Remove
the snap ring and retainer.
To install, insert retainer and install snap ring into the groove of
valve. Be sure snap ring is completely inserted into groove.
Liner Removal 2"-12" Sizes
The tool used for removal should be free of sharp edges to pre-
vent damage to the liner, the valve body seat or control cham-
ber surfaces. A motorcycle tire iron or similar tool works well.
1. Insert the tool between the liner and the valve body as
deeply as possible.
2. Using the seat edge as a fulcrum, rock the end of the tool
away from the valve in a manner to pull the liner bead out of the
body. Grasp the liner and remove from the valve body.
Liner Installation 2", 3", 4" Sizes
Thoroughly clean out the interior of the valve body control cham-
ber cavity.
Liberally apply glycerine inside the control chamber cavity and
around the seal bead area of the liner.
DO NOT USE ANY HYDROCARBON OR SILICONE BASED
LUBRICANTS ON LINERS AS THESE COMPOUNDS CAN
SEVERELY ATTACK THE LINER MATERIAL.
3. Fold the liner as shown and install into the valve body con-
trol chamber as deeply as possible.
4. Continuing to force the liner into the control chamber cavity,
again fold the liner as shown to insert the liner seal bead section
under the valve body seat surface.
5. Work the folded section of the liner into place by pushing
against the folded area to slide the seal bead down the conical
face of the control chamber.
Liner Seating Instructions 2", 3", 4" Sizes
After installing the liner, it must be seated over the manifold ring
in the valve body. The objective of this seating procedure is to
place the inside lip of the liner over the outside lip of the mani-
fold ring.
6. 4" valve with liner installed.
7. Pinch, pull and knead the liner 360° around to seat the liner
on the manifold ring.
8. Using a dull tool or hammer handle, pry the outer part of the
liner towards the center to help "seat" the liner.
9. Now push the liner down into the valve, holding your hand
on the depressed liner, seal off the loading port with your finger.
10. Remove your hand from liner and continue holding your fin-
ger over the loading port. If liner is seated, it will be held in the
open position as long as your finger is over the loading port.
When you release your finger, the liner will popup. If not seated,
repeat with Step 7.
Install liner retainer into body.
1
3
5
7
9
2
4
6
8
10