4 inch elevations, Wall mount installation instructions – Gotham 4 Elevations Wall Mount User Manual
Page 2
4 inch Elevations
TM
Wall Mount Installation Instructions
T
R
A
H
C
G
N
I
T
O
O
H
S
E
L
B
U
O
R
T
n
i
m
e
l
b
o
r
p
e
h
t
e
t
a
c
o
l
,
n
o
it
i
d
n
o
c
d
o
o
g
n
i
m
e
e
s
y
e
h
t
fI
.
e
l
u
d
o
m
n
i-
e
m
a
r
f
r
o
p
m
a
l
e
h
t
o
t
e
g
a
m
a
d
e
l
b
i
s
i
v
y
n
a
r
o
f
k
c
e
h
C
.
s
n
o
it
c
a
e
v
it
c
e
r
r
o
c
d
n
a
s
e
s
u
a
c
e
l
b
i
s
s
o
p
f
o
t
s
il
g
n
i
w
o
ll
o
f
e
h
t
m
o
t
p
m
y
S
e
s
u
a
C
e
l
b
i
s
s
o
P
n
o
it
c
A
e
v
it
c
e
r
r
o
C
O
T
S
L
I
A
F
P
M
A
L
T
H
G
I
L
d
e
z
i
g
r
e
n
e
t
o
n
e
r
u
t
x
if
e
h
t
g
n
i
d
e
e
f
ti
u
c
r
i
C
·
n
o
it
c
e
n
n
o
c
e
l
u
d
o
m
r
o
ti
u
c
r
i
c
n
i
r
o
r
r
e
g
n
i
r
i
W
·
p
m
a
l
y
tl
u
a
F
·
t
u
p
t
u
o
t
s
a
ll
a
b
r
o
e
n
i
L
·
t
s
a
ll
a
b
y
tl
u
a
F
·
w
o
l
o
o
t
e
r
u
t
a
r
e
p
m
e
t
t
n
e
i
b
m
A
·
.
d
e
z
i
g
r
e
n
e
s
i
ti
u
c
r
i
c
t
a
h
t
e
r
u
s
n
e
o
t
e
s
u
f
r
o
r
e
k
a
e
r
b
ti
u
c
r
i
c
k
c
e
h
C
·
e
r
a
s
n
o
it
c
e
n
n
o
c
t
a
h
t
e
r
u
s
n
e
o
t
x
o
b
e
c
il
p
s
e
r
u
t
x
if
e
n
i
m
a
x
E
·
.t
c
e
r
r
o
c
y
l
b
a
r
e
f
e
r
p
,
p
m
a
l
r
e
h
t
o
n
a
e
t
u
ti
t
s
b
u
s
d
n
a
p
m
a
l
y
tl
u
a
f
e
h
t
e
v
o
m
e
R
·
l
a
n
i
g
i
r
o
e
h
t
e
c
a
l
p
e
r
,
s
t
h
g
il
p
m
a
l
e
h
t
fI
.t
h
g
il
o
t
n
w
o
n
k
s
i
t
a
h
t
e
n
o
.
e
n
o
w
e
n
a
h
ti
w
.
e
g
a
tl
o
v
ti
u
c
r
i
c
n
e
p
o
k
c
e
h
C
.
e
r
u
t
x
if
t
a
e
g
a
tl
o
v
e
n
il
k
c
e
h
C
·
.
y
ti
u
n
it
n
o
c
ti
u
c
r
i
c
k
c
e
h
C
·
.
s
n
o
it
i
d
n
o
c
l
a
t
n
e
m
n
o
r
i
v
n
e
g
n
it
s
i
x
e
t
s
n
i
a
g
a
g
n
it
a
r
t
s
a
ll
a
b
k
c
e
h
C
·
T
U
O
S
E
O
G
P
M
A
L
G
N
I
T
H
G
I
L
R
E
T
F
A
p
m
a
l
y
tl
u
a
F
·
n
a
h
t
r
e
h
t
a
r
m
o
t
p
m
y
s
s
i
h
t
ti
b
i
h
x
e
ll
i
w
p
m
a
l
a
y
ll
a
n
o
i
s
a
c
c
O
·
.
p
m
a
l
w
e
n
a
e
t
u
ti
t
s
b
u
S
.t
h
g
il
o
t
g
n
il
i
a
f
y
l
p
m
i
s
N
O
S
E
L
C
Y
C
P
M
A
L
F
F
O
D
N
A
e
r
u
t
x
if
o
t
e
s
o
l
c
o
o
t
s
i
n
o
it
a
l
u
s
n
I·
h
g
i
h
o
o
t
e
g
a
t
t
a
w
p
m
a
L
·
w
o
l
e
g
a
tl
o
v
t
u
p
t
u
o
t
s
a
ll
a
B
·
)
"
3
t
s
a
e
l
t
a
(
e
l
u
d
o
m
d
n
u
o
r
a
m
o
r
f
n
o
it
a
l
u
s
n
i
e
v
o
m
e
R
·
.
g
n
i
s
u
o
h
n
i
d
e
if
i
c
e
p
s
e
g
a
t
t
a
w
p
m
a
l
ll
a
t
s
n
I·
.
e
g
a
tl
o
v
ti
u
c
r
i
c
n
e
p
o
k
c
e
h
C
.
e
r
u
t
x
if
e
h
t
t
a
e
g
a
tl
o
v
e
n
il
k
c
e
h
C
·
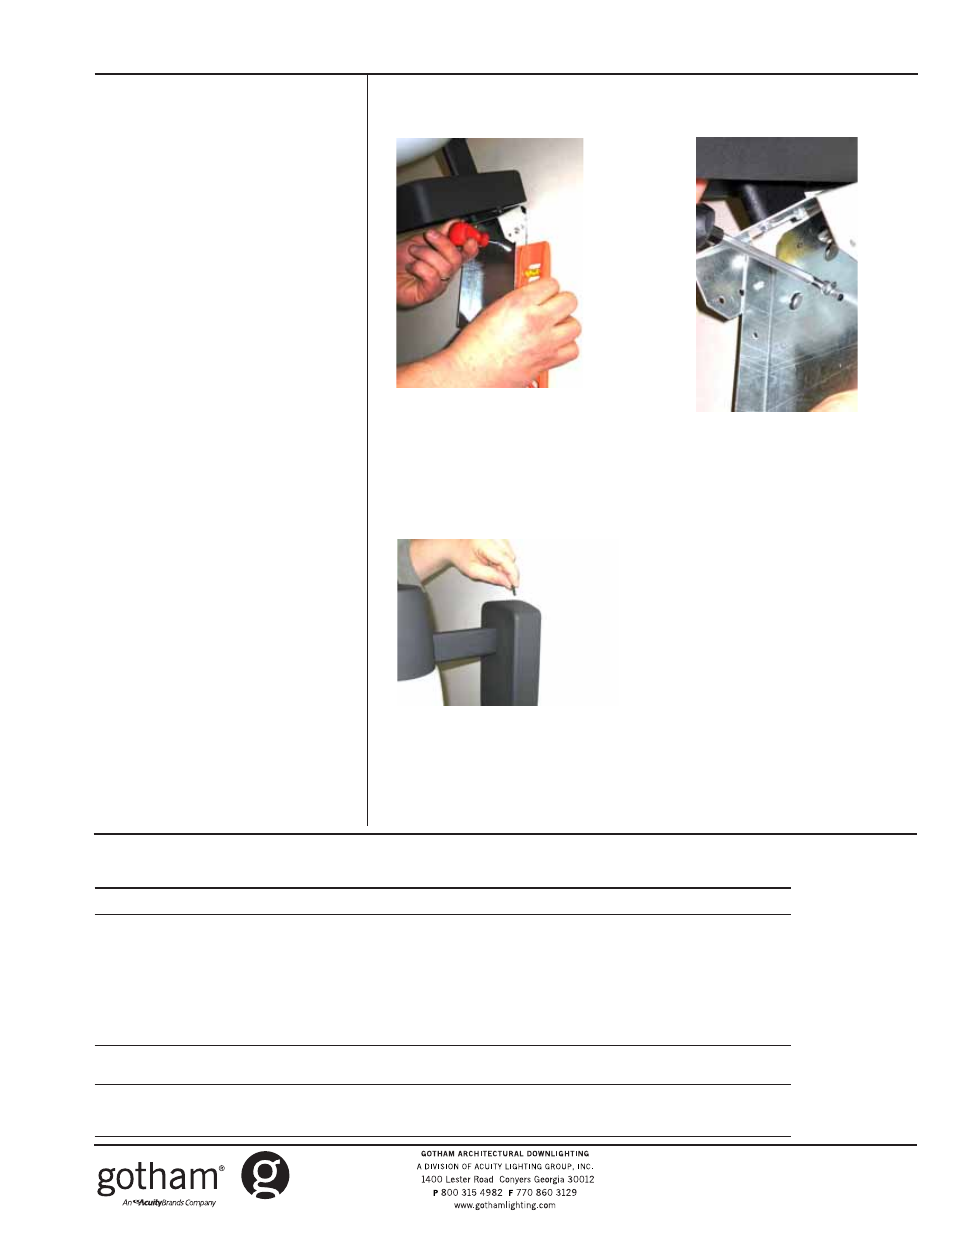
2. Hang fixture onto J-box using the
rear bracket keyhole slot and J-box
thumbscrew. Tighten thumb-screw
with fingers to secure fixture onto
wall. FIGURE 4.
3. From hardware bag, loosely install
#8 screw through inner bracket
slot into J-box bracket. Use level
to plumb fixture and once adjusted
vertically, tighten screw with tool to
lock position. SEE FIGURES 5A &
5B. - If desired, additional drywall
screws can be installed through the
lower inner bracket holes and into
mounting wall (not provided).
4. With fixture adjusted and secured,
connect the ballast, source and
socket leads as required, using
wire-nuts provided in hardware kit.
5. Once connections are complete,
bundle connections above the
ballast and/or underneath the pivot
arm bracket.
6. Remove the side screws from the
secondary locking holes to drop
arm and reinstall into the primary
screw holes to lock arm in closed
position.
7. Slide canopy back over inner
bracket assembly and reinstall
upper and lower canopy screws.
INSTALLATION COMPLETE. FIGURE 6.
Figure 5A
Part No. CJ520700
©2006 Gotham
7/06
4" Elevations
TM
Page 2 of 2
Figure 5B
Figure 6