Driverack, Getting started, 3 installation steps – dbx DriveRack PA+ User Manual
Page 10: 4 quick start, Signal path block diagram, Connections
2.3 Installation Steps
Make sure that the power outlet that your DriveRack® PA+ is to be plugged into is correct and
appropriate for the unit you purchased.
Using the mounting screws provided, screw the DriveRack PA+ into an appropriate rack.
Make sure that there is proper ventilation. The sides and back of the device should be free of
any obstruction that would prevent airflow.
Using the appropriate plug provided, plug the unit into an electrical outlet.
Fill out and send in the warranty card included or register online at www.dbxpro.com.
Please
keep your purchase receipt as final proof of purchase.
Connect the output of your console or other line level device to the inputs of the DriveRack
PA+ and the desired outputs of the DriveRack PA+ to the inputs of the selected amplifier.
Configure the DriveRack PA+ for your sound system using the dbx Wizard buttons and the
Quick Start below or with the use of the separate Quick Start Guide included in the box.
2.4 Quick Start
For those of you that wish to jump right in, the following information has been provided to
act as a quick start for optimizing performance of the DriveRack PA+.
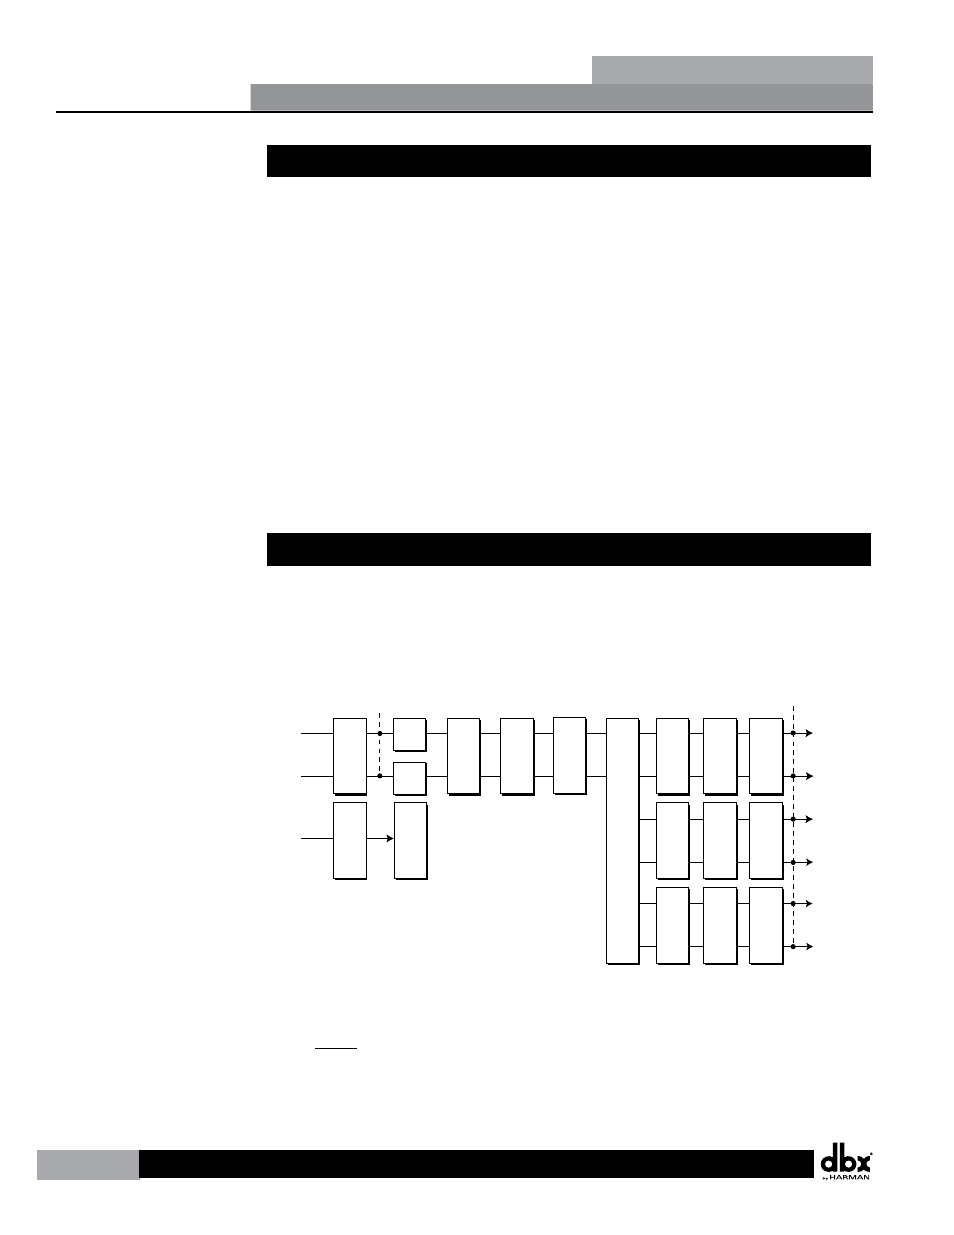
Signal Path Block Diagram
The following diagram shows the logical and intuitive signal path of the input, effects, and
output of the DriveRack PA+.
GEQ
GEQ
Meters
Left Input
Right Input
Left High
Right High
Left Mid
Right Mid
Left Low
Right Low
Mic Input
Outputs
Stereo Compressor
AFS Notch Filters
SubHar
monic Synth
3-Band PEQ
2-Band PEQ
2-Band PEQ
P
eak Stop Limiter
P
eak Stop Limiter
P
eak Stop Limiter
Alignment Dela
y
Alignment Dela
y
Alignment Dela
y
Crosso
v
er Section - (2X3, 4,5,6)
Stereo/Mono
Pink Noise
Micr Pre amp
R
T
A
Meters
Connections
When setting up the DriveRack PA+, make connections as follows:
Always
•
make connections prior to applying power to the unit.
Connect the output from the sending device (mixer) to either of the two XLR Input
•
connectors shown below. (Left to left and right to right is recommended)
Section 2
Getting Started
6
DriveRack
®
PA+