Diagram #2, Diagram #3, Diagram #4 – Derale Performance Direct Fit Jeep Wrangler Performance Electric Fan Kit User Manual
Page 2
ELECTRIC FAN ASSEMBLY INSTALLATION
With the four Mounting Brackets & Rubber Seal previously installed, take the
Electric Fan Assembly & carefully lower the unit into the engine compartment.
Note: Make sure the orientation of the Electric Fan Assembly directs the
fan wires toward the Passenger side of the vehicle.
1987-1996 JEEP WRANGLER YJ
4 & 6 Cylinder – Power Steering Reservoir mounts in factory location.
1.
Using the five factory mounting bolts, attach the Electric Fan
Assembly and Power Steering Reservoir to the radiator in the
factory hole locations. (See Diagram # 2)
2.
Using a 7/16” Socket and Ratchet, tighten bolts accordingly
making sure fan shroud is seated correctly in position.
1997-2006 JEEP WRANGLER TJ
6 Cylinder – Reference Diagram #3
1.
Identify the Radiator Overflow Reservoir Bracket.
2.
Take the Radiator Overflow Reservoir Bracket and four factory
shroud mounting bolts and attach the Electric Fan Assembly to
the radiator in the factory hole locations. The brackets have slots
and some adjustment may be necessary.
3.
Using a 7/16” Socket and Ratchet, tighten bolts accordingly
(Page 2)
Derale Performance, Los Angeles, CA
800.421.6288 www.derale.com
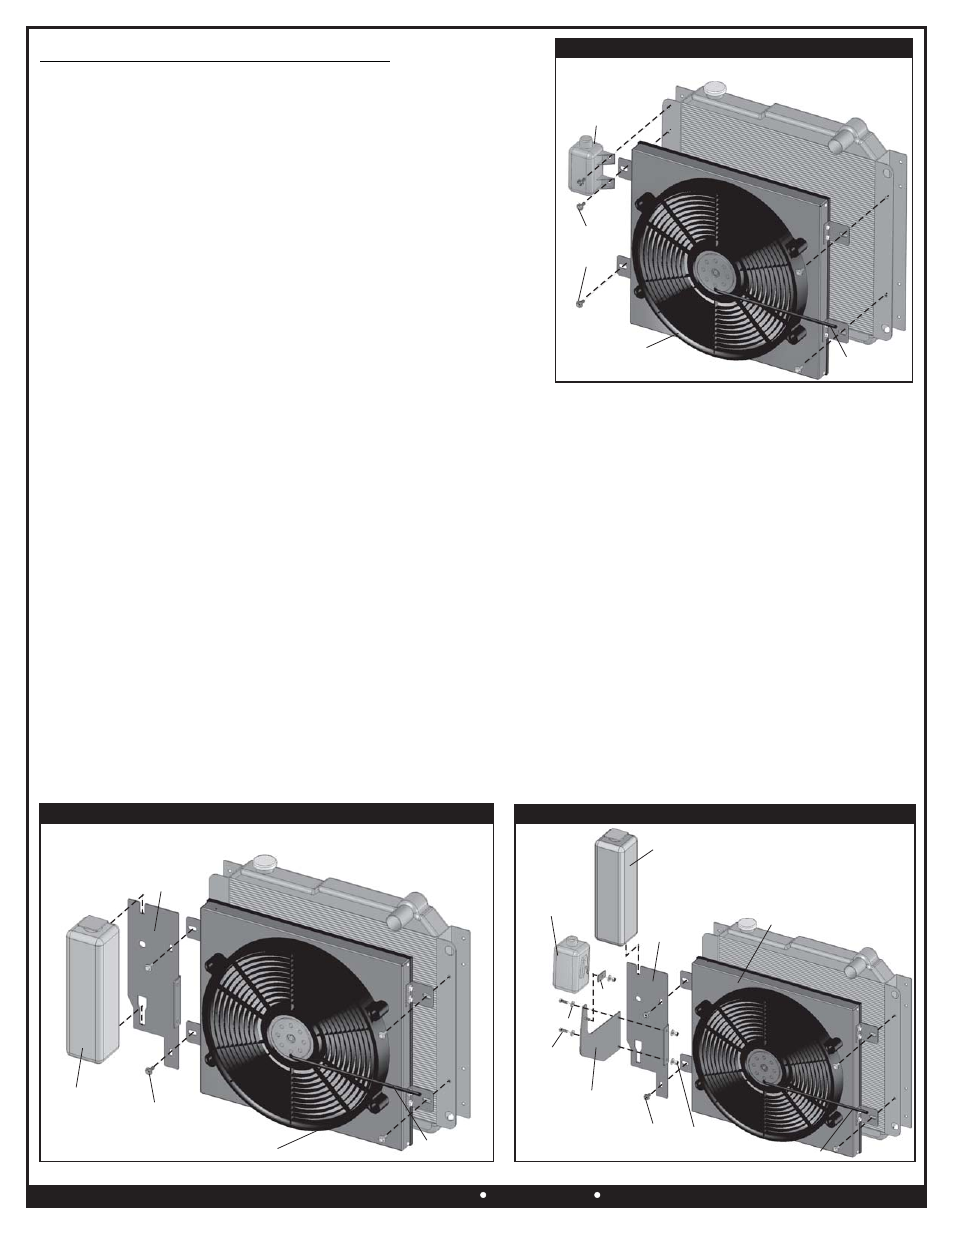
Diagram #2
1987-1996 YJ - 4 & 6 CYLINDER
Electric Fan
Assembly
Power Steering
Reservoir
Factory
Mounting
Bolts
making sure fan shroud is seated correctly in position.
4.
Reattach the Radiator Overflow Reservoir by carefully sliding it down in the slots until fully seated.
5.
Reconnect Overflow Hose to the radiator filler cap tube.
6.
Vehicles with automatic transmissions; Using the supplied 6” Zip Tie, attach the rubber transmission line routed across
the bottom of the Electric Fan Assembly to the provided two holes in the bottom of the shroud.
4 Cylinder – Reference Diagram #4
1.
Identify the Radiator Overflow Reservoir Bracket.
2.
Identify the Power Steering Reservoir Bracket Set, two 1/4-20 x 3/4” Hex Bolts, four 1/4” Flat Washers, & two 1/4-20 Lock Nuts.
3.
Using the 1/4-20 x 3/4” Hex Bolts, 1/4” Flat Washers, and 1/4-20 Lock Nuts, attach the Power Steering Reservoir
Bracket to the Radiator Overflow Bracket.
4.
Take the Radiator Overflow Reservoir Bracket (Assembly) and four factory shroud mounting bolts, attach the Electric
Fan Assembly to the radiator in the factory hole locations.
5.
Using a 7/16” Socket and Ratchet, tighten bolts accordingly making sure fan shroud is seated correctly in position.
6.
Reattach the Radiator Overflow Reservoir by carefully sliding it down in the slots until fully seated.
7.
Reconnect Overflow Hose to the radiator filler cap tube.
8.
Remove the rubber cap on the stud of the Power Steering Reservoir Bracket.
9.
Remove the Lock Nut, Washer and Clamp Bracket on the Power Steering Reservoir Bracket.
10. Take the Power Steering Reservoir and slide it onto the Power Steering Reservoir Bracket.
11. Using the Clamp Bracket, Lock Nut and Washer, previously removed, reinstall onto the stud and tighten pinching the
Power Steering Reservoir until plastic is slightly depressed.
12. Check to make sure power steering hoses are safely routed and not conflicting with any Hot or moving parts.
13. Vehicles with automatic transmissions; Using the supplied 6” Zip Tie, attach the rubber transmission line routed across
the bottom of the Electric Fan Assembly to the provided two holes in the bottom of the shroud.
1997-2006 TJ - 4 CYLINDER
Diagram #3
1997-2006 TJ - 6 CYLINDER
Diagram #4
Overflow
Reservoir
Bracket
Overflow
Reservoir
Factory
Mounting
Bolts
Electric Fan
Assembly
Factory
Mounting
Bolts
Overflow
Reservoir
Power
Steering
Reservoir
Overflow
Reservoir
Bracket
Power
Steering
Reservoir
Bracket
Clamp
Bracket
Clamp
Bracket
1/4-20
x 3/4”
Hex Bolts
1/4” Flat
Washers
1/4” Flat
Washers
1/4-20
Lock Nuts
1/4-20
Lock Nuts
Fan Wires
Fan Wires
Fan Wires