Bk n a – Peerless-AV PAG-UNV-HD - Installation User Manual
Page 6
6 of 27
ISSUED: 08-13-09 SHEET #: 056-9023-7 09-10-12
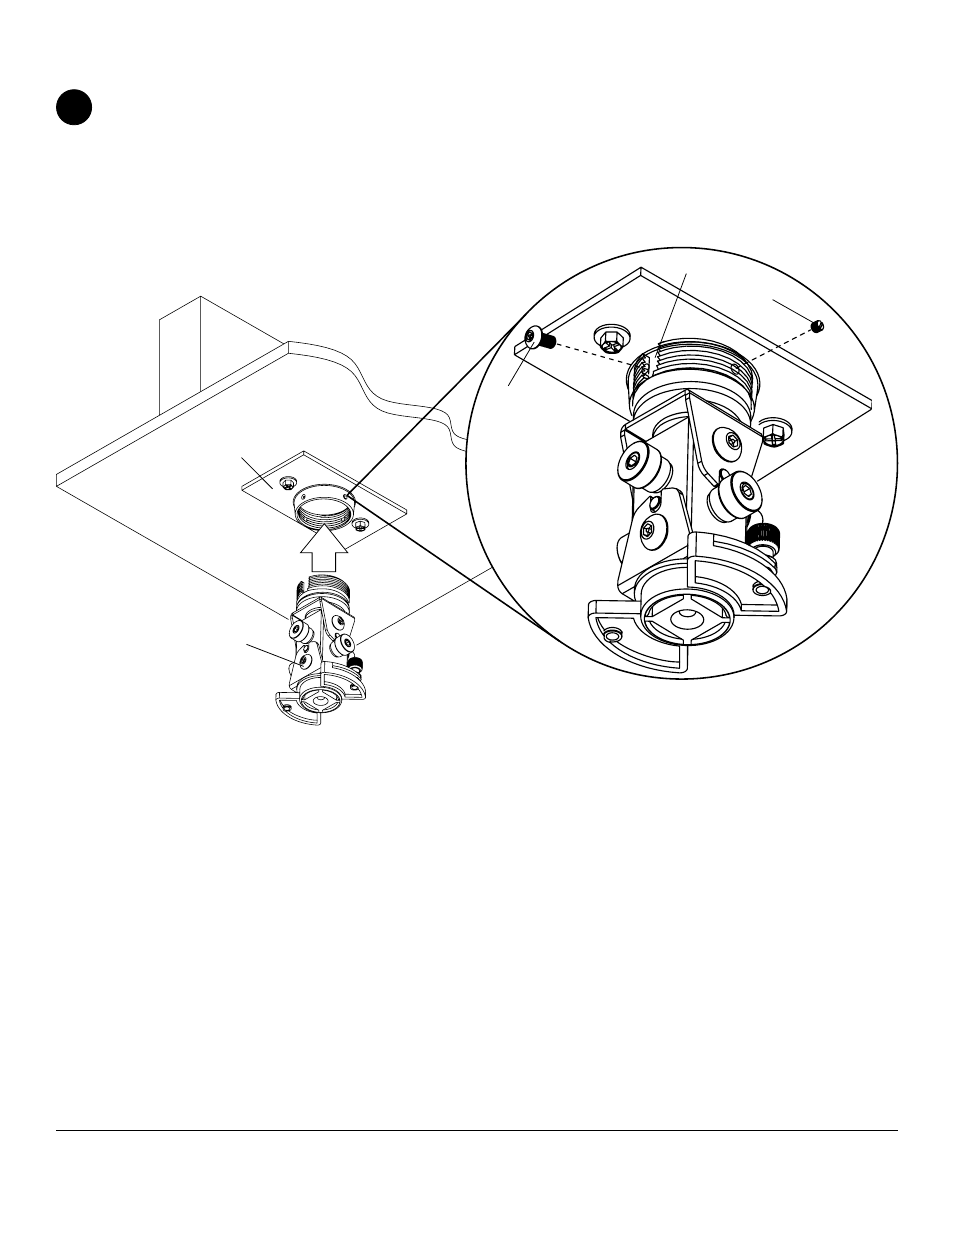
Hand thread projector mount assembly (
A) into ceiling plate (B) as shown in figure 2.1. Align the notch of projector
mount assembly with one of the four holes in ceiling plate (
B) and secure with an M5 x 10 mm socket pin screw (K)
using allen wrench (
O) as shown in detail 1.
NOTE: Slotted set screw (N) is used to jam against the threads of the projector mount assembly to prevent any
excess movement of the projector mount assembly (
A). Do not overtighten screw; overtightening screw will damage
threads making it difficult to separate projector mount assembly from ceiling plate.
Flush Mount Installation
2
fig. 2.1
DETAIL 1
B
K
N
A
NOTCH
See also other documents in the category Peerless-AV Projectors:
- PRGS-UNV - Installation (24 pages)
- PRGS-UNV-W - Sell Sheet (2 pages)
- PRS-UNV-S - Installation (12 pages)
- PRS45 - Sell Sheet (2 pages)
- PRG-EXC - Installation (14 pages)
- PSM-UNV-W - Installation (9 pages)
- PRG-JVC-DLA - Installation (13 pages)
- PRSS-455 - Sell Sheet (2 pages)
- PSTK-2955-W - Installation (9 pages)
- PSTK-600 - Installation (28 pages)
- PJF2-UNV-S - Sell Sheet (2 pages)
- PAG-UNV-MU - Sell Sheet (2 pages)
- PRS-EXC-W - Sell Sheet (2 pages)
- PRS-EXC-W - Installation (13 pages)
- PSTK-028-W - Sell Sheet (2 pages)
- PSTK-028-W - Installation (9 pages)
- PRG-UNV-S - Sell Sheet (2 pages)
- PRG-EXC-W - Installation (14 pages)
- PRG-UNV-S - Installation (51 pages)
- WL-AU-PST600A-W - Sell Sheet (2 pages)
- PRS-UNV - Installation (12 pages)
- PPC-W - Sell Sheet (2 pages)
- MOD-PRSSKIT300-B - Installation (24 pages)
- PAG-UNV - Sell Sheet (2 pages)
- MOD-PRGSKIT300-B - Sell Sheet (2 pages)
- PRG-EXC - Sell Sheet (2 pages)
- PSTK-600 - Sell Sheet (2 pages)
- PSTK-2955-W - Sell Sheet (2 pages)
- PSMU-PRS-S - Installation (11 pages)
- PSTA-028-W - Sell Sheet (2 pages)
- PSTA-600 - Sell Sheet (2 pages)
- PJF2-UNV-S - Installation (9 pages)
- WL-AU-PST600 - Sell Sheet (2 pages)
- PRSS-455 - Installation (28 pages)
- PAG-UNV-HD - Sell Sheet (2 pages)
- PRS-1S - Installation (13 pages)
- PRS45 - Installation (2 pages)
- PRS45 - Installation (13 pages)
- PPF-W - Sell Sheet (2 pages)
- PSTA-600 - Installation (28 pages)
- MOD-PRSSKIT300-B - Sell Sheet (2 pages)
- WL-PRG-UNV-200 - Sell Sheet (2 pages)
- PJF2-45 - Installation (7 pages)
- PRGS-455 - Installation (28 pages)