Remote cpu, Remote cpu front panel remote cpu rear panel – TC Electronic DB8 MKII User Manual
Page 13
13
HW & installation
remOTe Cpu
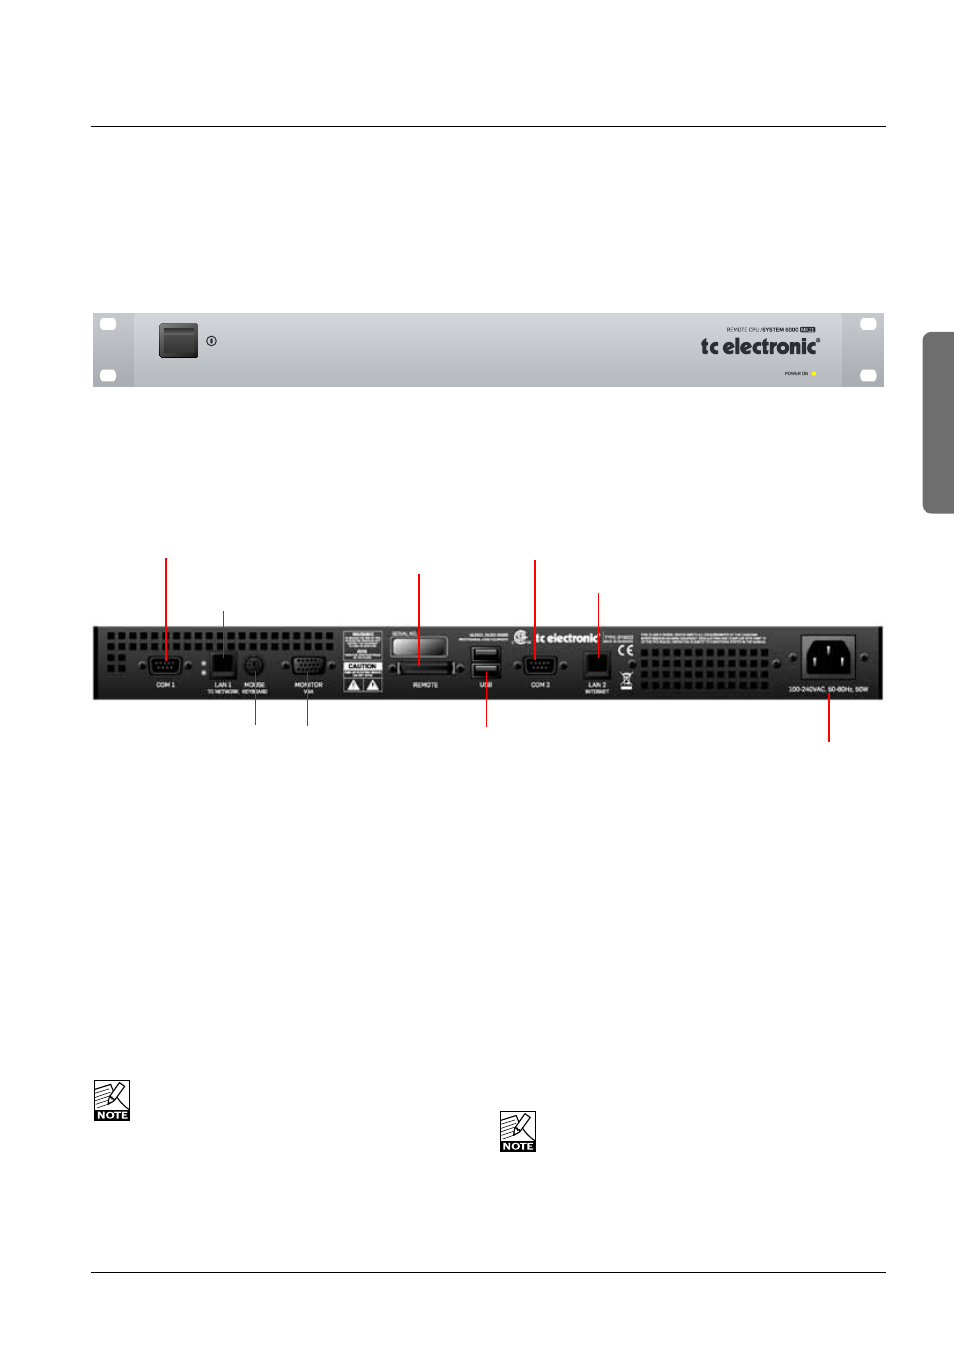
Remote CPU front panel
Remote CPU rear panel
LAN 1
connection for
setups with
multiple frames
COM port 1
COM port 2
PS-2 connection
for PC keyboard
and mouse
Connection
for TC Icon
2 x USB
Type A
Standard
Connectors
Power In
100 - 240V
Connection for
VGA monitor
Power Key
Switches power On/Off. Green LED indicates power on state.
Ethernet Connection
32 bit PCI Ethernet interface fully compliant with IEE
802.3u 10/100 Mbps CSMA/CD standards.
The connector type is a 100 Base-T RJ-45 (CN13)
Connection for PC keyboard or mouse
A standard PS2 Y-splitter must always be used when
connecting a PS2-mouse, a keyboard or both.
This cable is not supplied with the unit.
Connection for TC Icon
36 pin multi-cable connection for TC Icon.
TC Connection Cable.
Use the special TC Icon cable supplied with the
unit ONLY !
USB Connection
USB connection for some TC products with USB
connection. E.g. LM2
Monitor
By connecting a monitor via this standard 15 pin D-Sub
you can have the exact same picture as displayed on the
TC Icon, running in parallel with the Icon. Color depth is 24
bit with a screen resolution of 640 x 480 pixels at 60Hz.
Power
Connect 100-240V AC, 50/60Hz auto-select.
Rack-mounting Advice
• The CPU unit should not be placed in an environment
with a temperature exceeding 50 degrees celsius.
• Do not cover the ventilation openings on the back of the
Remote CPU.
The cooling fan is activated according to the
temperature inside.
Com ports / RS232
For connection of TC units with RS232 interface. E.g. P2
and DB2.
Ethernet/LAN
connection for sw
updates etc.
The following section describes the TC ICON hardware remote control.
Up to 8 mainframes can be controlled via the TC ICON hardware remote but DB8/DB4 units are most often controlled via
PC or Mac using the free TC Icon Software Editor. When using up to four instances of the TC Icon Software Editor; 32
frames can be controlled simultaneously. Please find descriptions of both in the following manual sections.