Timers button – Grain Systems PNEG-1935 User Manual
Page 22
5. Operations
22
PNEG-1935 Vision Hybrid for Portable Dryers
Timers Button
Select the
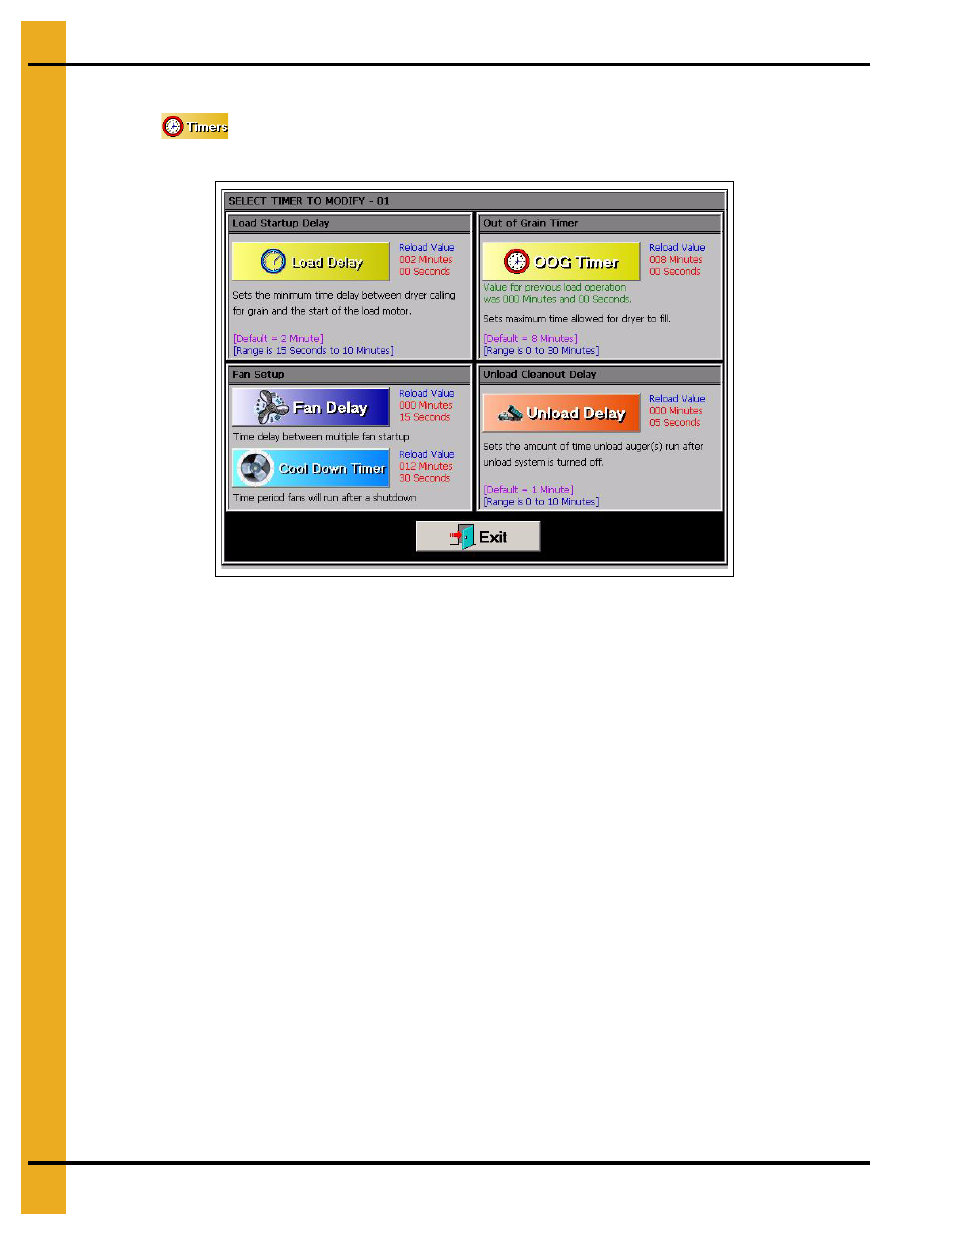
button. A new screen will appear called the “Select Timer to Modify” screen.
There are five (5) timers that can be modified.
Figure 5B
1. Load Delay: (Default setting - 2 minutes) This delay is used to prevent the load auger from
over-cycling. The load delay is active only when the Load switch is in the AUTO position. The timer
starts when the dryer calls for grain.
2. Out Of Grain (OOG) Timer: (Default setting - 8 minutes) The “OOG” timer should be set to the
maximum time it takes for the dryer to refill during continuous or batch drying modes. The computer
will display the time required to fill the dryer on the previous load, aiding you in setting an accurate
time. If the dryer runs out of grain while the Load switch is in the AUTO position, the “OOG” timer
automatically shuts off the dryer after the period of time preset on the timer.
3. Fan Delay: (Default setting - 3 seconds) The “Fan Delay” timer controls the amount of time between
each fan startup to reduce the dryer inrush amperage.
4. Unload Delay: (Default setting - 1 minute) The “Unload Delay” timer is used to regulate the amount
of time the unload auger runs after the metering rolls stop.
5. Cool Down: (Default setting - zero seconds) The dryer fans will operate for a “Cool Down” period in
the event that the dryer experiences a shutdown, other than that of a plenum, grain high temperature
or fan motor overload situation. The dryer can also be restarted by pressing the “Start” button on
the front of the Vision control panel. This prevents the fans from shutting down because of
nuisance warnings.
To change a timer setpoint, touch the button of the timer you wish to modify. The “Modifying Timer
Setpoint” screen will then be displayed, which is shown in
. The left number pad is
used to modify the minutes and the right number pad will modify the seconds. Touching the “Default”
button will automatically set the timer to the default setpoint for that timer. The “Accept” button will save
the displayed time as the setpoint. Choosing “Cancel” will exit the “Modifying Timer Setpoint” screen
without saving any changes and the timer will stay at the currently saved setpoint.