Rough Country 170P User Manual
Page 6
32. Raise the differential and install it in the upper driver bracket with the supplied 9/16” x 5” bolt, washers and nut. Also
install the differential in the passenger side with the factory hardware. Do not fully tighten at this time.
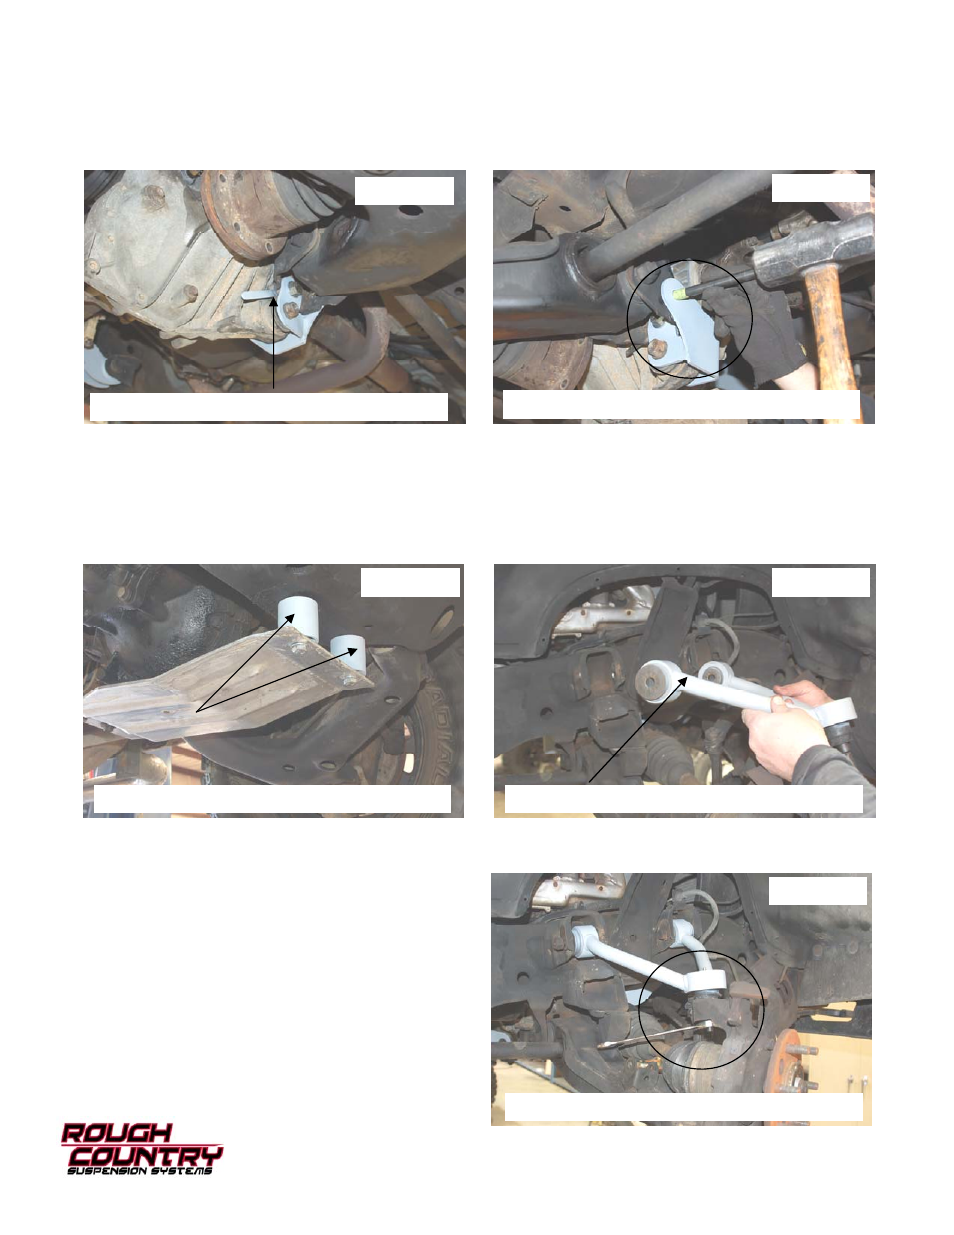
33. Install the driver side lower differential bracket on the differential with the factory hardware on the differential and the
supplied 9/16” x 1-1/2” bolt and flag nut as shown in Photo 25. Do not tighten at this time.
34. Make sure the bracket is flat on the frame and positioned correctly. Mark the hole as shown in Photo 26 and drill the
hole with a 1/2” drill bit. Install the 1/2” x 1 1/2” bolt, washers and nut.
35. Tighten all diff bolts using a 21mm socket / wrench for stock bolts and 21 & 22 mm for supplied bolts.
36. Reinstall the drive shaft with the stock hardware using a 11mm wrench.
37. Reinstall the axle shafts with the stock hardware using a 15mm wrench.
38. Reconnect vent hose to the differential and reconnect the axle wiring harness
39. If equipped with skid plate, install the front skid plate spacers as shown, using the supplied 10mm x 65mm bolts and
washers. Reuse your factory hardware in the rear. Tighten with a 17mm wrench. See PHOTO 27.
40. Install the upper control arms. Note there is a driver and passenger side. Passenger side shown. See Photo 28.
41. Install the control arm on the stock knuckle with factory nut and supplied cotter pin. Tighten ball joint to 50 ft/lbs with
a 18mm wrench. Do not over tighten the ball joint. Tighten the control arm to frame hardware using a 21mm
wrench to 90 ft/lbs. See Photo 29.
PHOTO 27
PHOTO 26
PHOTO 29
PHOTO 28
MARK AND DRILL THE NEW HOLE
REINSTALL THE SKID PLATE
PASSENGER SIDE ARM SHOWN
INSTALL THE UPPER CONTROL ARMS
PHOTO 25
INSTALL THE 9/16” X 1 1/2’ BOLT & FLAG NUT