Rough Country 682S User Manual
Page 8
REAR INSTALLATION INSTRUCTIONS
1. Jack up the rear of the vehicle and support the vehicle with jack stands, so that the rear wheels are off the ground.
Chock front wheels. Position a jack so it supports, but does not raise the rear axle.
2. Remove the rear tires/wheels
,
using a 19mm deep well
socket.
3. Using a 21mm socket remove the track bar from the
frame on the passenger side. Using a 21mm socket re-
move the track bar bolt at the axle and remove the track
bar from the vehicle. Retain the frame side stock hard-
ware for reuse.
4. Using a 21mm socket loosen, but do not remove the
bolts securing the lower control arms at both the axle and
frame.
5. Using a 10mm wrench, unbolt the brake hose bracket at
the frame. Retain hardware for later use.
6. Remove and discard the rear shocks using a 18mm
wrench. Retain stock hardware.
7. Lower the axle enough to remove the stock coil springs.
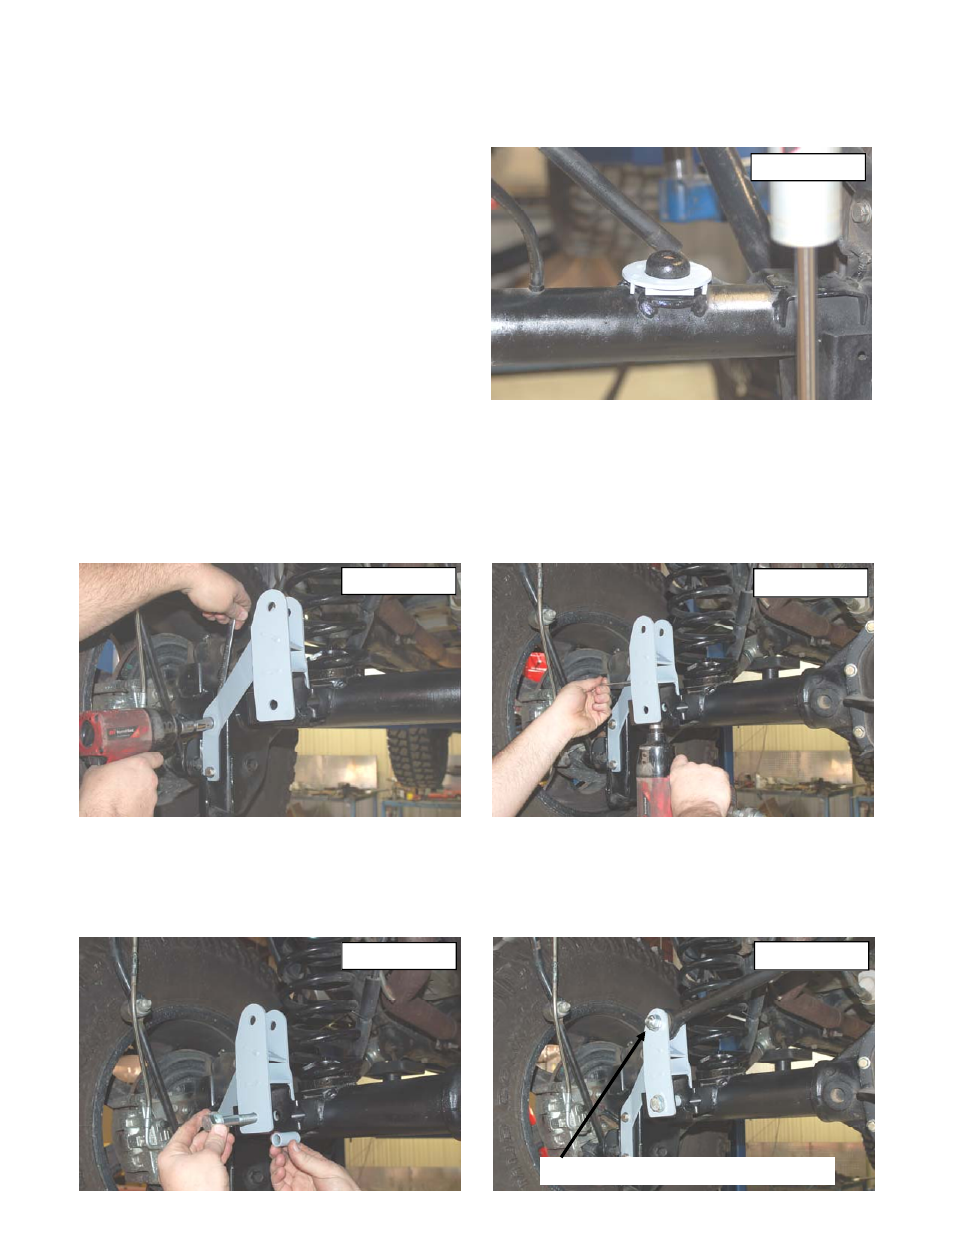
8. Install the supplied rear coil shim as shown in Photo 12.
9. Install the coil springs and rotate the coils so that they seat properly in the coil seat, raise the axle enough to seat
the coil springs.
10. Place the bracket on the factory mount and install the supplied 3/8” x 1” Bolts , washers and Flange lock nuts as
shown in the factory holes. Do not tighten at this time. See Photo 13.
11. Using the track bar bracket as a template mark and drill a 13/32” hole in the top of the original track bar mount from
the top.
12. Install using the .375-16 x 1” bolt, washer through the drilled hole from the top and secure with flange nut using a
9/16” wrench and socket. See PHOTO 14.
13. Insert the supplied sleeve, inside the factory track bar mount. Insert the supplied 14mm” x 80mm” bolt through the
bracket, factory mount, and sleeve secure using the washer and nut. Do fully tighten. See Photo 15.
14. Tighten all track rod bracket hardware.
15. Install the factory track bar with the supplied 14mm x 75mm bolt washer & flange nut (upper hole) with the head of
the bolt on the front by the coil spring. See Photo 16. The passenger side mount on the track bar will be installed in
a later step.
PHOTO 13
PHOTO 14
PHOTO 15
PHOTO 16
Bolt shown pointed toward rear of vehicle
PHOTO 12