Rough Country PERF662X User Manual
Page 8
13. Install the new Rough Country coil springs making sure the rubber damper in positioned in the upper mount. It
will be necessary to use a coil spring or strut compressor to install the new coil springs.
14. Jack up the axle to compress the coil spring and to align the track rod with the new mounting point. Install using
the supplied 12mm x 65mm bolt and flange lock nut. Do not tighten at this time.
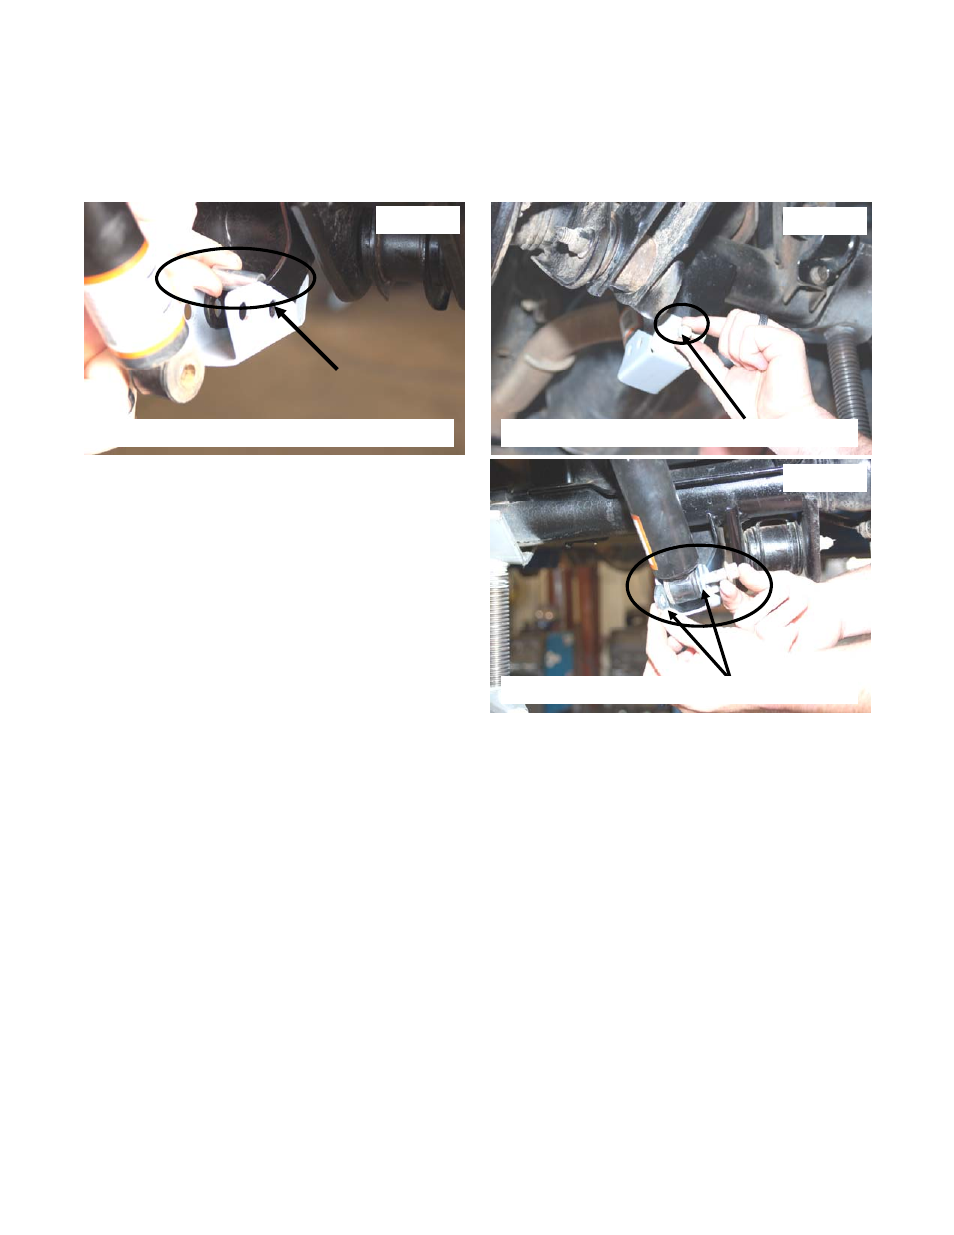
15. Install the lower shock bracket as shown in Photo 5 with the supplied 12mm x 65mm bolts, flange locknuts with
supplied crush sleeves.
16. Install the supplied 5/16” x 3/4” bolts, washers & nuts as shown in Photo 6 in the shock bracket. Tighten the
12mm bolts using a 18mm wrench & 18mm socket.
Tighten the 5/16” bolts using a 13mm socket and
wrench.
17. Install the rear Rough Country 2.2 Shock absorber
Part #660576 on the upper mount and install the
supplied flat washers as shown in Photo 7 on the lower
shock mounts with the factory hardware. Tighten using
a 15mm & 18mm wrench. (Stock shocks shown in
picture). RCX 2.2 Series shock absorbers are
designed to be installed with the piston down and
body up.
18. Reinstall the wheels and tires. Lower the vehicle to the
ground and tighten the lug nuts to the factory
specifications using crossing pattern (80-110 ft. lbs).
19. On the rear, assemble the sway bar bushings and
10mm sleeves in the new rear extended sway bar links. Secure the links to the stock location, using the 10mm x
60mm bolt, washers and nuts supplied. On the upper mounts you will reuse the factory flag nut. Tighten to 40 ft.
lbs using a 15mm wrench & socket.
20. Tighten lower arm pivot bolts to 130 ft. lbs using a 21mm socket & wrench
21. Tighten the rear track bar mounting bolts to 74 ft. lbs using a 18mm socket & wrench.
22. Please refer to the transfer case instructions included with that kit for transfer case drop bracket install.
23. Bleed brake system.
1. Bleed brake lines and test brakes before driving. Check for leaks.
2. Have a qualified alignment center realign front end to factory specs. As a general rule you set caster to the mini-
mum of the factory spec and set toe-in to the maximum.
3. Install Warning to Driver decal on sun visor.
4. Adjust headlights to proper settings.
5. All components must be retightened after 500 miles, and every three thousand miles after installation.
POST INSTALLATION
Install 12mm x 65mm hardware & crush sleeve
PHOTO 5
Install 5/16” x 3/4” Hardware
PHOTO 6
PHOTO 7
Install Flat Washers here