Th-1026-ct installation instructions-02, Step 11. cable management, Installation complete – Atdec Telehook TH-1026-CT Installation manual User Manual
Page 2: Step 8, Step 10
No portion of this document or any artwork contained herein should be reproduced in any way without the express written consent Atdec Pty Ltd.
Due to continuing product development, the manufacturer reserves the right to alter specifications without noticed. Published 19.04.12 ©
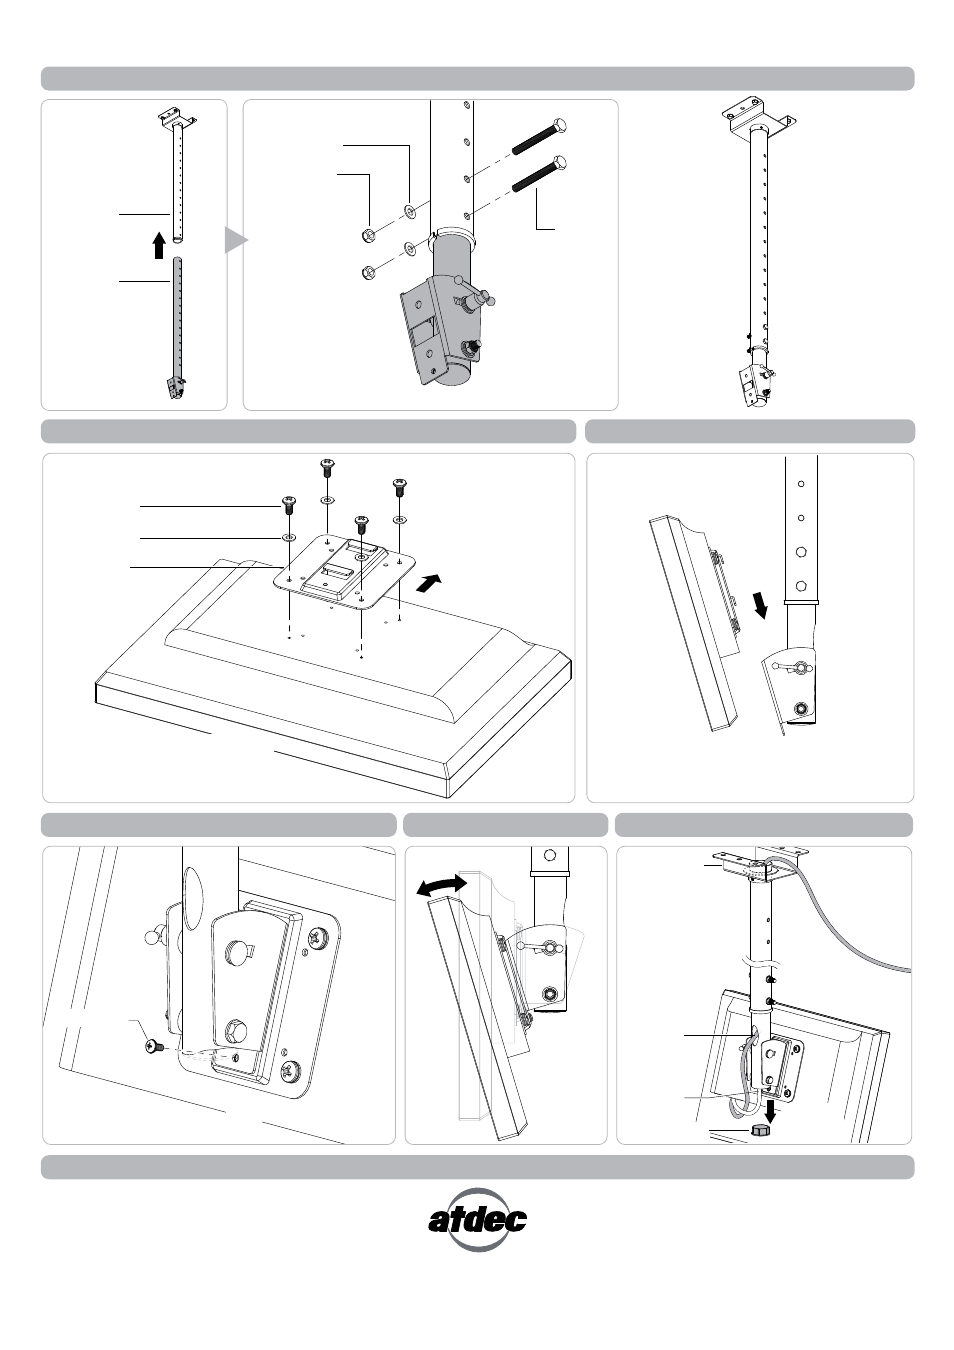
Step 6. Slide Lower Pole up inside Upper Pole and fix to desired height
Step 7. Attach Screen Mount to Display
Step 9.
Fix Display with Security Screw
SLIDE
Upper Pole
Lower Pole
Hex-Head
Screw
Washer 8.5mm
Nyloc Hex Nut
Slide Lower Pole up
inside Upper Pole.
Fix Lower Pole at desired
height using two hex-head
screws, two washers and two nuts.
TOP OF
DISPLAY
Back of Display
Mounting Screw
Washer 4.5mm
Screen Mount
HOOK
Step 8.
Attach Display to Lower Pole
The screen mount supports VESA
mounting hole configurations
75x75mm and 100x100mm.
Step 10.
Tilt Adjustment
Security Screw
Fix Display with supplied Security Screw
using a phillips head screw driver.
Back of Display
Step 11. Cable Management
0-15°
Installation Complete
REMOVE
Lower Pole Cap
Option 1
Option 2
Ceiling Mount
(for Option 2)
- Telehook TH-3070-UFP Installation manual (2 pages)
- Levitate L-PB product brochure (2 pages)
- Telehook TH-3060-UFH Technical specs (2 pages)
- Telehook TH-2050-VFM product brochure (2 pages)
- Visidec VF-WD Installation manual (2 pages)
- Spacedec SD-POS-VBM Installation manual (2 pages)
- Spacedec SD-POS-HA Installation manual (2 pages)
- Telehook TH-3060-UF Installation manual (2 pages)
- Spacedec SD-FS-H product brochure (2 pages)
- Telehook TH-FM Technical specs (2 pages)
- Telehook TH-1040-CT-B2B Technical specs (1 page)
- Spacedec SD-DO Installation manual (2 pages)
- Telehook TH-1040-VFM Installation manual (2 pages)
- Visidec VP-0001-590 Technical specs (1 page)
- Visidec VF-AT Installation manual (2 pages)
- Telehook TH-3070-UF Installation manual (2 pages)
- Spacedec SD-POS-VBM-B2B Technical specs (1 page)
- Telehook TH-1026-CT Technical specs (1 page)
- Telehook TH-TVCH Installation manual (4 pages)
- Telehook TH-3060-LPF Installation manual (2 pages)
- Visidec VF-M Installation manual (2 pages)
- Telehook TH-3060-UT Installation manual (2 pages)
- Telehook TH-1026-VF product brochure (2 pages)
- Telehook TH-3070-CTL Technical specs (2 pages)
- Telehook TH-3070-CTL product brochure (2 pages)
- Levitate L-PB Technical specs (2 pages)
- Telehook TH-1040-CTS Technical specs (1 page)
- Telehook TH-3060-UFH Product brochure (2 pages)
- Telehook TH-3070-UT Installation manual (2 pages)
- Telehook TH-FM Installation manual (3 pages)
- Spacedec SD-AT-DW Installation manual (4 pages)
- Telehook TH-VWV product brochure (2 pages)
- Telehook TH-3060-UFL Installation manual (3 pages)
- Visidec VFS-Q Technical specs (1 page)
- Telehook TH-3070-CT-B2B Installation manual (2 pages)
- Levitate L-PB Installation manual (6 pages)
- Telehook TH-VA-2x2-NECX463 Installation manual (5 pages)
- Telehook TH-3260-UFB Installation manual (2 pages)
- Telehook TH-2250-VF Technical specs (1 page)
- Telehook TH-3270-UFM Technical specs (2 pages)
- Visidec VFS-DH Technical specs (1 page)
- Telehook TH-EMC Installation manual (2 pages)
- Telehook TH-3060-LPT Installation manual (2 pages)
- Visidec VFS-DH Installation manual (2 pages)
- Visidec VFS-DH Installation manual (2 pages)