Attaching the display to the wall plate, Adjusting tilt – Atdec Telehook TH-3070-UT Installation manual User Manual
Page 2
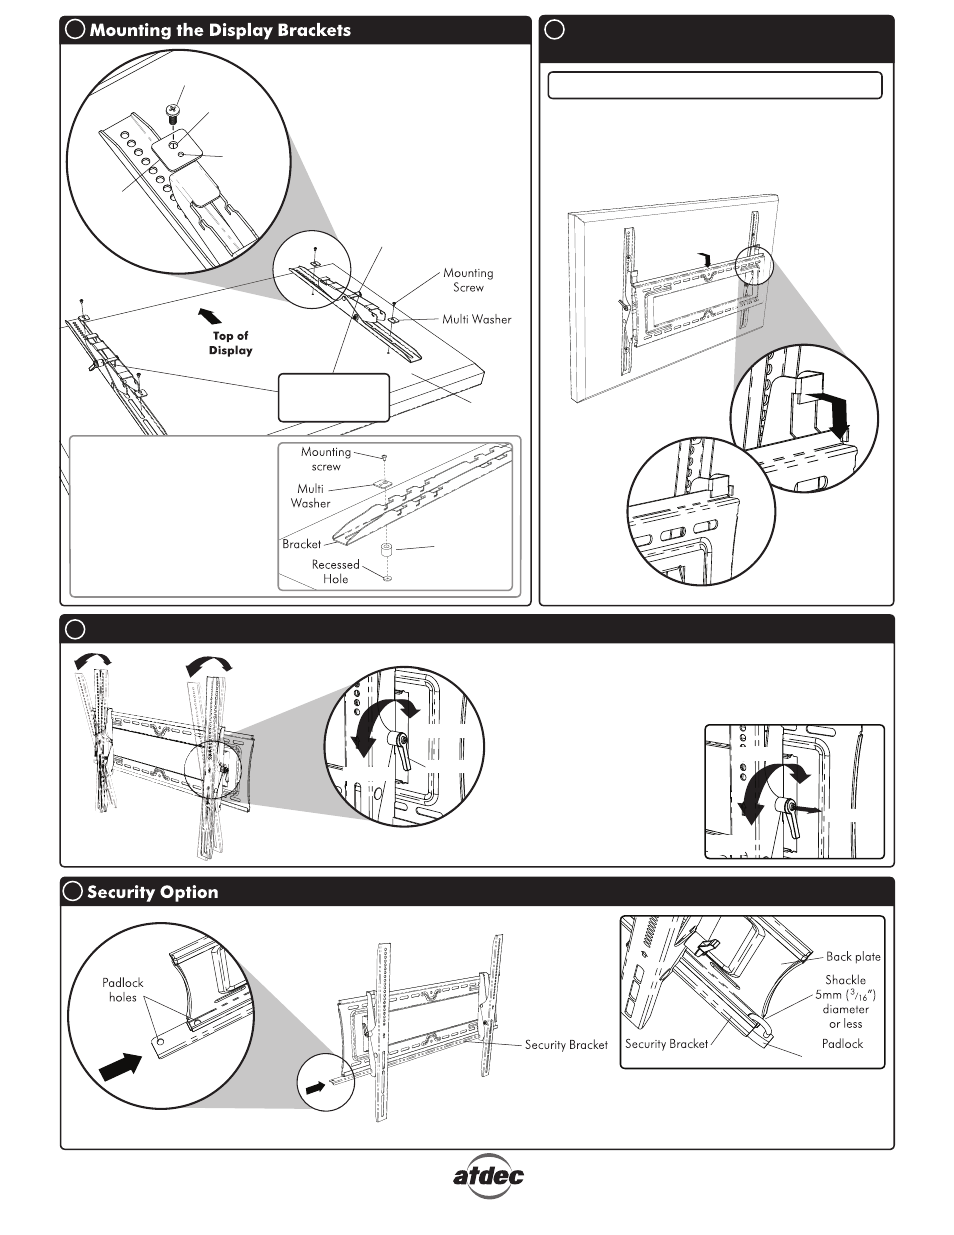
Attaching the display to the wall
plate
B
Multi
Washer
M6 & M8
Screw Hole
M4 & M5
Screw Hole
Mounting
screw
C
When attaching the
Brackets ensure that
both are vertically
aligned. Ensure that
the tightest fitting hole
in the multi washer is
used when attaching
the mounting screw.
With the brackets attached to the display, lift the
display and hook the brackets onto the Wall Plate
as shown.
Adjusting Tilt
D
-5° to 15°
tilt adjustment
TIGHTEN
LOOSEN
To adjust the angle of the display, loosen the Tilt Lever
located on each bracket then adjust to desired angle. Once
in position, tighten each lever firmly.
Tilt Lever
To adjust the Tilt Lever position
without tightening or loosening
the lever, pull the lever as shown
to dis-engage the ratchet
mechanism and rotate the lever
into the desired position.
Tilt Lever
PULL
ADJUST
Ensure both Tilt
Levers are facing
outwards.
Note: This procedure will require two persons
D.1.
D.2.
Back of
display
E
For additional security, it is suggested that a Padlock is
attached through the Security Bracket and the Wall Plate
on either side as shown. The Padlock (not supplied) should
have a shackle diameter no larger than 5mm (
3
/
16
”).
No portion of this document or any artwork contained herein should be reproduced in any way without the express written consent of Atdec Pty Ltd.
Due to continuing product development, the manufacture reserves the right to alter specifications without notice. Published: 19.02.09©
E.2.
E.1.
Recessed Mounting Holes
(not supplied)
Spacer Bush
If the mounting holes are recessed
into the back of the display, use
the appropriate Spacer Bushes
provided to pack the recessed hole.
Please note the 13mm Spacer
Bushes can only be used with M4,
M5, and M6 Mounting screws.
Ensure the brackets are securely
fixed to the display.