Altronix Sav9D Installation Instructions User Manual
Page 2
- 2 -
Sav4/9/18/182/36D
Overview:
Altronix Sav Power Supplies provide 12VDC distributed via four (4), nine (9), eighteen (18), thirty-six (36)
Class 2 Rated PTC protected power-limited outputs for powering Surveillance Cameras and other 12VDC devices.
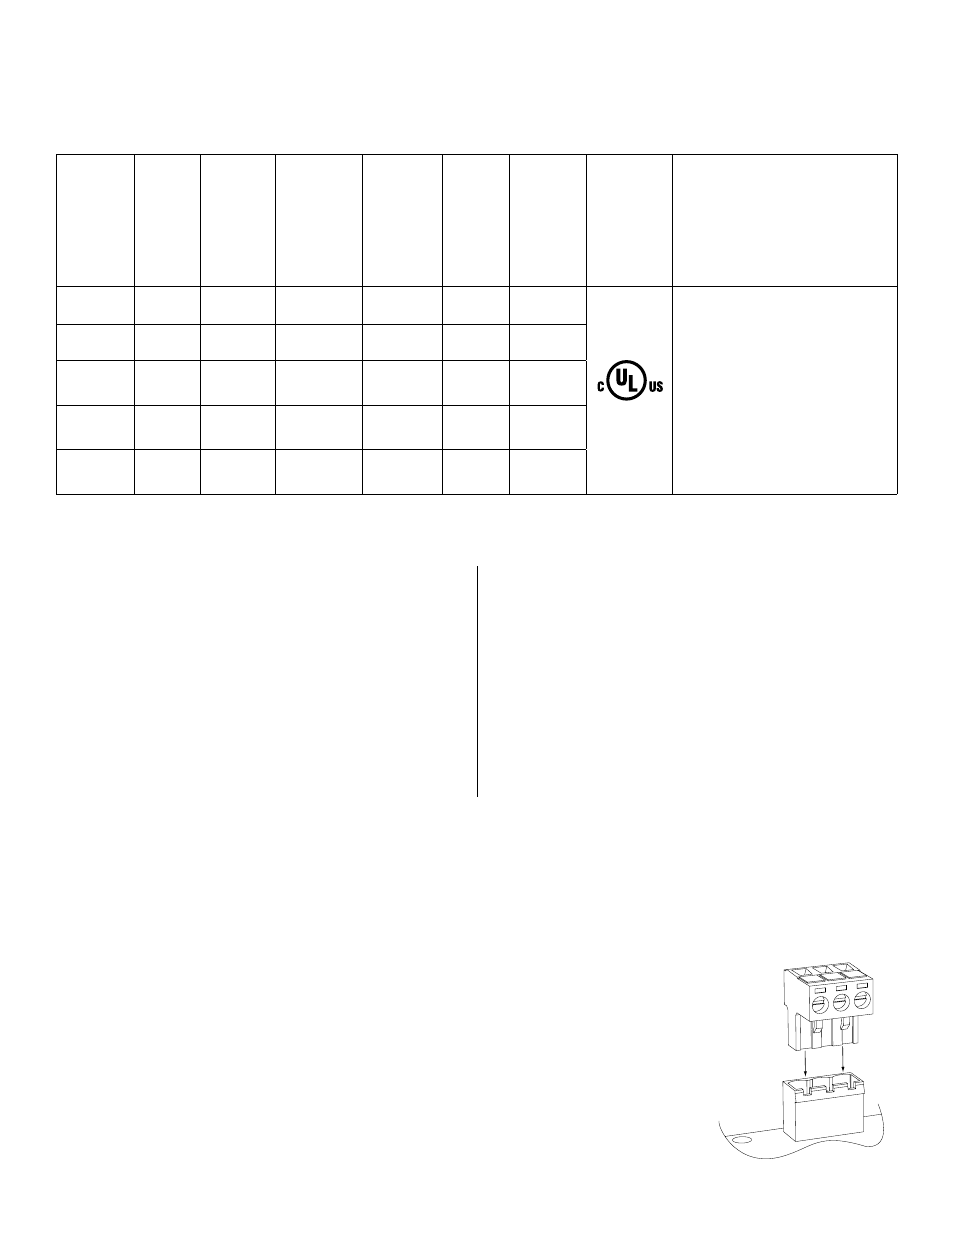
Sav Reference Chart:
Altronix Model Number
Total Output Current (Power)
Output Voltage
Number of Class 2 Rated PTC Protected Power- Limited Outputs
Output Current (max per output)
115VAC 60Hz Input Current
230VAC 50Hz Input Current
Agency Listings
UL Listings and File Numbers
Sav4D
5 amp
12VDC
4
2.5 amp* 1.5 amp 0.75 amp
UL Listed for Commercial
CCTV Equipment (UL 2044).
CUL Listed - CAN/CSA
C22.2 No. 1-04, Audio,
Video and Similar
Electronic Equipment.
Sav9D
5 amp
12VDC
9
2.5 amp* 1.5 amp 0.75 amp
Sav18D
5 amp
12VDC
18
2.5 amp* 1.5 amp 0.75 amp
Sav182D 11 amp 12VDC
18
2.5 amp*
3 amp
1.5 amp
Sav36D
11 amp 12VDC
36
2.5 amp*
3 amp
1.5 amp
*Not to exceed total output current.
230VAC/50Hz operation is intended for use outside of the North American Markets only.
Specifications:
Installation Instructions:
This installation should be made by qualified service personnel and should conform to all local codes and in accordance
with the National Electrical Code. Product is intended for indoor use only.
1. Mount unit in the desired location. Mark and predrill holes in the wall to line up with the top two keyholes in the
enclosure. Install two upper fasteners and screws in the wall with the screw heads protruding. Place the enclosure’s
upper keyholes over the two upper screws, level and secure. Mark the position of the lower two holes. Remove the
enclosure. Drill the lower holes and install two fasteners. Place the enclosure’s upper keyholes over the two
upper screws. Install the two lower screws and make sure to tighten all screws (Enclosure Dimensions, pgs. 11-12).
2. SAV4D, SAV9D and SAV18D:
Connect unswitched AC power 115VAC, 60 Hz / 230VAC, 50 Hz to
the removable terminals marked [L, G, N] (Fig. 1, pg. 2).
SAV182D and SAV36D:
Connect unswitched AC power 115VAC, 60 Hz / 230VAC, 50 Hz to black and white flying
leads, which are factory installed. Connect main incoming ground to the provided
green grounding conductor lead.
To install 3-wire line cord with integral strain relief (supplied) refer to pages 9 and 10.
3. Unit is factory set at 12VDC. To adjust output voltage use the trimpot
(Fig. 2a pg. 4, 3a pg. 5, 4a pg. 6, 5a pg. 7, 6a, pg. 8) on the power supply board(s), connect
digital volt meter to the terminals marked [OUT1 to OUT18] and slowly
Fig. 1
Input:
• 115VAC 60Hz or 230VAC 50Hz.
Output:
• 12VDC outputs.
(1.2 amp per device, 2.5 amp max.).
• four (4), nine (9), eighteen (18) or thirty-six (36)
Class 2 Rated PTC protected power-limited outputs
• Filtered and electronically regulated outputs.
• Short circuit and thermal overload protection.
Features:
• Four (4) power LEDs.
• Power ON/OFF switch.
Features (cont’d):
• Field installable 3-wire line cord
with integral strain relief.
• Unit maintains camera synchronization.
• Ease of installation saves time and
eliminates costly labor.
Enclosure Dimensions (H x W x D approx.):
•
Sav4D, Sav9D and Sav18D:
8.5” x 7.5” x 3.5” (215.9mm x 190.5mm x 88.9mm).
• Sav182D and Sav36D:
13.5” x 13” x 3.25” (342.9mm x 330.2mm x 82.55mm).