Adjustments – Spicer Drive Axles Service Manual Wheel Reduction Drive Axles (EA-50) User Manual
Page 14
12
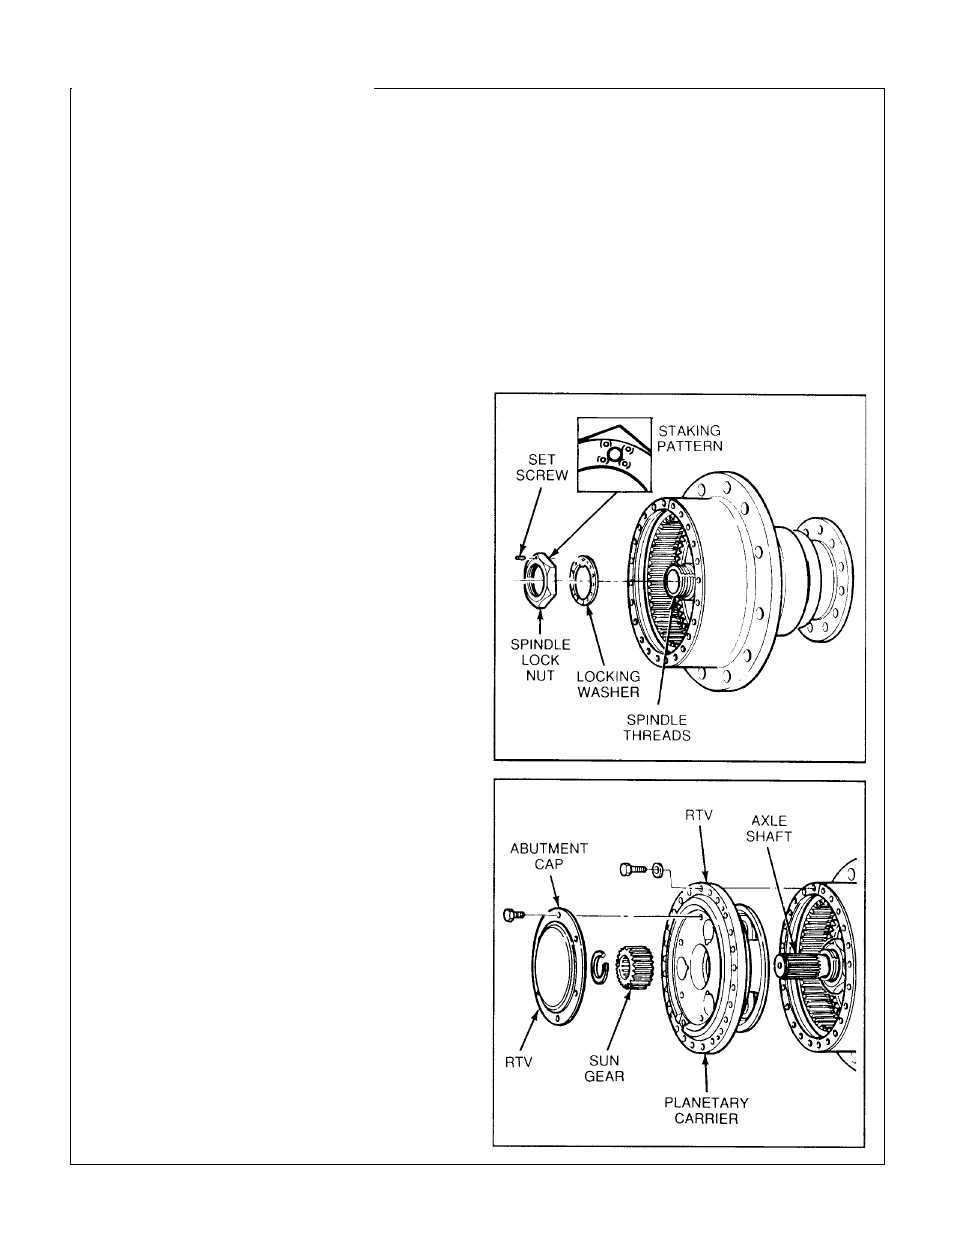
Adjustments
Wheel Bearing Adjustment
Wheel bearings should be adjusted at regular
intervals using the following procedure:
1. Drain wheel hub lube per instructions in this
manual.
2. Remove the planetary carrier assembly.
3. Remove the sun gear and axle shaft
assembly.
4. Remove set screw spindle lock nut and
washer.
5. Clean spindle threads carrier abutment
threads and hub threads of Loctite. Clean
all sealing surfaces.
6. Visually inspect spindle for damage or
wear. Inspect the nut and spindle threads
for damage. Apply a light coat of oil to the
spindle threads. Inspect doweled washer
and replace if damaged.
7. Install washer on spindle against ring gear
support.
8. Install nut on spindle with stepped diameter
against washer. Torque nut to 250 ft.-lbs.
(350 ft.-lbs. on WR10 and 12 models).
9. Rotate hub 360
°
in both directions while
hitting hub or ring gear support with a soft
mallet.
10. Re-torque to 250 ft.-lbs. (350 ft.-lbs. on
WR10 and 12 models) and repeat Step 9
until 250 ft.-lbs. (350 ft.-lbs. WR10/12) does
not advance the nut.
11. Install one (1) new 126900 set screw
(207357 on WR10 and 12 models) in nut,
with dog point engaging washer hole. If the
set screw is being reused coat with Loctite
277 or equivalent before installing. The set
screw is advanced completely when one
internal thread of set screw hole is showing.
• If set screw does not align with washer
hole, tighten the spindle nut until the next
hole aligns. Do not exceed 350 ft.-lbs.
(450 ft.-lbs. on WR10/12).
12. Stake set screw in place with a center
punch at four (4) places around set screw
hole thread.
13. Install sun gear and axle shaft assembly.
14. Install planetary carrier with RTV on flange.
Apply Loctite 277 or equivalent to bolts.
Torque bolts to 75-85 ft.-lbs. (149-179 ft.-lbs.
on WR10 and 12 models).
15. Install Apply abutment cap with RTV on
flange. Loctite 277 to bolts. Torque bolts to
35-40 ft.-lbs. (45-54 on WR10/12).