High Lifter Radiator Relocation Kit Low Profile - Polaris Sportsman 850 XP (09-13) User Manual
Page 13
13
36. With all the plastic cut, holes drilled, rectifier relocated, headlight modified, and radiator
installed you will need to reattach the front plastic and top rack.
37. Now test the rack to see if it will clear the radiator when it is opened.
38. Once you have tested the rack for clearance take it back off the ATV.
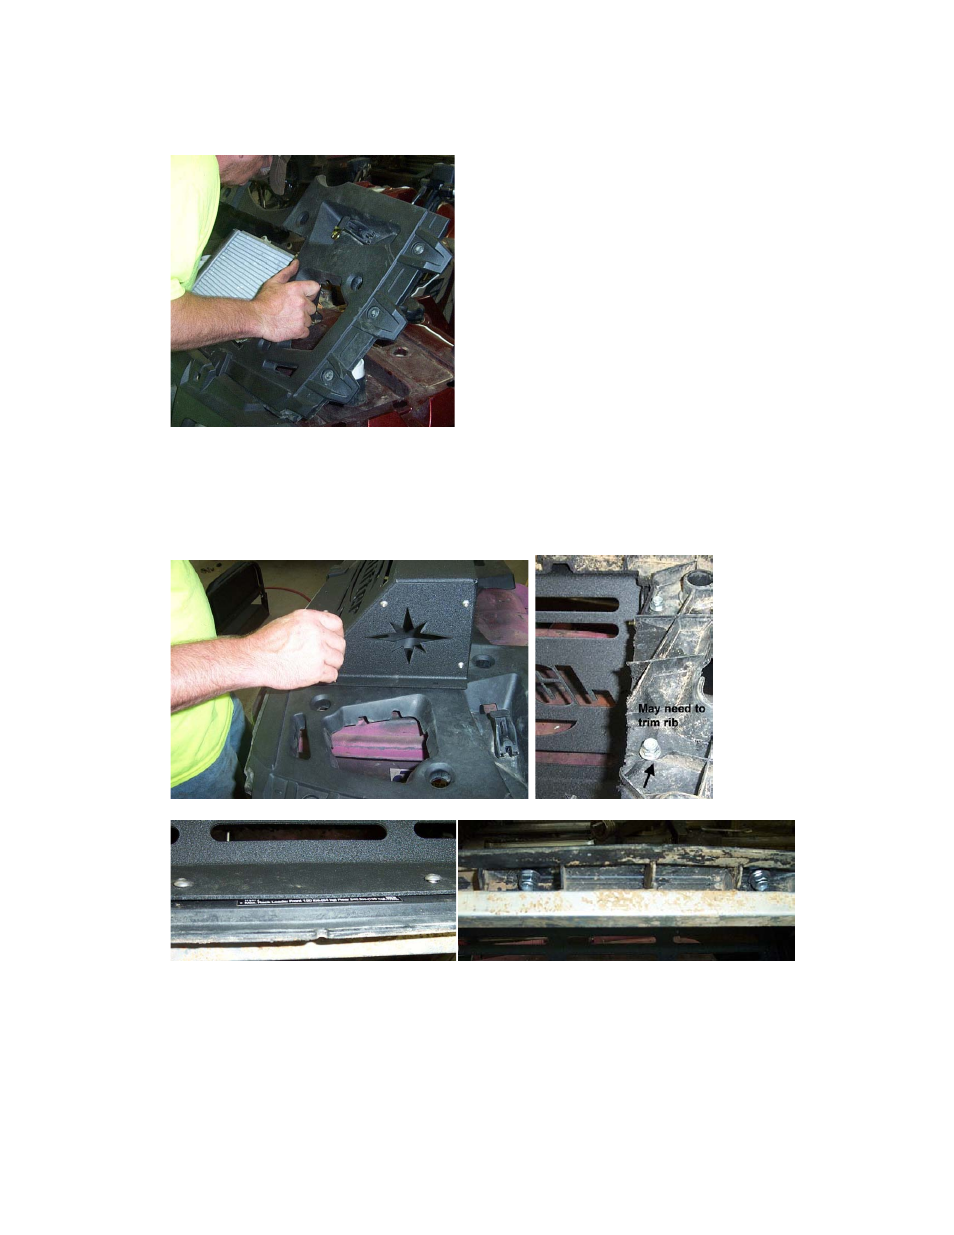
39. Assuming that it opened properly, connect the new radiator shroud to the rack. You
should have drilled the holes earlier in the installation.
40. Connect the shroud to the rack using six ¼ x ¾ button head bolts, six ¼” flat washers and
six ¼” lock nuts.
NOTE: You may need to trim some plastic ribs on the back side of the rack lid to allow the
bolts, washers, and nuts to mount properly.
41. Now it’s time to connect the hoses to the radiator. The radiator provided requires a
smaller hose to be adapted to the kit. Provided in this kit are two 1” to ¾” hose adapters
made of aluminum.
- Fender Kit for Honda Rubicon 500 (00-04) (2 pages)
- Looney Tuned Dual Exhaust for Kawasaki Teryx (08-10) (3 pages)
- Outlaw Clutch Kit for Suzuki Vinson 500 (02-06) (2 pages)
- Outlaw Clutch Kit for Yamaha 450 Rhino (06-09) (2 pages)
- DynoJet Jet Kit for Kawasaki Prairie 650 (2002) (2 pages)
- Lift Kit for Honda Foreman 450 (98-01) (9 pages)
- DynoJet Jet Kit for Polaris Scrambler (98-09) (2 pages)
- Outlaw Clutch Kit for Arctic Cat 550 H1 EFI 4x4 (2009) (2 pages)
- Outlaw Clutch Kit for Yamaha 700X Big Horn Crew (10-14) (2 pages)
- Outlaw Clutch Kit for Polaris 800 RZR "S, RZR "4" (10-13)" (2 pages)
- Lift Kit for Arctic Cat 1000 ATVs (8 pages)
- Dalton Pro Mudrunner Clutch Kit for Can-Am Outlander_Renegade 800 HO, 800 R (06-12) (5 pages)
- DynoJet Jet Kit for Yamaha YFZ 450 (04-05) (2 pages)
- Crushlok Wheels 12” & 14” Installation (5 pages)
- Outlaw Clutch Kit for Honda 500 Rubicon Springs Only (2 pages)
- Outlaw Super Duty Extreme Clutch Kit for Arctic Cat 650 Mud Pro H1 4x4 (10-11) (2 pages)
- Lift Kit for Kawasaki Bayou 400 2x4, 4x4 (93-99) (5 pages)
- DynoJet Jet Kit for Yamaha Rhino 660 (04-07) (2 pages)
- Lift Kit for Yamaha Grizzly 660 (02-07) (6 pages)
- Lift Kit for Yamaha Grizzly 660 (02-07) (3 pages)
- Outlaw Clutch Kit for Polaris 700 Sportmsan Non-EFI (05-06) (2 pages)
- Outlaw Clutch Kit for Arctic Cat 500i Auto (06-09) (2 pages)
- DynoJet Jet Kit for Suzuki Vinson 500 (02-07) (2 pages)
- Lift Kit for Polaris Mid-Size RANGER - Signature Series (9 pages)
- DynoJet Jet Kit for Yamaha Big Bear 400 (07-12) (2 pages)
- DynoJet Jet Kit for Can-Am Outlander 400 HO (04-08) (2 pages)
- Outlaw Clutch Kit for Honda 500 Foreman 2x4_4x4 (05-11) (2 pages)
- Outlaw Super Duty Extreme Clutch Kit for Arctic Cat 700 EFI (06-08) (2 pages)
- Outlaw Clutch Kit for Polaris 500 Sportsman HO (01-05) (2 pages)
- Outlaw Clutch Kit for Arctic Cat 500i Auto (01-05) (2 pages)
- Outlaw Super Duty Extreme Clutch Kit for Can-Am Bennche Spire 800 (10-14) (2 pages)
- Lift Kit for Polaris Ranger 700 (3 pages)
- Outlaw Clutch Kit for Polaris 800 RZR "S (2009)" (2 pages)
- Max Clearance Lower Arched Radius Bars for Arctic Cat 1000 Wildcat (6 pages)
- Outlaw Clutch Kit for Yamaha 700 Rhino (2008) (2 pages)
- DynoJet Jet Kit for Suzuki King Quad 300 (92-99) (2 pages)
- Lift Kit for Yamaha Timberwolf 250 (95-99) (4 pages)
- Radiator Relocation Kit for Polaris Rangers - Black Color Hood (19 pages)
- Lift Kit for Honda Rancher 420 SRA Only (07-13) (5 pages)
- Outlaw Clutch Kit for Arctic Cat 550 H1 Prowler EFI 4x4 (09-11) (2 pages)
- Outlaw Super Duty Extreme Clutch Kit for Polaris 800 RZR (08-09) (2 pages)
- DynoJet Jet Kit for Arctic Cat 400 2x4 (99-01) (2 pages)
- Outlaw Clutch Kit for Polaris 500 Sportsman HO Carb (06) & (08-12) Non-EBS (2 pages)
- Lift Kit for Arctic Cat 500i (02-04) (3 pages)
- DynoJet Jet Kit for Yamaha Grizzly 350 Auto IRS (07-11) (2 pages)