Administration – Tripp Lite B020-U08-19-IP User Manual
Page 50
50
7. Administration
(continued)
7.3.4 ANMS (continued)
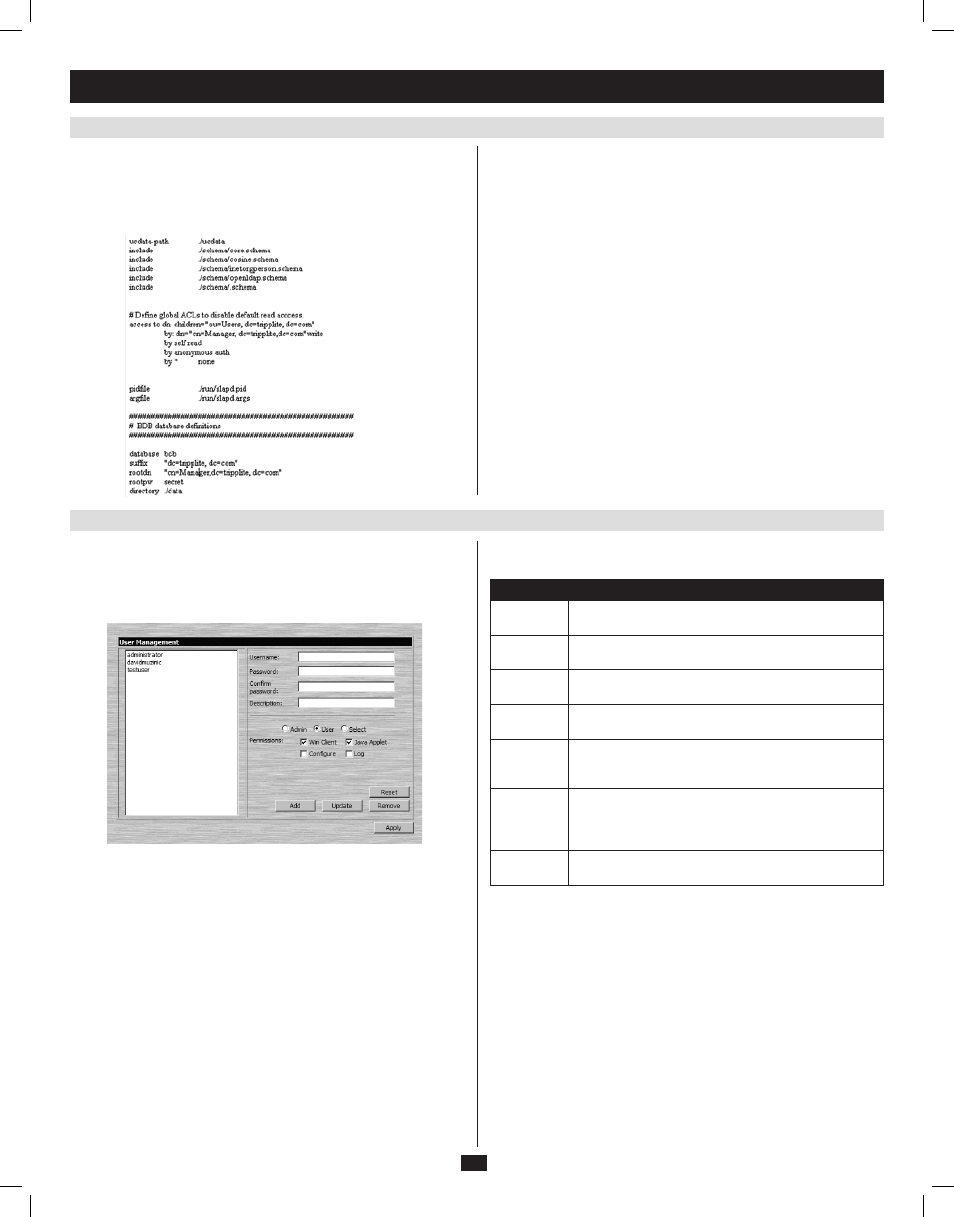
7.3.5 User Management
Using the New Schema
To use the new schema, do the following:
1. Save the new schema file (e.g., B020-U08-19-IP.schema) in the /
OpenLDAP/ schema/
directory.
2. Add the new schema to the slapd.conf file, as shown in the figure:
3. Restart the LDAP server.
4. Write the LDIF file and create the database entries in init.ldif with the
ldapadd
command, as shown in the following example: ldapadd -f
init.ldif -x -D “cn=Manager,dc=tripplite,dc=com” -w secret
Log Server Settings
Also included in the ANMS screen are settings that are required for the
Windows-based log server; MAC Address and Port. If these settings are
not entered correctly, the log server will not be able to communicate with
and pull log information from the KVM switch.
• MAC Address: Enter the MAC address of the computer that the
Windows-based log server was installed on here.
• Port: Enter the firewall access port being used to communicate with
the Windows-based log server here.
The User Management page allows administrators to Add, Edit and Delete
User
and Administrator accounts. Up to 64 accounts can be established,
with any combination of Administrators and Users. The Port Access
settings can not be configured using the Web Management Interface, and
must be configured via the Remote OSD. (See page 34 for details.)
•
To add a new account, fill in the account information and click the Add
button. The new account shows up in the list.
• To edit an existing account, highlight it in the list, and then update the
account information that appears on the right side of the page. When all
information has been updated, click on the Update button.
• To delete an existing account, highlight it in the list and click the
Remove button. When clicking the Remove button, you are not asked
to confirm whether you want to delete the selected account, it is
automatically deleted.
• To clear the account information on the right side of the page without
affecting the selected account, click the Reset button. In addition to
clearing all account information, this de-selects any accounts that were
selected prior to clicking the Reset button. It’s as if you just entered the
User Management
page for the first time.
• When you are done adding, updating or removing information from the
User Management
page, click the Apply button to apply your changes.
The table describes the account information fields and settings that are
found in the User Management page.
Setting
Description
Username
Enter the account username here. A minimum of 6 and a
maximum of 16 characters are allowed.
Password
Enter the account password here. A minimum of 6 and a
maximum of 16 characters are allowed.
Confirm
Password
Re-enter the account password here. If the two entries do
not match, you will be prompted to re-type the password.
Description
Additional information about the user that you may wish
to include (optional).
Admin
Check this option to give the account Administrator
access rights. Administrators have access to all features
and configuration settings of the KVM.
User
Check this option to give the account User access rights.
Users have access to both the Windows Client and Java
Client, but do not have access to the Log Server or
Configuration Settings.
Select
Check this option to Select the account access rights
yourself. (See Permissions below for details.)
Permissions
The following permissions are included in the User Management page,
and determine what access rights are available to each account:
• Win Client: When selected, the corresponding account can access the
KVM switch using the Windows Client in the Web Management
Interface
and the non-browser AP Windows Client.
• Java Applet: When selected, the corresponding account can access the
KVM switch using the Java Applet in the Web Management Interface
and the non-browser AP Java Client.
• Log: When selected, the corresponding account can access the Log File
included in the Web Management Interface.
• Configure: When selected, the corresponding account can access the
Administrator
settings in the Local Console OSD, Remote OSD and
Web Management Interface
.
201009236 93-2985.indd 50
11/18/2010 4:21:49 PM