Administration – Tripp Lite B020-U08-19-IP User Manual
Page 34
34
7.2.3 Remote OSD Administration Tab (continued)
7. Administration
(continued)
User Management – Permissions
The following permissions are included in the Add User and Edit User
screens of the User Management tab, and determine what access rights
are available to each account:
• Win Client: When selected, the corresponding account can access the
KVM switch using the Windows Client in the Web Management
Interface
and the non-browser AP Windows Client.
• Java Applet: When selected, the corresponding account can access the
KVM switch using the Java Applet in the Web Management Interface
and the non-browser AP Java Client.
• Log: When selected, the corresponding account can access the Log File
included in the Web Management Interface.
• Configure: When selected, the corresponding account can access the
Administrator
settings in the Local Console OSD, Remote OSD and
Web Management Interface
.
User Management – Port Access
The Port Access button at the bottom of the User Management Add User
and Edit User screens allow port access to be customized for each
account. Although user accounts can be created, edited and deleted using
both the Web Management Interface and the Remote OSD, the only place
Port Access
settings can be edited is in the Remote OSD. In this page,
access can be toggled between three access types by clicking on the field
next to the corresponding port, or by highlighting the desired port and
using the [+] or [-] keys on the number pad of the keyboard. By default,
all accounts have Full Access to all computers on the installation.
• Full Access: The user has the ability to both view and perform
keyboard/mouse operations on the corresponding computer.
• View Only Access: The user only has the ability to view the
corresponding computer’s video.
• No Access: The user has no access to the corresponding computer.
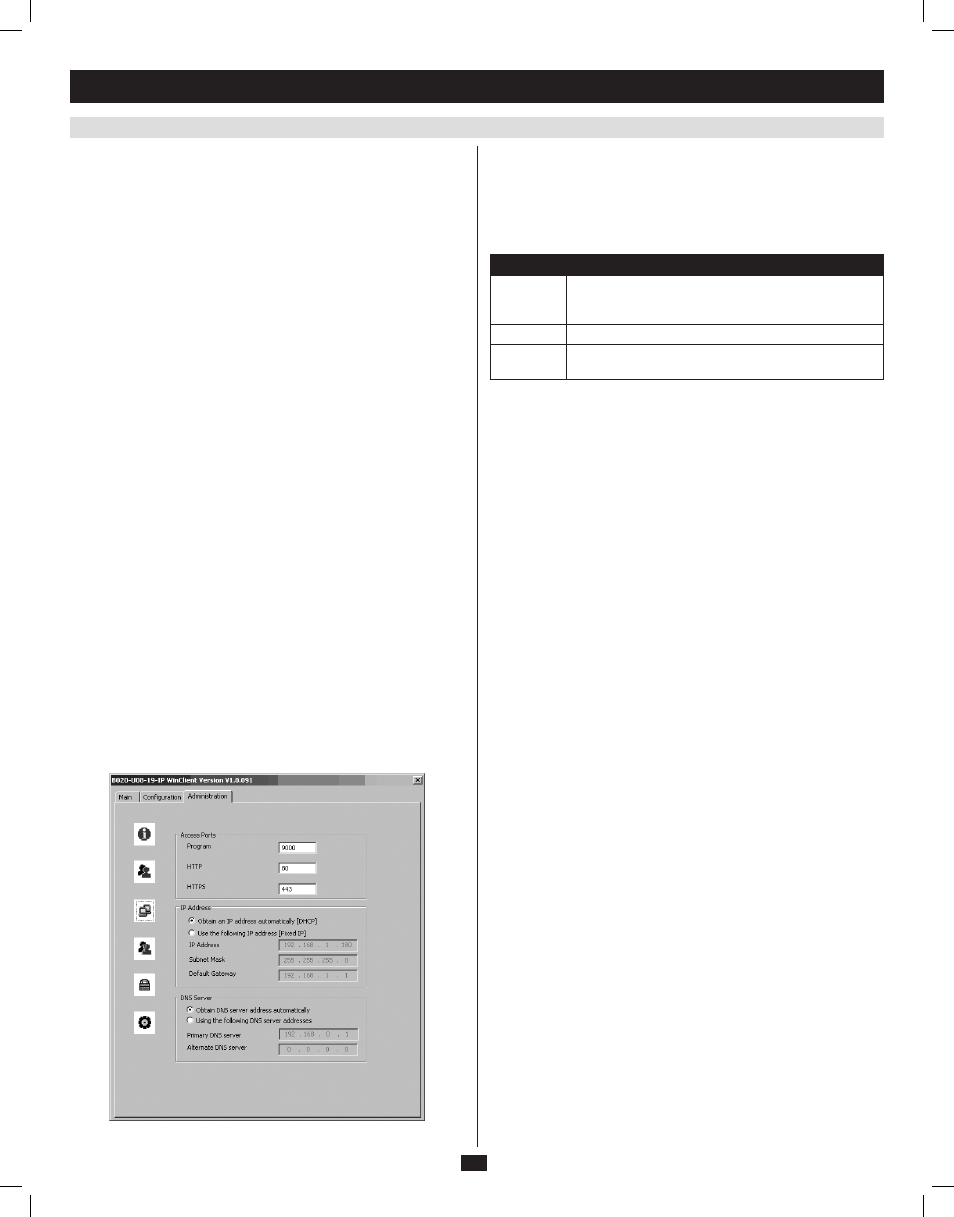
Network
The Network screen of the remote OSD allows administrators to set the
network parameters for the KVM switch. In addition to the IP Address,
Subnet Mask
and Default Gateway, which can be set using the local
console OSD, the Network screen of the remote OSD allows you to set
firewall access ports and the DNS server address. These settings can also
be configured using the Web Management Interface.
Network – Access Ports
If a firewall is being used, these fields allow administrators to specify port
numbers that the firewall will allow. The firewall must be set to allow
access to these ports. If an invalid port number (or no port number) is
specified in the firewall, the KVM switch will not be found.
An explanation of the Access Port fields is given in the table:
Port
Description
Program
This is the port number that must be specified when con-
necting to the KVM via the AP Windows or Java client.
The default is 9000.
HTTP
This port number is for a browser login. The default is 80.
HTTPS
This port number is for a secure browser login. The
default is 443.
Note: A different value must be set for each access port. If there is no
firewall, it doesn’t matter what these numbers are set to, since they have
no effect.
Network – IP Address and DNS Server
Both the IP address and DNS Server address can be assigned either
automatically by a DHCP server or given a fixed IP address by an
administrator. By default, the KVM is set to have its IP address assigned
automatically via DHCP server. To set the IP address and DNS Server
address of the KVM, follow these steps:
1. To have the IP address pulled automatically via DHCP server, make
sure that the Obtain an IP address automatically [DHCP] option is
selected.
2. To assign a fixed IP address, make sure the Use the following IP
address [Fixed IP]
option is selected.
3. Fill in the IP Address, Subnet Mask and Default Gateway fields with
information appropriate to your network.
4. If you have set the IP address to be pulled via DHCP server, you can
either choose to assign the DNS server address via DHCP as well, or
assign a fixed DNS server address. If you have assigned a fixed IP
address for the KVM, you must also assign a fixed DNS server
address. To have the DNS server address pulled via DHCP server,
make sure that the Obtain DNS server address automatically option is
selected. To assign a fixed DNS server address, make sure that the
Using the following DNS server address
option is selected.
5. Fill in the Primary DNS server and Alternate DNS server fields with
information appropriate for you network.
Note: Specifying the primary DNS Server address is mandatory. The
alternate DNS Server address is optional.
6. After all changes have been made, make sure that the Reset on exit
checkbox in the Customization screen is checked. This checkbox
should automatically be checked anytime network settings have been
changed.
7. Exit the remote session and logout of the KVM switch. Upon logging
out of the KVM, a prompt will appear stating the KVM will be reset.
Upon completion of the KVM reset, the new network settings will be
saved.
201009236 93-2985.indd 34
11/18/2010 4:21:44 PM