Administration – Tripp Lite B020-U08-19-IP User Manual
Page 41
41
7.2.3 Remote OSD Administration Tab (continued)
7. Administration
(continued)
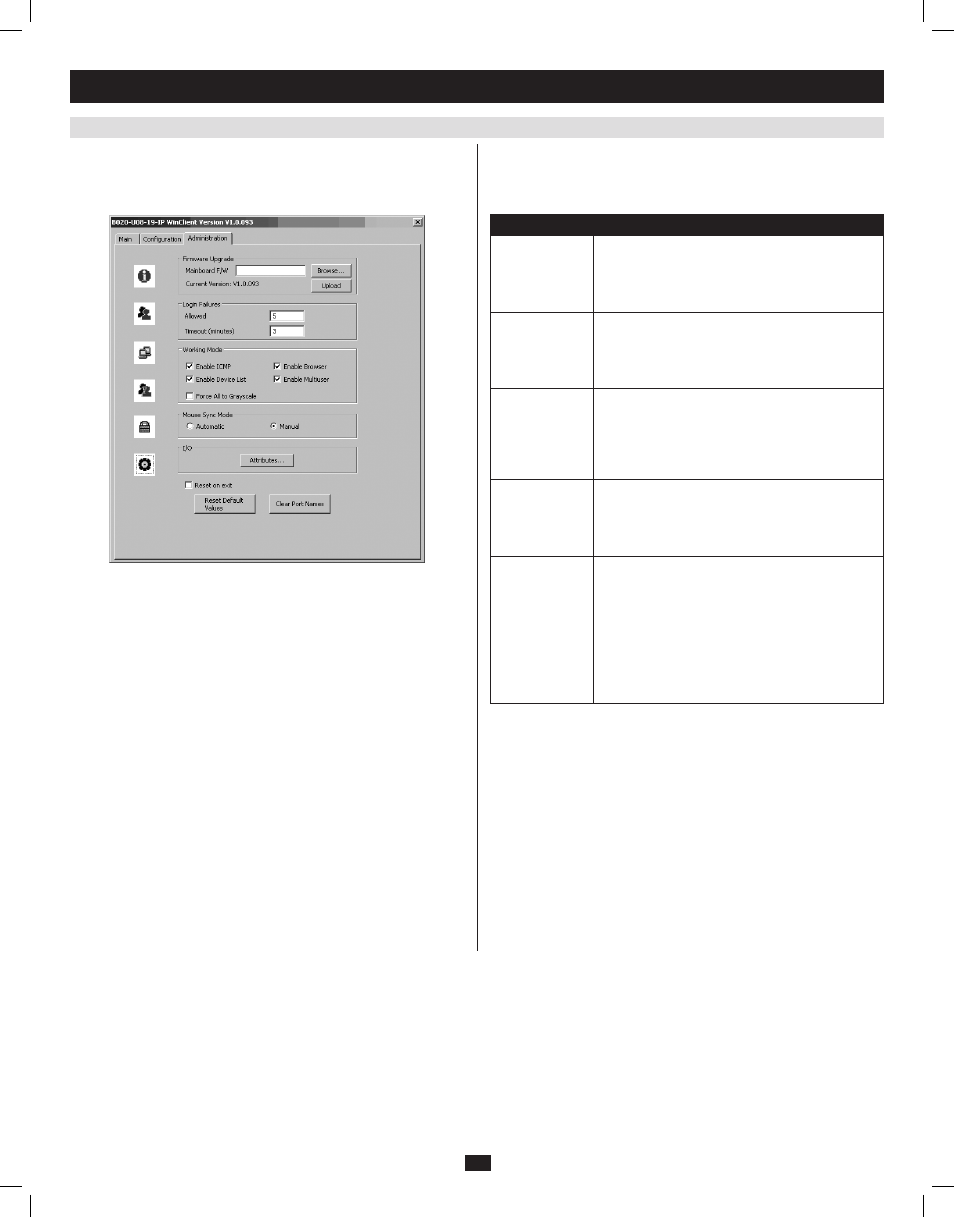
Customization
The Customization screen allows administrators to upgrade the IP
firmware of the KVM and configure settings related to KVM operation.
The sections that follow discuss the settings you will find on this page.
Customization – Firmware Upgrade
To upgrade the KVM’s IP firmware, follow these steps:
1. Download the firmware upgrade file from the Tripp Lite website.
2. Open the Remote OSD and navigate to the Customization tab.
3. Click the Browse button and select the firmware upgrade file you just
downloaded from the Tripp Lite website.
4. Click the Upload button in the Customization tab. A prompt appears
to inform you the firmware upgrade process is underway. Upon
completion, a prompt will appear stating the upgrade was successful,
and that you will need to log out and reset the KVM.
5. Upon logging out of the KVM, a reset is performed to complete the
upgrade process.
Firmware Upgrade Recovery
In the event of a firmware upgrade failure, or an aborted firmware
upgrade, perform a firmware upgrade recovery by completing the
following steps.
1. Power OFF the switch. If it is part of a daisychain installation,
disconnect it from the chain.
2. Connect the firmware upgrade cable to the firmware upgrade port.
3. Slide the Firmware Upgrade Recovery switch to the Recover position.
4. Power the switch back ON and repeat the upgrade procedure.
5. After the switch has been successfully upgraded, power it OFF and
slide the Firmware Upgrade Recovery switch back to the NORMAL
position.
6. If the switch is part of a daisychain, reconnect it to the daisychain.
7. Power the switch back ON.
Customization – Login Failures
• Allowed: Enter into this field the number of unsuccessful login
attempts that will be allowed from a remote computer.
• Timeout (minutes): Enter into this field the number of minutes a user
must wait before attempting to login again after exceeding the
maximum number of unsuccessful logins.
Customization – Working Mode
The Working Mode section allows administrators to toggle particular
KVM functions ON/OFF. The table describes the functions that can be
controlled:
Function
Description
Enable ICMP
When enabled, the B020-U08-19-IP can be pinged
and an IP address can be assigned with the ARP
command. If it is not enabled, the device cannot be
pinged, nor can it be assigned an IP address with
the ARP command. The default is Enabled.
Enable Device
List
When enabled, the B020-U08-19-IP will show up in
the list of recognized devices in the AP Windows
Client main screen. If not enabled, the AP Windows
Client will not be able to display it in the list of recog-
nized devices. The default is Enabled.
Force All to
Grayscale
When enabled, the remote display for all users and
ports is displayed in black and white. In low band-
width situations, forcing video to grayscale can
reduce the amount of data being transferred over the
network and improve keyboard/mouse response
time. The default is Disabled.
Enable Browser
When enabled, users are able to access the KVM
switch via web browser. If browser access is not
enabled, users must use either the AP Windows or
Java clients to access the switch. The default is
Enabled.
Enable Multiuser
When enabled, more than one user can log into the
B020-U08-19-IP at the same time. The default is
Enabled.
Note: This does not allow multiple users to simulta-
neously access different ports on the KVM switch, it
only allows multiple users to login at the same time.
When logged in at the same time, the first user to
access the KVM switch will have control of the
selected port, and all other users will be able to view
that port.
Customization – Mouse Sync Mode
Determines how the local and remote mouse pointer movement becomes
synchronized.
Note:
In order to be able to remotely access computers connected to the
KVM via the PS/2 connectors on the KVM cable kit, this setting must be
set to Manual. It is set to Manual by default.
Selecting Automatic provides automatic syncing of the local and remote
mouse pointers, eliminating the need to constantly re-sync the two
movements manually. If Automatic syncing isn’t able to keep the pointers
in sync, selecting Manual provides you with a number of methods to
bring them back into sync. (See page 21 for details on mouse
synchronization.)
201009236 93-2985.indd 41
11/18/2010 4:21:48 PM