FujiFilm FinePix E900 User Manual
Page 9
16
17
Getting
Ready
1
CORRECTING THE DATE AND TIME / CHANGING THE DATE FORMAT
3
1 Press “d” to move to page number.
2 Press “a” or “b” to select “PAGE 3”.
1
4
3
2
SET
SET
ENGLISH
ENGLISH
SET
SET
NTSC
NTSC
:
SET
SET
PAGE
PAGE
3
:
:
:
:
:
0
1
0
2
1
4
3
2
SET
SET
SET
SET
DATE/TIME
DATE/TIME
ENGLISH
ENGLISH
SET
SET
NTSC
NTSC
:
:
:
:
:
4
1 Press “c” to move to menu item.
2 Press “a” or “b” to select “ì” DATE/TIME.
3 Press “c”.
0
1
0
3
0
2
SET-UP
SET-UP
SET
SET
1
2
AUTO
AUTO
OFF
OFF
:
:
:
:
STD
STD
:
2
1 Press “a” or “b” to select “˜” SET-UP.
2 Press “c”.
0
1
0
2
1
Press the “MENU/OK” button to display the menu
on the LCD monitor.
SELF-TIMER
SELF-TIMER
SET
SET
1
2
AUTO
AUTO
OFF
OFF
OFF
OFF
:
:
:
:
:
STD
STD
:
DATE/TIME
DATE/TIME
AM
AM
SET
SET
CANCEL
CANCEL
D D. M M . Y Y
D D. M M . Y Y
Y Y. M M . D D
Y Y. M M . D D
9 / 2 4 / 2 0 0 5
MM/DD/YY
MM/DD/YY
1 0 : 0 0
DATE/TIME
DATE/TIME
SET
SET
CANCEL
CANCEL
YY.MM.DD
YY.MM.DD
2007
2006
2005
2004
2003
9. 4
2
0
1 00
AM
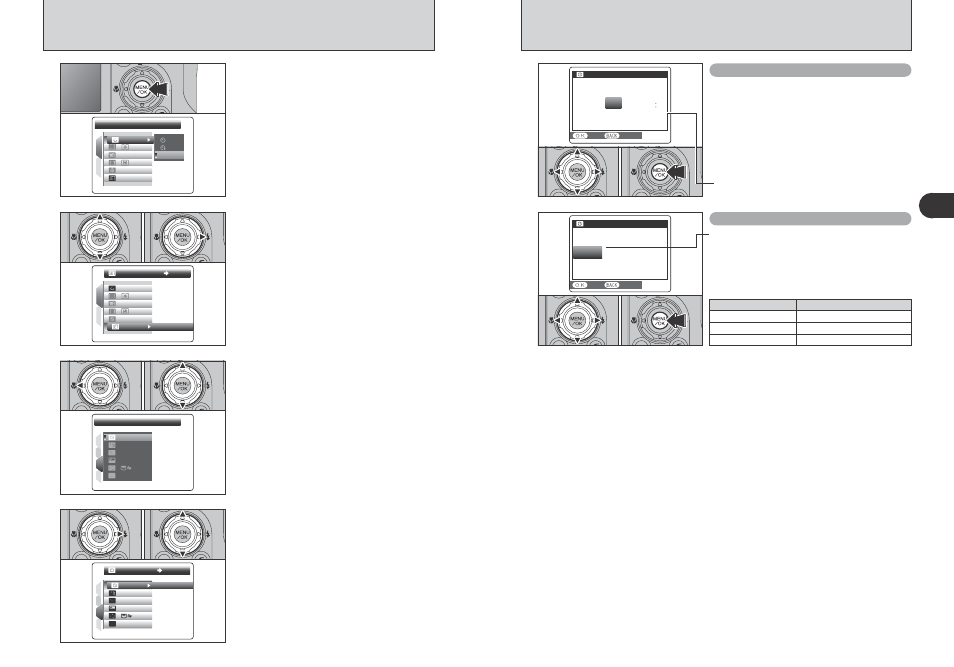
Correcting the date and time
Changing the date format
0
1
0
2
0
3
5
1 Press “d” or “c” to select Year, Month, Day,
Hour or Minute.
2 Press “a” or “b” to correct the setting.
3 Always press the “MENU/OK” button after the
settings are completed.
0
1
0
2
0
3
1 Press “d” or “c” to select the date format.
2 Press “a” or “b” to set the format. Refer to the
table below for details of the settings.
3 Always press the “MENU/OK” button after the
settings are completed.
●
!
Holding down “a” or “b” changes the numbers continuously.
●
!
When the time displayed passes “12”, the AM/PM setting
changes.
Date format
Sample settings
YY.MM.DD
2005.9.24
MM/DD/YY
9/24/2005
DD.MM.YY
24.9.2005