Manual, D exposure compensation – FujiFilm FinePix E900 User Manual
Page 22
42
43
Advanced
Features
3
320
F
6.4
Aperture
66
N
N
ISO
400
ISO
400
ISO
400
320
F
6.4
Shutter speed
66
N
N
ISO
400
ISO
400
ISO
400
> MANUAL
PHOTOGRAPHY FUNCTIONS
Set the Mode dial to “>”.
Use Manual mode to set any shutter speed and
aperture setting.
Setting the shutter speed
Press “a” or “b” to select the shutter speed.
h Shutter speed setting
15 sec. to 1/2000 sec. in 1/3 EV increments
●
!
See P.128 for information on EVs.
●
!
Use a tripod to prevent camera shake.
●
!
In shots with long exposures, noise (dots) may appear on the
image.
●
!
If the shutter speed is set to a speed faster than 1/1000 sec.,
the image may appear dark even if the flash is used.
Setting the aperture
1 Hold down the “D” button.
2 Press “a” or “b” to select the aperture.
h Aperture settings
Wide-angle: F2.8 to F8 in 1/3 EV increments
Telephoto: F5.6 to F8 in 1/3 EV increments
◆
The exposure indicator
◆
Use the exposure indicator on the LCD monitor as a
guide when setting the exposure.
When the brightness of the subject is outside the
camera’s brightness metering range, the exposure
indicator disappears on the LCD monitor.
0
1
0
2
320
F
6.4
Exposure indicator
66
N
N
ISO
400
ISO
400
ISO
400
250
F
5.6
66
N
N
ISO
400
ISO
400
ISO
400
Exposure
compensation
indicator
Use this function for shots to get the correct brightness (exposure), such as shots with extremely
high contrast between the subject and the background.
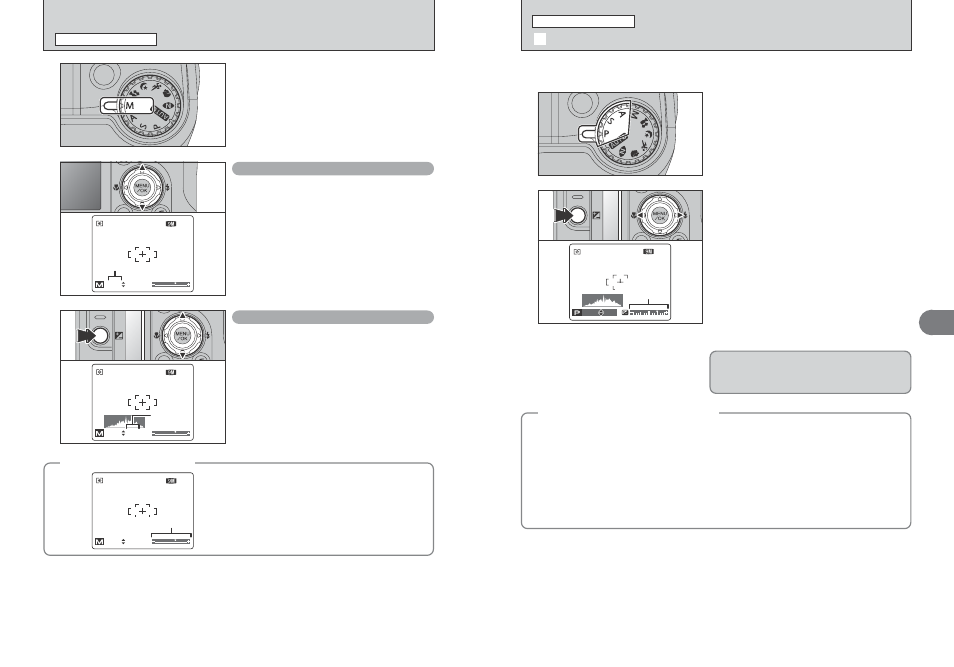
Set the Mode dial to “N”, “M” or “<” mode.
1
1 Hold down “D” button.
2 Press “d” or “c” to set the compensation value.
The symbol indicating the compensation direction
(– or +) turns yellow. The “D” icon also turns yellow
while exposure compensation is being set and then
turns blue after setting is completed.
h Compensation range
–2 EV to +2 EV (13 steps in 1/3 EV increments)
●
!
Exposure compensation cannot be used in the “
B
”, “
À
”,
“
U
”, “
.
”, “
/
”, “
>
” and “
r
” modes.
●
!
The LCD monitor brightness will increase or decrease
depending on the exposure compensation setting.
●
!
The following disables exposure compensation:
Shooting dark scenes in “
d
” Forced flash or “
b
” Red-eye
reduction mode
This setting is retained when the mode is changed
or the camera is turned off (“
D
” icon appears). Set
the exposure compensation to “0” unless
compensation is required.
0
1
0
2
2
D EXPOSURE COMPENSATION
PHOTOGRAPHY FUNCTIONS
◆
To obtain the optimum brightness
◆
Adjust the exposure compensation according to the level of brightness or darkness in the image.
h When the subject appears too bright
Try a negative (–) compensation setting.
This will make the overall image darker.
h When the subject appears too dark
Try a positive (+) compensation setting.
This will make the overall image brighter.
■ Guide to compensation
i Backlit portraits: +2 steps to +4 steps (+
DW
EV to +1
DQ
EV)
i Very bright scenes (such as snowfields) and highly reflective subjects: +3 steps (+1 EV)
i Shots made up predominantly of sky: +3 steps (+1 EV)
i Spotlit subjects, particularly against dark backgrounds: –2 steps (–
DW
EV)
i Scenes with low reflectivity, such as shots of pine trees or dark foliage: –2 steps (–
DW
EV)
Available Photography modes:
N, M, <