3 in global p6: user arpeggio, select the pattern, 4 if you moved here from program mode, a will 4 au, 5 in “pattern,” select the arpeggio pattern that y – KORG Speaker System User Manual
Page 105: 6 in “length,” specify the length of the pattern, 7 make settings for the “q ,” “octave,” “resolutio, 8 in arpeggio pattern setup, make settings to spec, 9 select the pattern edit tab, Creating an example pattern, 1 set “step no.” to 01, and press the [0] key, 2 set “step no.” to 02, and press the [1] key
101
Basic functions
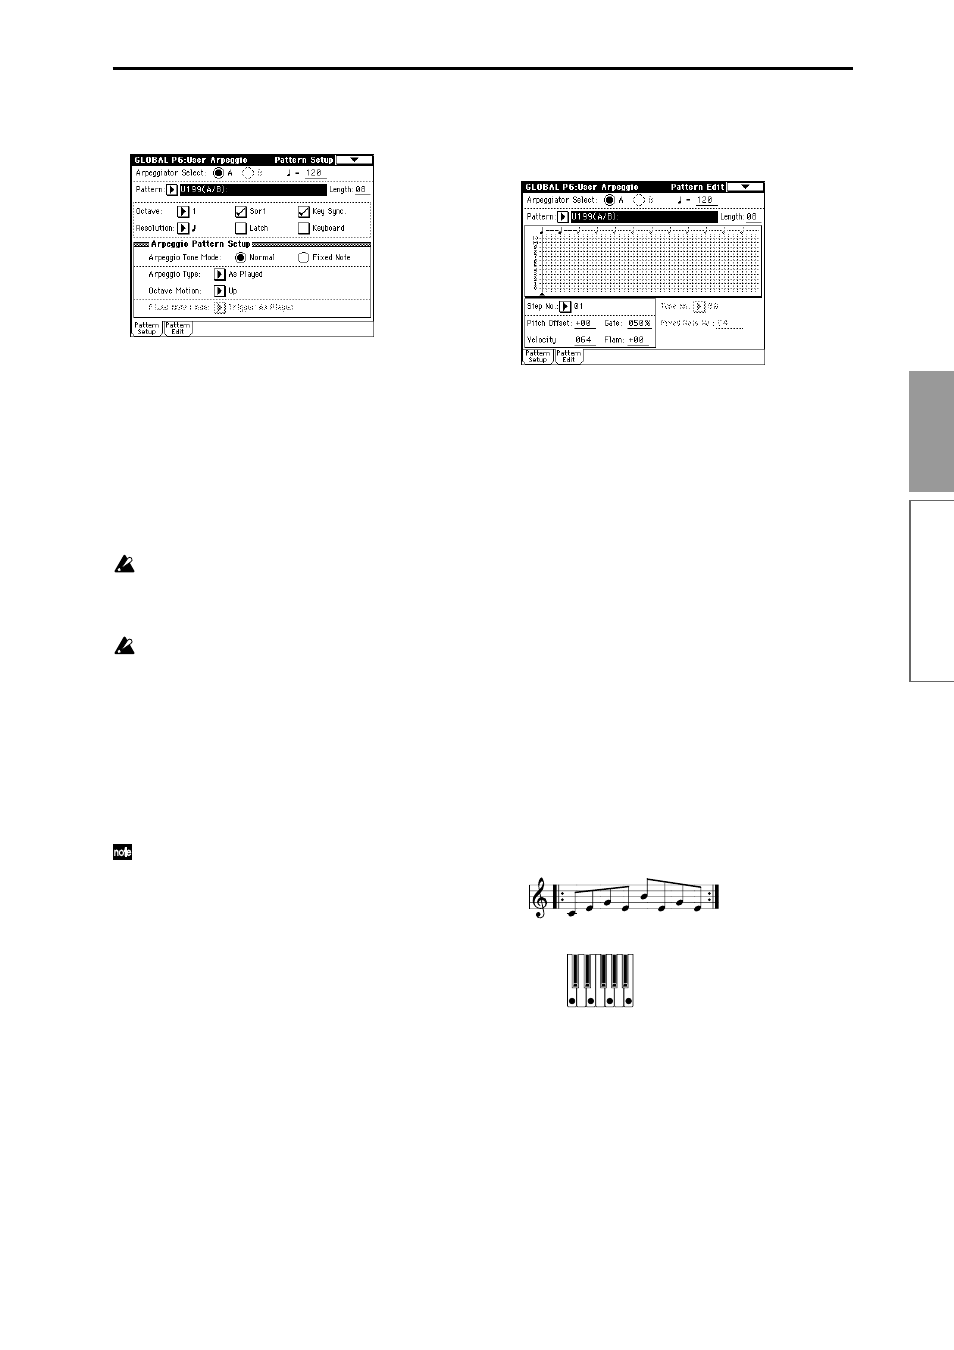
3 In Global P6: User Arpeggio, select the Pattern
Setup tab.
4 If you moved here from Program mode, A will
automatically be selected for “Arpeggiator Select.”
5 In “Pattern,” select the arpeggio pattern that you
wish to edit.
For this example, select an empty user arpeggio
pattern.
If you have moved from Program mode, the arpeg-
gio pattern selected by the program will be dis-
played.
If a blank pattern is selected, playing the keyboard
will not start an arpeggio. Although preset arpeg-
gio patterns P000–P004 can be selected, they can-
not be edited.
When you edit a user arpeggio pattern, the
changes will have an effect anytime that this pat-
tern is used in Program, Combination, Sequencer,
or Song Play mode.
6 In “Length,” specify the length of the pattern.
After the pattern has played for the length specified
here at the note interval specified by “Resolution,” it
will return to the beginning. This setting can also be
changed during or after editing. For this example,
set it to 8.
For the preset arpeggio patterns U000(A/B)–
U199(A/B)
, simply changing the “Length” can sig-
nificantly change the character of the pattern. Try
changing the length and listening to the result.
7 Make settings for the “
,” “Octave,” “Resolution,”
“Sort,” “Latch,” “KeySync.,” and “Keyboard”
parameters.
These are program parameters, but can be set from
here as well.
If after moving here from Program mode, you mod-
ify these parameters and wish to keep your changes,
return to Program mode and write the program.
These parameters are not saved by “Write Arpeggio
Pattern.”
For this example, make the settings shown in the
illustration 3.
8 In Arpeggio Pattern Setup, make settings to spec-
ify how the arpeggio will be played.
These settings can be changed during or after edit-
ing (
☞
p.127 in the Parameter Guide).
9 Select the Pattern Edit tab.
A pattern consists of Steps and Tones.
• Step: A user arpeggio pattern can have a
maximum of 48 steps. The arpeggiator will play
from the first step, at intervals of the note value
specified by “Resolution.” The vertical lines of
the grid shown in the center of the LCD screen
indicate the steps.
Use “Step No.” to select the step. For each step,
specify “Pitch Offset,” “Gate,” “Velocity” and
“Flam.”
• Tone: At each step, a chord consisting of up to
12 tones (“Tone No.” 00–11) can be sounded.
To input tones, select “Step No.” and then use
numeric keys [0]–[9], [–], and [./10’s HOLD] to
input tones. The “Tone No.” corresponds to the
[0]–[9], [–], and [./10’s HOLD] keys as shown
below. Each time you press a [0]–[9], [–], or [./
10’s HOLD] key, the corresponding tone will be
turned on/off. The horizontal lines of the grid
shown in the center of the LCD screen indicate
the tones.
Tone00–09:
[0]–[9] keys
Tone10:
[–] key
Tone11:
[./10’s HOLD] key
Creating an example pattern
1 Set “Step No.” to 01, and press the [0] key.
2 Set “Step No.” to 02, and press the [1] key.
3 Set “Step No.” to 03, and press the [2] key.
4 Set “Step No.” to 04, and press the [1] key.
5 Set “Step No.” to 05, and press the [3] key.
6 Set “Step No.” to 06, and press the [1] key.
7 Set “Step No.” to 07, and press the [2] key.
8 Set “Step No.” to 08, and press the [1] key.