Fp2607 install battery – Monessen Hearth DIRECT VENT GAS FIREPLACE KHLDV400 User Manual
Page 39
73D0024
39
KHLDV Series Gas Fireplace
note
Due to the sensitive temperature monitoring
components in the transmitter, it is necessary
to allow the transmitter to stabilize to room tem-
perature before accurate room temperatures
are displayed. If the transmitter is activated
from a severe cold condition, allow 15 minutes
for accurate temperature readings to appear on
the LcD display.
w
arn
In
G
turn appliance oFF (at the Master Switch) if
you are away from your house for an extended
period of time. never leave anything on top of
the surface of the transmitter.
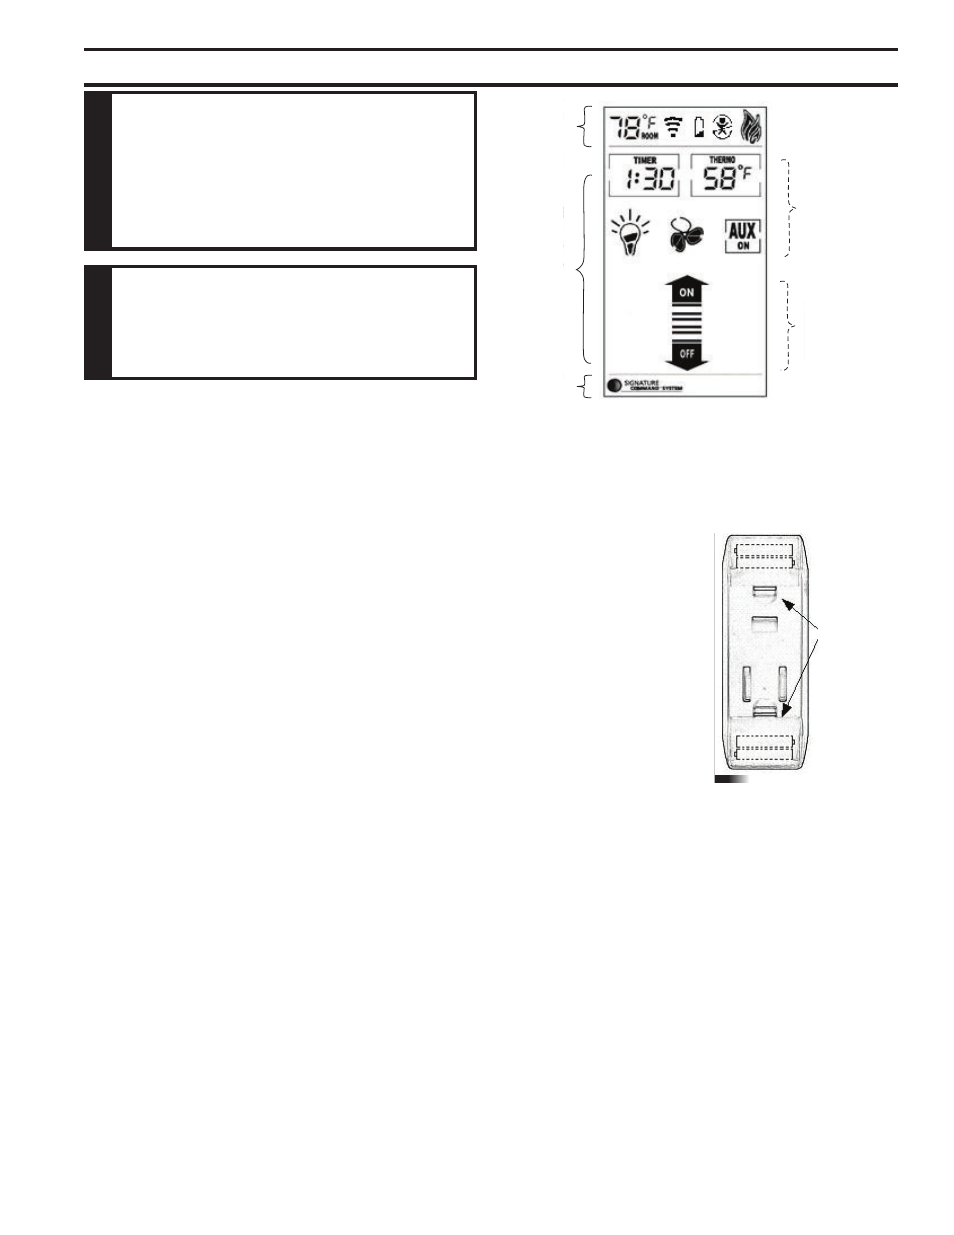
toucH Screen reMote controL operatIon
n
Function Areas of the LCD Display
Figure 26 shows the display of the TSFRSC LCD.
Information Bar
The information bar shows the room temperature, the
“sending signal” radio icon, the low battery indication icon,
the child-proof icon, and the flame icon. This area doesn’t
have touch buttons.
•
The room temperature will always be shown after
power-up. It displays the room temperature from 40
°F to 99 °F. “Lo” and “HI” will be displayed when the
room temperature is lower than 40°F or higher than
99°F, respectively.
•
The radio icon will be shown when the transmitter is
sending a signal.
•
The low battery indication icon will be shown when
the battery voltage is low.
•
The child-proof icon will be shown when the child-
proof mode is activated.
•
The flame icon indicates the current flame height
- Off, Low, Medium and High
touch area
The touch area contains all touch buttons to control the
transmitter. It consists of two categories: menus and ad-
justment arrows. The blue LED backlight lights up for 8
seconds when any of the touch buttons is pressed.
•
The menus include TIMER, THERMO, LIGHT, FAN
and AUX (Rear Burner Control).
•
The adjustment arrows include ON/up and OFF/
down. Their default function is to adjust the flame
height. When a button from the menu is pressed,
the ON/up and OFF/down buttons will temporarily
become adjustment controls for the selected item.
When the adjustment is done, the ON/up and OFF/
down buttons go back to flame height controller
again.
Logo Bar
The Logo Bar contains the brand logo: Signature Com-
mand System.
n
Initialization and Setting up
Installing Batteries:
Figure 50
The remote transmitter has
two battery compartments,
one on each end of the trans-
mitter. always change all
four (4) batteries at the
same time.
To install batteries,
1. Press down the battery
door tab and pull out to re-
move the battery door.
2. Install the batteries as in-
dicated inside the battery
compartments.
3. Close the battery door by snapping in place.
4. When all four batteries are installed, the transmitter
will initialize for 5 seconds and then is ready for use.
5. The batteries should be replaced every 12 months or
when the low battery icon indicator is displayed.
changing temperature unit
When batteries are installed in the transmitter,
1. All available icons on the LCD will be turned on then
be cleared.
2. The LCD will display temperature unit: °F. Use ON ∆
to toggle the units between °F and °C within the first 5
seconds.
3. The transmitter enters Manual Mode
4. The LCD displays room temperature with the chosen
unit.
FP2646
TSFSC display
Information
Bar
Touch
Area
Logo
Bar
Menus
Adjustment
Controls
Function areas of the LcD Display
Figure 49
FP2607
install battery
Battery Door
Tabs
Figure 50