Grizzly G0444 User Manual
Page 44
-42-
G0444/G0444Z 10" Table Saw
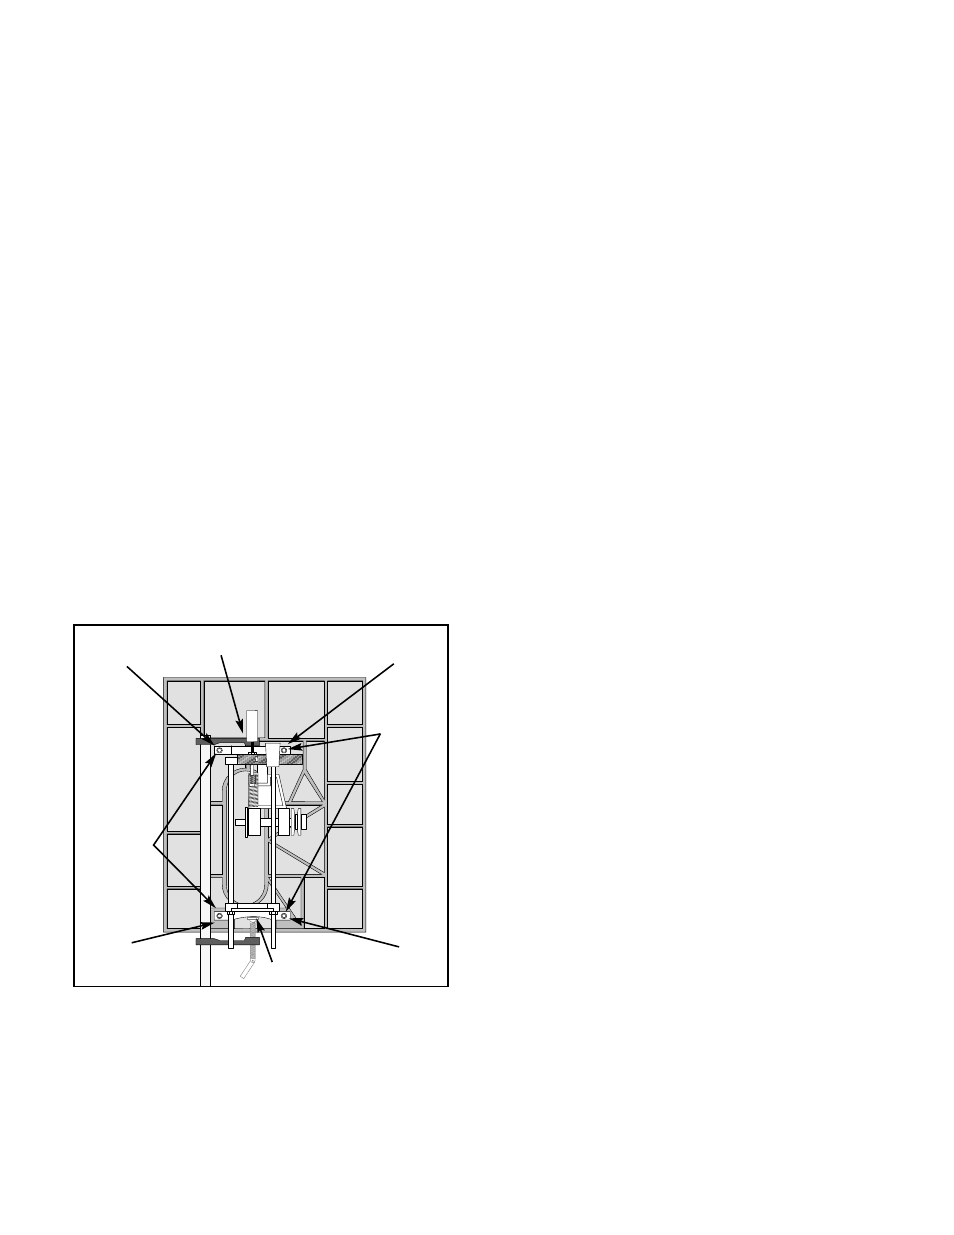
Figure 55.
Underside view of
table/trunnion assembly.
6.
Tilt the blade to 45° and repeat
Steps 3-5
.
— If the difference was less than 0.004"
when the blade was positioned at 90˚ and
45˚, then the blade parallelism is set cor-
rectly. Skip to the next sub-section.
— If the difference was greater than 0.004"
when the blade was positioned at 90˚ or
45˚, then the trunnion assembly below the
table needs to be adjusted. Continue with
the next step.
7.
Remove the fence and the blade guard.
8.
Lower the saw blade completely below the
table surface.
9.
Flip the saw upside down on the floor.
Note—
Lay clean and staple-free cardboard
or a blanket on the floor to prevent damage
to the cast iron table.
10.
To maintain the trunnion assembly as one
unit, place a bar clamp across the entire
trunnion assembly as shown in
Figure 55
.
11.
Refer back to the measurements taken in
steps 3-6
.
— If the blade was not parallel in the 90˚
position, then proceed to the set of
instructions titled “To Shift The Trunnion.”
— If the blade was not parallel in the 45˚
position, then proceed to the set of
instructions titled “To Shim The Trunnion.”
To Shift The Trunnion:
1.
Loosen the trunnion bolts (
Figure 55
).
2.
Move the trunnion assembly according to the
difference measured when the blade was in
the 90˚ position.
3.
Tighten the trunnion bolts.
4.
Flip the saw rightside up and repeat
steps 2-
6
on
page 41
.
5.
Once the miter slot is adjusted parallel to the
blade, recheck all measurements and be
sure the table mounting bolts are secure.
6.
Re-attach the blade guard and fence.
7.
Verify that the blade guard is correctly
aligned with the blade.
To Shim The Trunnion:
1.
Loosen the trunnion bolts (
Figure 55
).
2.
Using
Figures 56 & 57
, shim the trunnion
assembly according to the difference mea-
sured when the blade was in the 45˚ posi-
tion.
— If the distance of A is shorter than B,
shim(s) will need to be placed under cor-
ners #1 and #2.
— If the distance of B is shorter than A,
shim(s) will need to be placed under cor-
ners #3 and #4.
Note—
Very thin shim stock works well, just make
sure they are all the same thickness and you put
an equal number under each of the two corners.
Clamp Here
Clamp Here
Trunnion
Bolts
Trunnion
Bolts
#1 Shim
#3 Shim
#4 Shim
#2 Shim