After you have completed connections, Connecting to an md deck or dat deck, Coaxial optical – FUNAI DRV-B2734 User Manual
Page 17: Av2 (rear), Av3 (front), Get tin g s tar ted en, The unit is for the drv-b2737, S-video out audio out
17
Get
tin
g S
tar
ted
EN
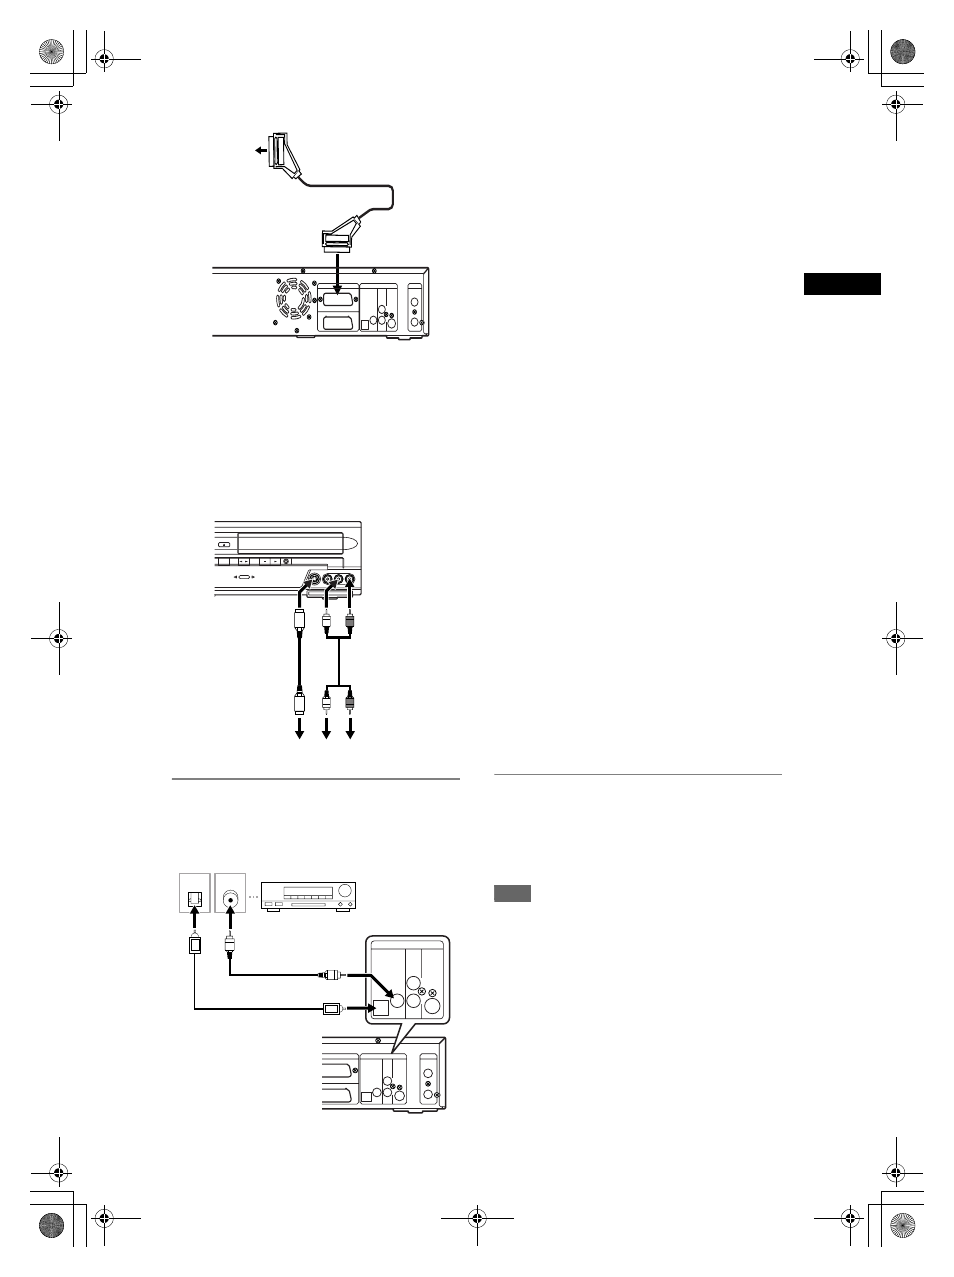
Recording from a camcorder or other
Audio-Video equipment with no Scart output
jack (AV3)
If no S-Video input jack is available, connect to
VIDEO input jack on the front panel using an RCA
Video cable.
Change the setup when using S-VIDEO IN jack. (See
page 32.)
Digital audio for better sound quality
(only for DVD)
The connections illustrated above are
optional for better sound.
1
For clear digital sound quality, use
the DIGITAL AUDIO OUT (OPTICAL
(DRV-B2737 only) or COAXIAL) jack
to connect your digital audio
equipment.
If the audio format of the digital output does not
match the capabilities of your receiver, the
receiver will produce a strong, distorted sound or
no sound at all.
Connecting a Dolby Digital™ decoder, DTS
decoder or MPEG decoder
• Connecting multi-channel Dolby Digital decoder
allows you to enjoy the 5.1ch Dolby Digital surround
system as well as DTS decoder, 5.1 channel
surround system.
• After connecting to a Dolby Digital decoder, set
“DOLBY DIGITAL” to “Stream” in the AUDIO menu.
(See page 60.)
• After connecting to a DTS decoder, set “DTS” to
“ON” in the AUDIO menu. (See page 60.)
• After connecting to a MPEG decoder, set “MPEG” to
“Stream” in the AUDIO menu. (See page 60.)
Connecting to an MD deck or DAT deck
• The audio source recorded in Dolby Digital 5.1
channel surround format cannot be recorded using
an MD or DAT deck as a digital sound.
• If not connected to a Dolby Digital decoder, set
“DOLBY DIGITAL” to “PCM” in the AUDIO menu.
Playing back a DVD using incorrect settings may
generate noise distortion, and damage speakers.
• Set “DOLBY DIGITAL,” and “MPEG” to “PCM” and
set “DTS” to “OFF” in the AUDIO menu for
connecting to an MD or DAT deck.
• You can use AUDIO OUT jacks for the connection of
your audio system.
After you have completed
connections
Switch the input selector on your TV to an appropriate
external input channel. For details, refer to the
Owner’s Manual of your TV.
Note
• Connect this unit directly to the TV. If the AV cables
are connected to a VCR, pictures may be distorted
due to the effects of the copy protection system.
DVD/VCR
AV2(DECODER)
AUDIO
OUT
AERIAL
RF OUT
L
R
S-VIDEO
OUT
AV1(TV)
DVD
DVD/VCR
DIGITAL
AUDIO OUT
COAXIAL
OPTICAL
AV output jack
(Scart)
Scart cable (supplied)
AV2 (Rear)
*
The unit is for the DRV-B2737.
DUBBING
SELECT
STOP
PLAY RECORD
SELECT
DVD
VCR
S-VIDEO
VIDEO
L(MONO)-AUDIO-R
OPEN/CLOSE
S-VIDEO
OUT
AUDIO
OUT
AV3 (Front)
S-Video cable
(not supplied)
Audio cable
(not supplied)
*
The unit is for
the DRV-B2737.
DVD/VCR
AV2(DECODER)
AUDIO
OUT
AERIAL
RF OUT
L
R
S-VIDEO
OUT
AV1(TV)
DVD
DVD/VCR
COAXIAL
OPTICAL
DIGITAL
AUDIO OUT
COAXIAL
OPTICAL
AUDIO
OUT
L
R
S-VIDEO
OUT
DVD
DIGITAL
AUDIO OUT
COAXIAL
OPTICAL
or
Dolby Digital decoder,
DTS decoder or
MPEG decoder, etc.
Digital audio
input jacks
Optical cable
(not supplied)
Coaxial cable
(not supplied)
*
The unit is for
the DRV-B2737.
DRV_B2737_B2734.book Page 17 Thursday, March 31, 2005 10:04 PM