Front panel, Rear panel – Denon DJ DJ SC6000M Prime Dual-Layer Media Player with 10.1" Multi-Touch Display User Manual
Page 10
10
27.
Hot Cue
: Press this button to enter Hot Cue Mode.
28.
Loop
: Press this button once to enter Manual Loop Mode, and press it again to enter Auto Loop Mode.
29.
Roll
: Press this button to enter Roll Mode.
30.
Slicer
: Press this button once to enter Slicer Mode, and press it again to enter Slicer Loop Mode.
31.
Parameter
/
: Use these buttons for various functions in each Pad Mode. See
for more information.
32.
Loop In
/
Loop Out
: Press either of these buttons to create a Loop In or Loop Out point at the current location. Their placement
will be affected by the
Quantize
and
Smart Loops
for more information.
33.
Auto Loop
/
Loop Move
: Turn this knob to set the size of an automatic loop. The value will be shown in the touchscreen
and platter display.
Press this knob to activate or deactivate an automatic loop at the current location of the track.
Tip
: You can assign auto loops to pads in Manual Loop Mode. See
for more information.
Press and hold
Shift
and turn this knob to shift the active loop to the left or right.
34.
Beat Jump
: Press either of these buttons to skip backward or forward through the track. Use the
Auto Loop
knob to
determine the beat jump size.
Press and hold
Shift
and then press one of these buttons to search backward or forward through the track.
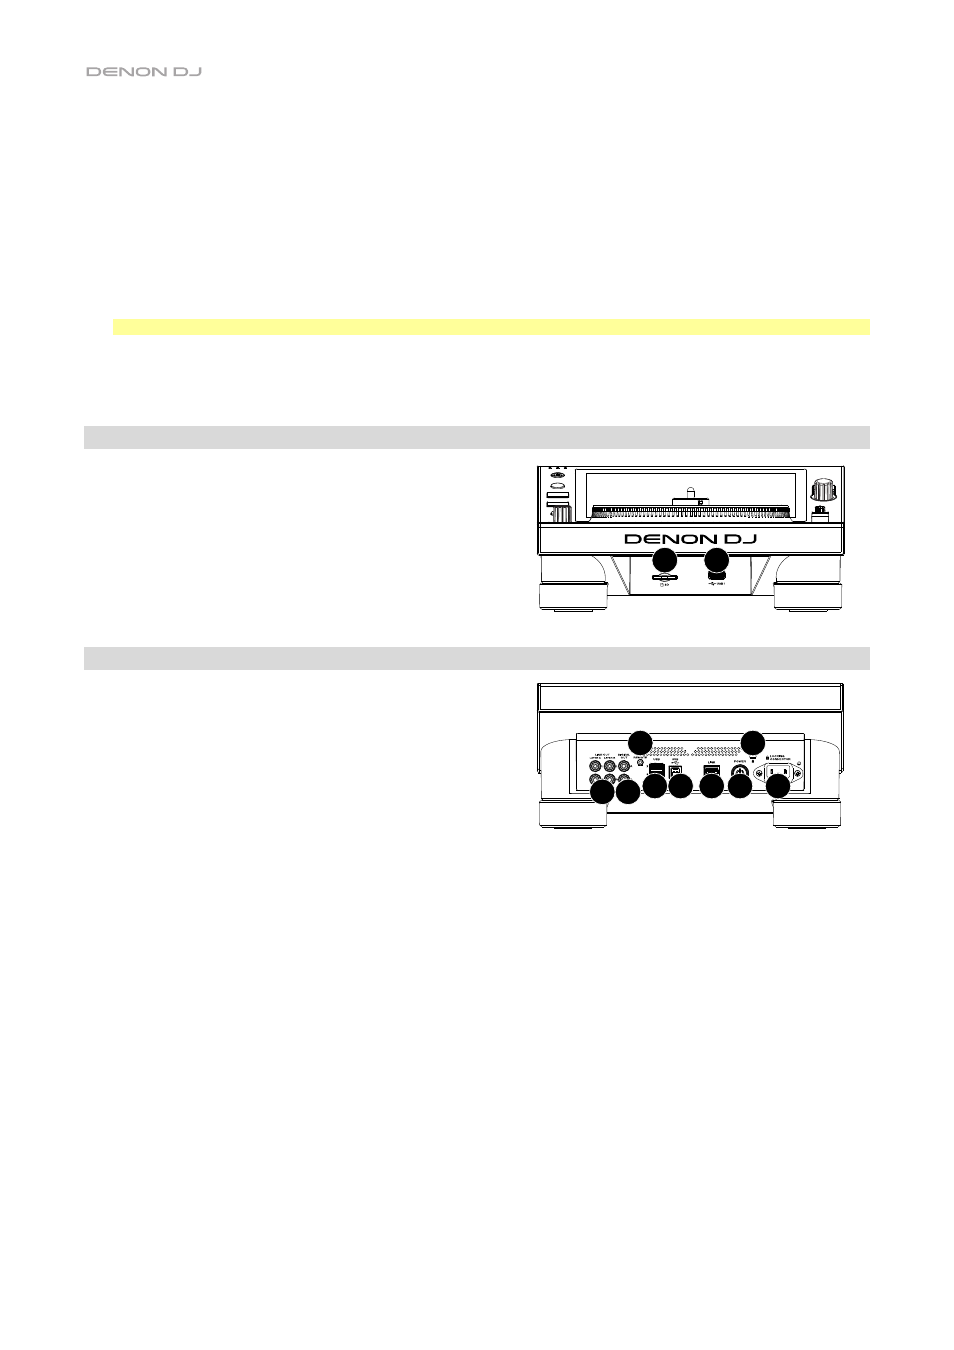
Front Panel
1.
Front USB Port
: Connect a standard USB drive to this USB port.
When you select that USB drive as a source (press the
Source
button), you can use the display to select and load tracks from your
USB drive. There are also two similar USB ports on the rear panel.
You can use the included USB extension cable to accommodate
larger or smaller USB thumb drives.
2.
SD Card Slot
: Insert a standard SD card to this slot. When you
select that SD card as a source (press the
Source
button), you
can use the display to select and load tracks from your SD card.
Rear Panel
1.
Power Input
: Use the included locking power cable to connect
this input to a power outlet. To remove the power cable, push
down on the yellow tab and then pull the cable out of the input.
You can also use a standard IEC power cable in place of the
included locking power cable.
SC6000M PRIME has a protection circuit to safely eject all media
after an unexpected power loss to protect your data from
corruption. Reconnect your power source to return to normal
operation.
2.
Power Button
: Press this button to power SC6000M PRIME on or off. Power on SC6000M PRIME only
after
you have
connected all of your input devices and
before
you power on your amplifiers and loudspeakers. Power off your amplifiers
and loudspeakers
before
powering off SC6000M PRIME.
Press and hold this button for 10 seconds to reset SC6000M PRIME.
3.
Link Port
:
Use the included networking cable to connect this port to another SC6000M PRIME or to your Denon DJ mixer.
Each networked SC6000M PRIME can share track databases, timing and BPM information, and other track data over this
connection.
4.
USB B Port
: Use a standard USB cable (included) to connect this USB port to an available USB port on your computer.
This connection sends and receives MIDI messages to and from the computer.
5.
Rear USB Ports 2
/
3
: Connect standard USB drives to these USB ports. When you select one of those USB drives as a
source (press the
Source
button), you can use the display to select and load tracks from your USB drives. There is also a
similar USB port on the front panel.
6.
Layer A
/
B Outputs
: Use standard RCA cables to connect these outputs to your DJ mixer. The
Layer A
Line Outputs send
out the audio signal from Layer A. The
Layer B
Line Outputs send out the audio signal from Layer B.
7.
Digital Outputs A
/
B
: Use standard digital coaxial cables to connect these 24-bit/96 KHz outputs to devices and mixers
such as the Denon DJ X1850 PRIME mixer.
8.
Remote Input
: Use a standard remote start cable to connect this input to the remote-start output of your mixer (if available).
While connected to a remote-start-compatible mixer, moving the crossfader toward the side that corresponds to this
SC6000M PRIME (or raising the channel fader for its channel) will automatically start the track on the currently selected layer.
9.
Kensington
®
Lock Slot
: Use this slot to secure SC6000M PRIME to a table or other surface.
1
2
3
4
5
6 7
8
9
1
2