Deck section – Roland DJ-202 2-Channel, 4-Deck DJ Controller for Serato DJ Lite User Manual
Page 5
5
Panel Descriptions
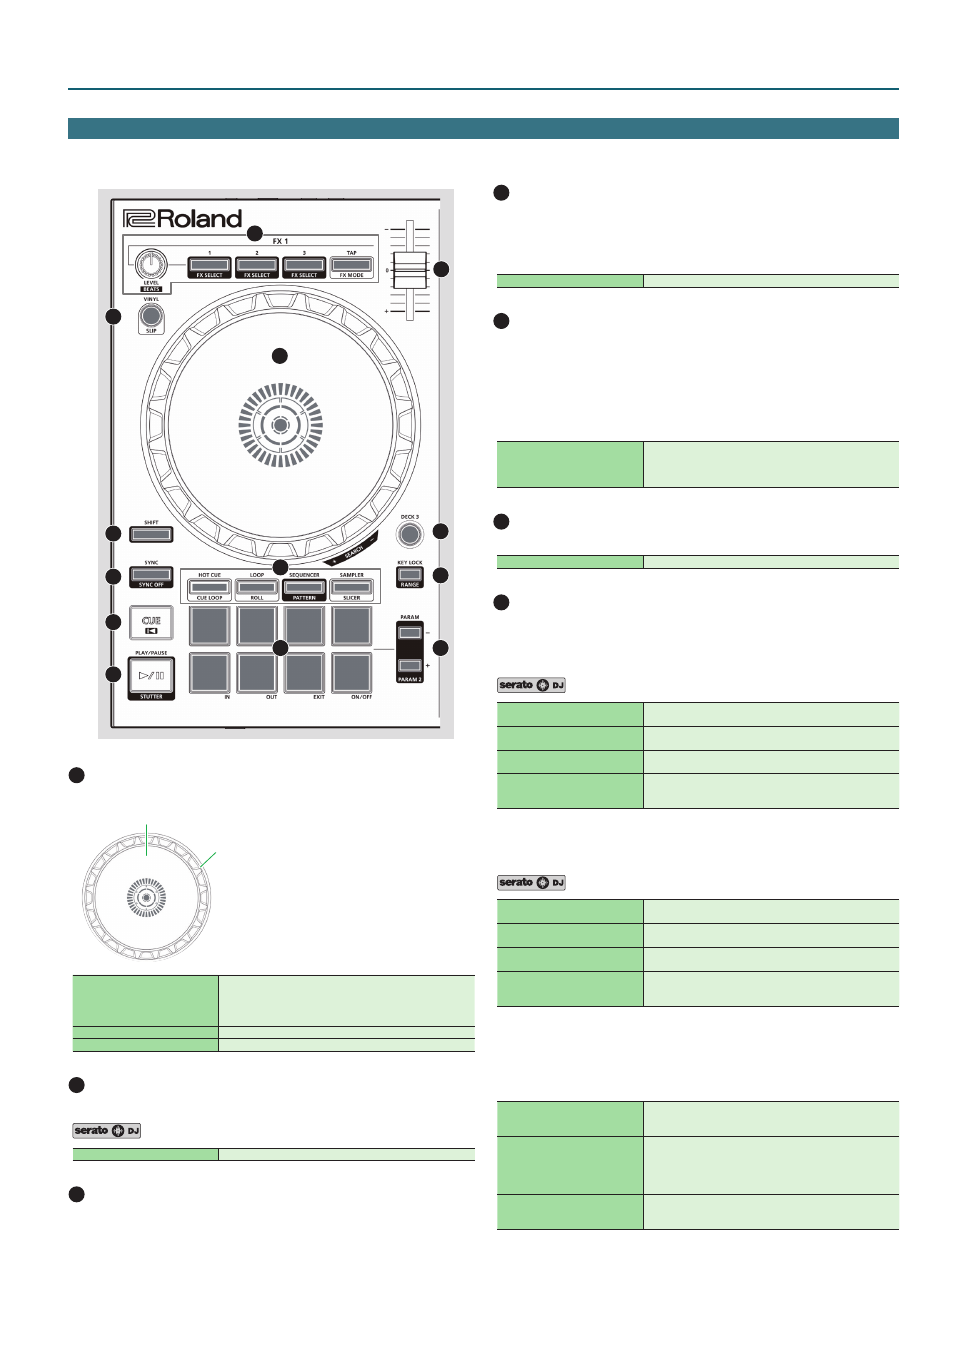
Deck Section
The deck sections located at the left and right control four decks (left: decks 1 and 3, right: decks 2 and 4).
1
2
3
4
5
6
7
8
9
10
11
12
13
1
Jog dial
Controls scratch and pitch bend (playback speed adjustment).
Top surface
Outer edge
Rotate the top surface
If VINYL MODE is on:
Performs scratch operations.
If VINYL MODE is off:
Performs pitch bend (playback speed) operations.
Rotate the outer edge
Performs pitch bend.
[SHIFT] + rotate the top surface
Rapidly moves the playback location.
2
[VINYL] button
Turns VINYL mode on/off.
[SHIFT] + [SYNC]
Turns slip mode on/off.
3
[SHIFT] button
You can recall other functions by holding down this button and pressing
another button.
4
[SYNC] button
Automatically matches the tempo (pitch) of multiple songs.
* In order to use the SYNC function, the song’s tempo must be specified. If
a tempo (BPM) has not been specified for the song, you can use the tap
tempo function (p. 7) to specify the tempo.
[SHIFT] + [SYNC]
Cancels SYNC.
5
[CUE
u
] button
Specifies, plays, or recalls a temporary cue point.
The first time that you press the [CUE
u
] button after switching the
playback song, the cue point is set.
After the cue point has been set, pressing the [CUE
u
] button moves the
cue point to the location at which you pressed the button.
If playback is in progress, pressing this button moves to the temporary cue
point and stops playback.
[SHIFT] + [CUE
u
]
If you press the buttons during the song, the location returns
to the beginning of the song.
If you press the buttons at the beginning of the song, the
previous song in the song list is loaded.
6
[
r
] button
Plays or pauses the song.
[SHIFT] + [
r
]
Returns to the temporary cue point, and plays.
7
Pad Mode select
Here you can select the control mode of the performance pads.
[HOT CUE] button
Press [HOT CUE]
Button: Lit
Assigns hot cue to performance pads 1–8.
[SHIFT] + [HOT CUE]
Button: Blinking slowly
Selects cue loop mode.
Press [HOT CUE] twice
Button: Blinking quickly
Selects pitch play mode.
Press [SHIFT] + [HOT CUE] twice
Button: Blinking at high speed
Hot cue is assigned to performance pads 1–4, and manual
loop is assigned to 5–8.
[LOOP] button
Selects loop mode (p. 11).
Press [LOOP]
Button: Lit
Assigns loop to performance pads 1–8.
[SHIFT] + [LOOP]
Button: Blinking slowly
Selects roll mode.
Press [LOOP] twice
Button: Blinking quickly
Selects manual loop mode.
Press [SHIFT] + [LOOP] twice
Button: Blinking at high speed
Loop is assigned to performance pads 1–4, and manual loop
is assigned to 5–8.
[SEQUENCER] button
Selects sequencer mode (p. 11, p. 13). You can use step recording to edit
the selected pattern.
Button : Lit
[SHIFT] + [SEQUENCER]
Button: Blinking slowly
Selects pattern mode (p. 11, p. 13).
Switches the sequencer’s pattern.
Press [SEQUENCER] twice
Button: Blinking quickly
Selects INST REC mode (p. 14).
The instruments you play from the performance pads are
recorded in the pattern. The selected pattern can be edited
in real time.
Press [SHIFT] + [SEQUENCER]
twice
Button: Blinking at high speed
Selects INST PLAY mode (p. 11).
You can use the performance pads to play the instruments.